Research on synchronous measurement technique of temperature and deformation fields using multispectral camera with bilateral telecentric lens
2022-08-26WenxiongShiYngyngLiRuChenChenghoZhngZhnweiLiuHuiminXieFeiLiu
Wenxiong Shi , Yngyng Li , Ru Chen , Chengho Zhng , Zhnwei Liu b , Huimin Xie , ,Fei Liu ,
a School of Aerospace Engineering, Tsinghua University, Beijing 10 0 084, China
b School of Aerospace Engineering, Beijing Institute of Technology, Beijing 10 0 081, China
Keywords:Bilateral telecentric-multispectral measuring system Colorimetric method Digital image correlation Synchronous measurement Temperature and deformation fields
ABSTRACT The hot-section parts easily occur the creep-fatigued interaction under the condition of mechanicalthermal coupled load during the period of service, which may lead to the damage of the parts, and therefore, the measurement and characterization of thermal-deformed fields of the parts are important to understand its damage process. Aiming at relevant demand, the bilateral telecentric-multispectral imaging system was established, the research of synchronous measurement technique of the temperature and deformation fields was developed. On the one hand, the measurement technology for surface temperature of the object was developed using the two-color images captured by the multispectral camera with bilateral telecentric lens and combined with colorimetric method. On the other hand, the 2D-DIC measurement technique of the multispectral camera was developed by conducting digital image correlation analysis using the blue light images before and after deformation, which can measure the high temperature deformation field of the object (the blue light images were filtered by multispectral camera).Results showed that the bilateral telecentric lens is used to replace the ordinary optical lens for imaging,which can effectively eliminate the distortion of the multispectral imaging system. Since the temperature measurement process of this measurement system is little affected by the emissivity of the object, therefore, it has excellent robustness. The thermal expansion coefficients of the nickel alloys are evaluated at the temperature ranges of 70 0–10 0 0 °C, indicating this system can achieve the synchronous and precise measurement of the temperature and deformation fields of the object.
Nickel alloys have been extensively used to manufacture aeroengine parts now, due to their excellent corrosion resistance, fatigue resistance and good high temperature mechanical properties [ 1 –3 ]. During the period of engine service, the evolution of the temperature and deformation fields within the Ni alloy is extremely complicated under the conditions of high temperature and pressure, etc., due to the uniformity of the temperature inside the parts affecting the distribution of its deformation field, and the deformation field distribution of the parts is also a key factor affecting its mechanical properties [ 4 –6 ], and therefore, the full-field and synchronous measurement of temperature and deformation fields of the parts is of great significance for clarifying the component failure mechanism and prolonging the service life of the engine.
Infrared thermography (IR) is one of the most important measurement techniques for temperature field [ 7 –9 ]. However, in addition to the influence of temperature on the radiation intensity received by the infrared camera, it is also related to the emissivity of the material, the IR method is hard to simply conduct for the temperature measurement of the material with high emissivity, and therefore, there is an urgent need to develop a proper and simply measuring method for temperature. In recent years, with the development of high-speed photography technology, the development of temperature measurement technology has remarkably promoted [ 10 , 11 ]. In particular, the colorimetric method based on blackbody radiation theory has been extensively applied in the measurement of dynamic temperature field, such as detonation temperature measurement, due to its high measurement accuracy,strong anti-interference ability, and measuring temperature process not affected by material emissivity, it is suitable for the temperature measurement of the material with high emissivity, which has attracted the attention of scholars in this field [ 12 –17 ]. For instance, Tang et al. [12] proposed an iterative algorithm, which can divide optical images into radiated and reflected parts, and they used the red and green lights of the radiated part to calculate temperature field, used the blue light of the reflected part to calculate deformation field, the synchronous measurement of temperature and deformation fields are achieved. Yue et al. [13] propose a color crosstalk correction method based on the imaging characteristics, which increases the accuracy of the synchronous measurement of the full-field temperature and deformation. Ushiki et al.[14] developed a calibrated colorimetric method based on the traditional colorimetric method. When they used this method to measure the temperature of the object at 1900°C, the error of calibrated method is less than 5%, and the measurement accuracy of colorimetric temperature measurement is increased using this calibrated method [14] .
Digital image correlation (DIC) method is a non-contact fullfield measurement technique for deformation field [ 18 –20 ], which not only can evaluate the displacement and deformation fields of the different materials and structures, but also not limits to the size of the measured object, and from the object with nanosized dimension to macro-sized building all of these objects can be measured [ 21 –23 ]. In addition, if the high temperature resistant speckle is produced on the specimen surface, the high temperature deformation field can be measured. It reported that the deformation field of the object at room temperature or above 30 0 0°C all can be measured using DIC method [24] . However, the surfaces of the measured images must be required to have a highly random grayscale gradient when using DIC method to evaluate the deformation field of the object, while the surfaces of the measured images must be required to have a uniform emissivity when using IR method, which led to DIC and IR is hard to match, and then the full-field synchronous measurement of temperature and deformation fields is hard to come by. Hence, there is an urgent need to develop a new approach of measurement temperature, which matches the DIC method, and then the synchronous measurement of temperature and deformation fields of the object can come true.
In the present work, combining the bilateral telecentricmultispectral imaging system, the measurement technique of synchronous measuring temperature and deformation fields of the object is developed. When using multispectral camera imaging, the color image and near-infrared image of the object surface can be obtained, and the red, green and blue images can be obtained by filtering color images using filtering software. The temperature field of the object surface can be measured using filtered red light image and near-infrared image combining colorimetric method.Combined with blue light illumination, the high temperature deformation field can be calculated using filtered blue light images before and after deformation conducting DIC analysis. In order to eliminate imaging distortion, the bilateral telecentric lens is used to replace the ordinary optical lens for imaging, which can effectively eliminate the multispectral distortion and realize the accurate measurement of temperature and deformation fields of the object surface.
The temperature and deformation fields of the object were synchronously measured using the multispectral camera with singlelens model AD-130GE. The studied object of this work is the nickel-based alloy for manufacturing aeroengine blades. Its chemical composition was Ni-20.74Fe-18.44Cr-5.5Nb-3.27Mo-0.8Ti-0.5Al-0.4Mn. The temperature under the service environment of the Ni alloy was simulated and measured, and therefore, the alloy was heated to 720°C, then its temperature field was measured. According to the blackbody radiation curve, compared with other light,the radiation intensities of red light and near-infrared light are larger at 720°C, and therefore, the red light and near-infrared light are used to measure the temperature field of the alloy ( Fig. 1 a).In order to ensure the measurement accuracy of the temperature field, two independent photosensitive chips with a resolution of 1296 × 966 pixels were installed inside the multispectral camera. The chips are respectively sensitive to the visible light range(40 0 ~70 0 nm) and near-infrared light range (730-10 0 0 nm). Since there is the path of built-in beam split in the multispectral camera, which led to generating a displacement between the images with different wavelength bands, then the imaging distortion was generated, and therefore, in order to accurately measure the deformation field of the object, the multispectral camera must be improved. Since only the light parallel to the optical axis of the bilateral telecentric lens can pass through the lens ( Fig. 1 b), and the bilateral telecentric lens is not sensitive to the change of the object distance and image distance within the range of telecentric depth, the bilateral telecentric lens has a constant imaging magnification. In addition, since the multispectral camera is not sensitive to the small movement of the target surface induced by out-of-plane displacement and temperature change, the displacement in-plane and strain of the object can be accurately measured by multispectral camera [ 25 –28 ]. Therefore, after the visible light is filtered, in addition to measuring the temperature field using the obtained red light, the illumination light sources consisted of the blue light and the compensation light source of blue light are used to measure the deformation field by speckle images captured by the multispectral camera with bilateral telecentric lens( Fig. 1 b).
The calibration results of the distortion of the bilateral telecentric lens are shown in Fig. 2 . The obtained color pictures and near-infrared pictures are used as reference images ( Fig. 2 a), and then the calibration images are captured by translation. The translation distance is 0.01 mm (about 0.529 pixels), the 25 images are captured after each translation operation to perform the grayscaleaverage technique, and then the displacement field is calculated according to the averaged images. The visible light and nearinfrared light images are respectively translated five times, namely,the final translation distance is 0.05 mm. In addition, the images of the red and blue lights are obtained by using Matlab software to treat the colored picture ( Fig. 2 a). As shown in Fig. 2 b and c, after translating different positions, the displacement measurement errors of the red light, blue light and near-infrared light images are small in time,The strain field change of the near-infrared picture is not obvious with the increase of the translation distance, which indicates that the bilateral telecentric lens has the smaller imaging distortion.
Figure 3 shows the change of the grayscale position between the red, green, blue light images and near-infrared image. As shown in Fig. 3 , the change range of the grayscale position between the blue light image and near-infrared image is 1.86 pixels (2.15-0.29), that of between the green light image and nearinfrared image is 0.78 pixels (1.54-0.76), that of between the red light image and near-infrared image is 0.75 pixels (1.59-0.84). It can be seen that the change range of the grayscale position between the red light image and near-infrared image is smallest,which indicates that the measurement accuracy is highest when using the red light image and near-infrared image to measure temperature. Therefore, the present work uses the red light and nearinfrared light to measure the temperature field of the Ni-based alloys ( Fig. 1 a).

Fig. 1. Bilateral telecentric-multispectral measuring system [ 29 –33 ]. ( a ) Schematic diagram of the measurement process of temperature and deformation fields; ( b ) Schematic diagram of the multispectral camera and bilateral telecentric lens
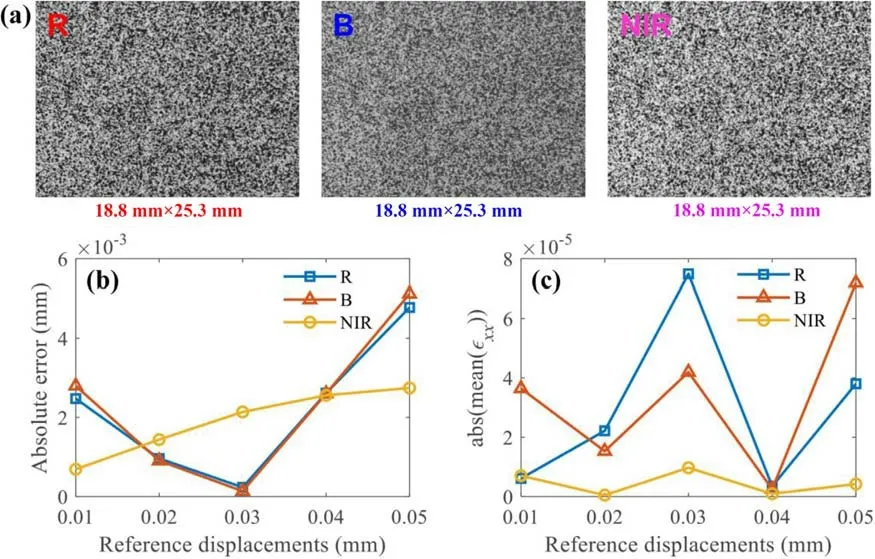
Fig. 2. Distortion calibration of bilateral telecentric lens. ( a ) Speckle images of red (R), blue (B) and near-infrared (NIR) lights; ( b ) Absolute error of average displacement field of red, blue and near-infrared images; ( c ) Average strain field of red, blue and near-infrared images.
Provided the spectral radiation intensity of object isM[λ,ε(λ),T] , according to Plank radiation equation [ 16 , 34 ],we can get:
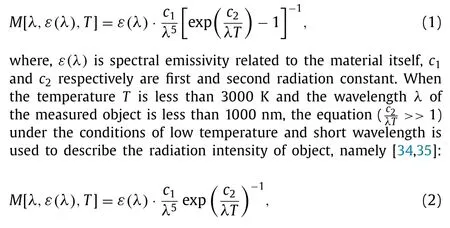
when the two wavelengthsλ1andλ2of same object are close, the change of its corresponding emissivityε(λ)is little. Therefore, according to Eq. (2) , the ratio of radiation intensityRcorresponding to the two wavelengthsλ1andλ2can be described as:

In addition, it can be obtained from Ref. [36] :

It can be seen from Eq. (4) , when the temperature of object is different, the radiation intensity ratio within the range of the two wavelengths is also different. Hence, after determining theλ1andλ2, the radiation intensity ratio can be measured by the camera,then the temperature of the object can be calculated.
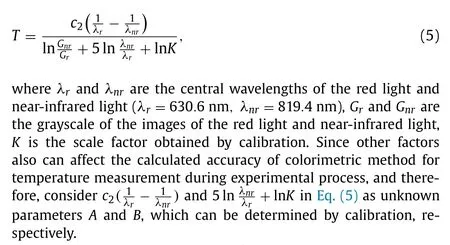
In the present work, the temperature of the image captured by red light and near-infrared light can be calculated using the following equation [36] :
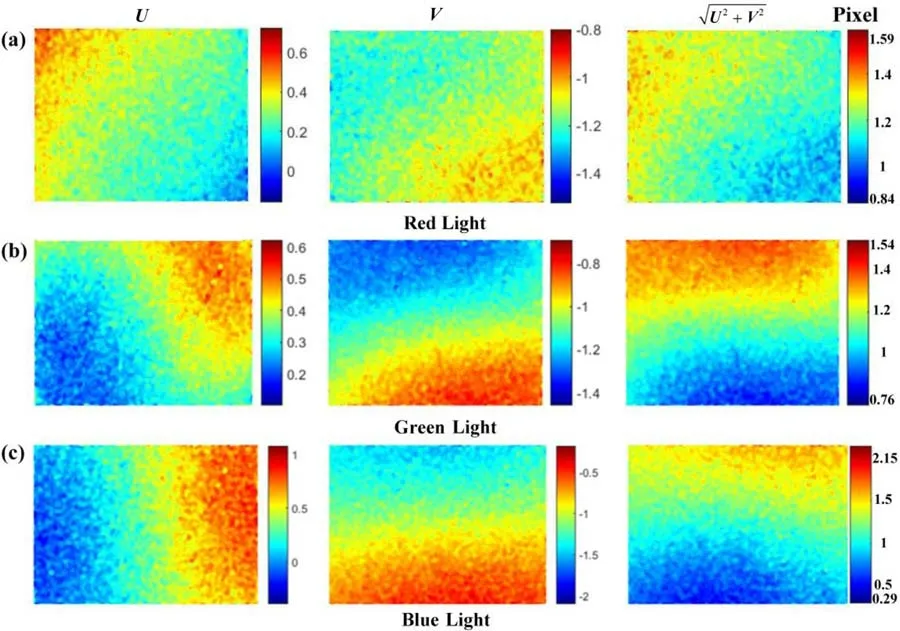
Fig. 3. Change of grayscale position between the red, green, blue light images and near-infrared image. ( a ) Red light image as reference map, near-infrared image as deformation map; ( b ) Green light image as reference map, near-infrared image as deformation map; ( c ) Blue light image as reference map, near-infrared image as deformation map.
During the calibrated process of colorimetric method measuring temperature, the calibrated temperature range is set to 560-10 0 0°C, the step size of incremental temperature is 20°C, each incremental step is heat preserved for 20 min, and then the images of the visible light and near-infrared light are obtained using the multispectral camera under conditions of different tem peratures ( Fig. 4 ). Since the grayscale range of the red light and nearinfrared light all is 0-255, in order to avoid the effect of overexposure when the radiation intensity is too high and noise when the radiation intensity is too low, when colorimetric method is used to measure the temperature, the grayscale ranges of the images of two wave bands are limited to within 20-250, then the calibrated bilateral telecentric-multispectral imaging system is used to measure the temperature field of the object. What’s more, using blue light as light source to illuminate the object, at the same time of measuring temperature field of the object using the calibrated system, and then combined with DIC method, the synchronous measurement of temperature and deformation fields of the object is achieved.
The measurement system of 2D-DIC method is shown in Fig. 5 .The optical axis of charge coupled device (CCD) camera is set to be perpendicular to the surface of measured object. When measured object generates the deformation under the condition of loadP,the images of the object surface before and after loading are automatically captured by CCD camera. Then, the correlation degree between two subimages is calculated to obtain the displacement change of the object before and after loading, and then the strain field of the object before and after deformation can be calculated by the displacement field.
In order to ascertain the imaging characteristics of the bilateral telecentric-multispectral imaging system, the imaging distortion degree of the images captured by ordinary optical lens and bilateral telecentric lens are compared, the measuring temperature results obtained by multispectral system and infrared camera are also compared. The grayscale image based on visible light RGB color picture as a standard reference image, the comparison of the displacement fields between the pictures of the different wave bands captured by ordinary optical lens and bilateral telecentric lens and the displacement field of the standard image is shown in Fig. 6 . As shown in Fig. 6 a, the displacement values between the images of near-infrared wave band and standard images are greater than that of between the images of each color wave bands and standard images. When the bilateral telecentric lens is used to capture pictures ( Fig. 6 b), since the work distance of bilateral telecentric lens is fixed, and therefore, the capturing distance and view of field are changeless, under the condition of the approximately same view of field, the displacement fields of each wave bands images captured by bilateral telecentric lens are all less than that of ordinary optical lens, and the value distribution of each displacement field corresponding to bilateral telecentric lens is more uniform, which does not appear apparently radial distortion distribution. Since the light passing through bilateral telecentric lens is parallel, after the beam splitting prism is passed through by the lights, the imaging on different tar get surfaces remains consistent and does not change with the change of optical path difference( Fig. 1 b). However, for ordinary lens of pinhole imaging, since there is an inclination between the light after passing lens and the horizontal direction, which changes the optical path difference and the size of the corresponding image, which leads to the displacements of each wave lengths obtained by ordinary lens displaying the same circular, radial distortion distribution.
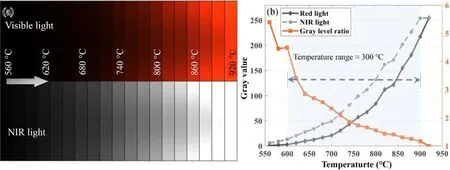
Fig. 4. Calibration of colorimetric measuring temperature system. ( a ) Images of the visible light and near-infrared light at different temperatures; ( b ) Grayscale of the images of the visible light and near-infrared light at different temperatures.
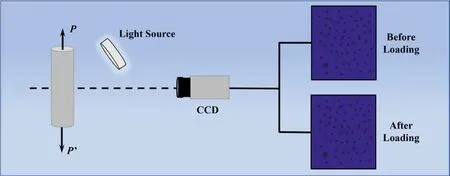
Fig. 5. 2D-DIC measurement system [ 37 , 38 ].
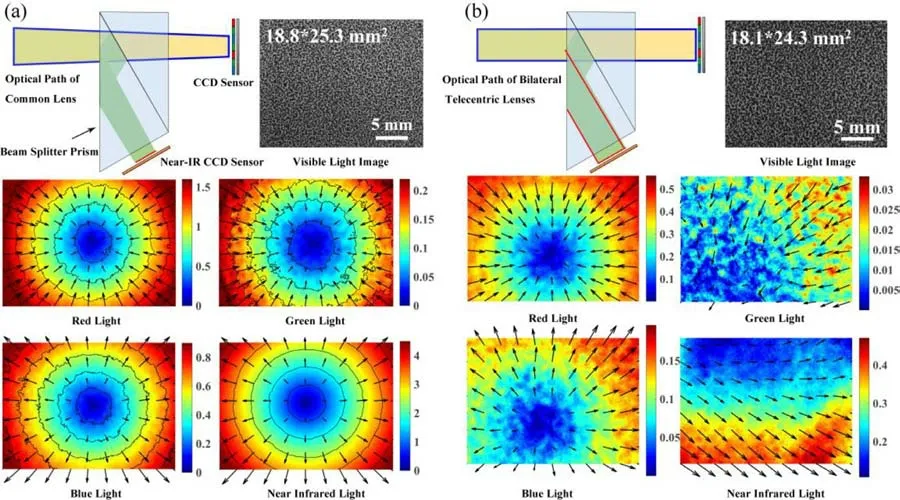
Fig. 6. Displacement fields of the different wave bands images captured by ordinary lens and bilateral telecentric lens.( a ) Ordinary lens; ( b )Bilateral telecentric lens.
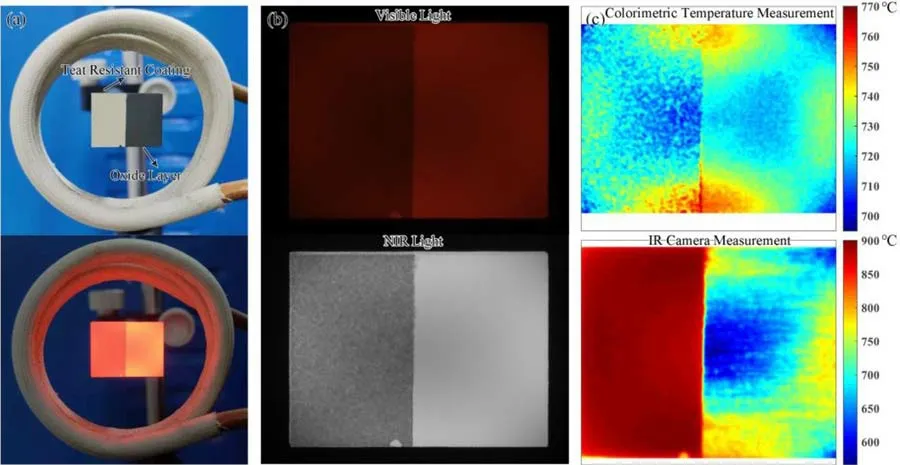
Fig. 7. Measurement results of colorimetric method and infrared camera at 720 °C. ( a ) Tested Ni-based alloy; ( b ) Images of visible light and near-infrared light; ( c ) Measuring temperature results of colorimetric method and infrared camera.
In addition, the images captured by bilateral telecentric lens have a higher accuracy in the wave bands of the red light and near-infrared light. Therefore, when using bilateral telecentric lens to capture pictures during experimental process, the grayscale images with same pixel at same position can be directly compared,and then the temperature of the object can be calculated using the colorimetric method. If using ordinary lens to collect image,needing according to the capture distance from lens to object to beforehand calculate the displacement field between red light image and near-infrared light image, and then the pixel coordinates of near-infrared light images are added to the displacement field coordinates to calculate the grayscale values of integer pixel coordinates, then the temperature field of the object can be calculated.To sum up, it can be seen that the captured image of bilateral telecentric lens not only has a small distortion, but also the calculated method of the temperature field is simpler compared with an ordinary lens. Therefore, the bilateral telecentric-multispectral imaging system can ensure the reliability of measuring temperature and deformation fields.
In order to ascertain the accuracy of the bilateral telecentricmultispectral imaging system, the present section designed the compared experiment of temperature measurement of the multispectral system and infrared camera. To begin with, the Ni alloy is heat preserved at 900°C for 20 min, which leads to the formation of the dense black oxide layer on its surface. After the alloy cooled, the alloy surface is divided into two regions with equal area, the black oxide layer remains in one region and the other region is sprayed high temperature resistant coating ( Fig. 7 a). Since the emissivity of black object is greater than that of white object, which results in the emissivity of the alloy surface displaying a sudden change. When the temperature increases to 720°C,the point thermometer is used to measure the temperature of alloy, the visible light images captured by multispectral measuring system and the pictures captured by infrared camera are shown in Fig. 7 b. As shown in Fig. 7 b, the grayscale value of the oxide layer is higher than that of the high temperature resistant coating. The comparison of the temperature field calculated by the colorimetric method using the red light and near-infrared light (multispectral measuring system) and the temperature field captured by infrared camera shows that when using the colorimetric method to measure temperature, the temperature distribution within the two areas is almost same, whereas using the infrared camera to measure temperature, the temperature value of the coating area is much larger than the area of oxide layer, which is ascribed to the sensitive wave bands of the infrared camera is 7.5-14 μm, which leads to the emissivity of central wave bands of the coating material is much larger than that of the infrared camera, which generates larger error. Therefore, for the material has the complex surface morphology, the infrared camera should be calibrated before measurement. To sum up, it can be seen that the temperature measurement process of the bilateral telecentric-multispectral imaging system is more simple and easy, and the temperature measurement range is also more extensive, it is more suitable for the temperature field measurement of the object with complex surface state.
In order to ascertain the reliability of the synchronous measurement system of temperature and deformation fields of the bilateral telecentric-multispectral, the deformation fields of the Ni alloy with different tem peratures are measured. The high temperature furnace is used to heat, and the blue light is used to illuminate the Ni-based alloy in the furnace. The thermal expansion coeffi-cient of the alloy with a size of 25 × 25 mm is evaluated using a multispectral camera with bilateral telecentric lens. The thermal expansion coefficients of the alloys with different temperatures are calculated by preparing the high temperature resistant speckle on the alloy surfaces using the DIC method. The alloys are heated from 550°C to 10 0 0°C with a temperature step size of 50°C,each temperature step size is heat preserved for 20 min, and then the displacement fields of the alloys are measured. Figure 8 shows the displacement field and the thermal expansion coefficients measured by the multispectral measuring system. As shown in Fig. 8 b,with increase of the measured temperature, the change of the calculated thermal expansion coefficients is not significant. To sum up, the bilateral telecentric-multispectral measuring system developed by our group can achieve the synchronous measurement of the temperature and deformation fields of the object under the conditions of different temperatures.
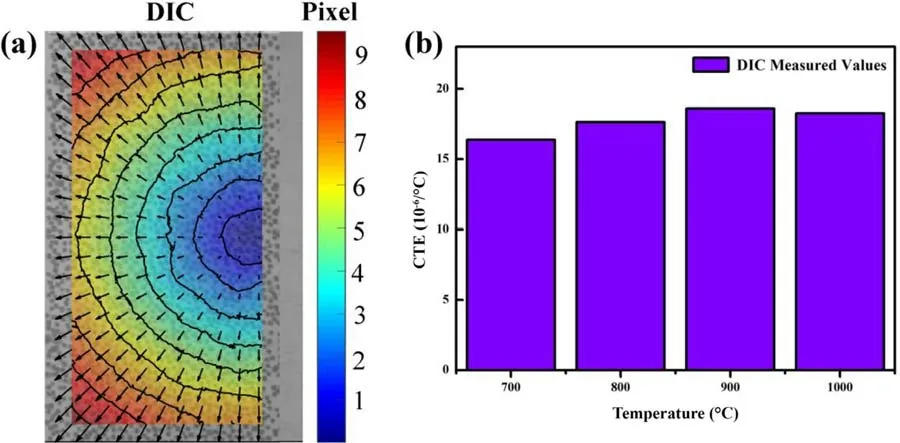
Fig. 8. Measurement results of displacement field and thermal expansion coefficient. ( a ) Displacement field calculated by DIC method at 900 °C, ( b ) thermal expansion coefficients measured by DIC at different temperatures.
The bilateral telecentric-multispectral synchronously measuring system of the temperature and deformation fields based on colorimetric method and DIC method is established. Since only the light parallel to the optical axis of the bilateral telecentric lens can pass through the lens, and thus the imaging distortion of the measuring system is decreased, the synchronously accurate measurements of the temperature and deformation fields are achieved. Compared with infrared camera, the temperature measurement process of the bilateral telecentric-multispectral imaging system is more simple and easy. When the temperature field of the Ni-based alloy with complex surface morphology is measured, the measured results are close, and the robustness of the bilateral telecentric-multispectral imaging system is proved. The thermal expansion coefficients of the Ni-based alloys were calculated using the bilateral telecentricmultispectral imaging system, achieving the measurement of the deformation field under the conditions of different temperatures(70 0–10 0 0°C).
Declaration of Competing Interest
The authors declare that they have no known competing financial interests or personal relationships that could have appeared to influence the work reported in this paper.
Acknowledgments
This work is financially supported by the National Natural Science Foundation of China (Grant Nos. 12032013 and 11972209 ), the National Key Research and Development Program of China (Grant No. 2017YFB1103900 ) and the National Science and Technology Major Project (Grant No. 2017-V Ⅰ -0 0 03-0 073 ).
杂志排行
Theoretical & Applied Mechanics Letters的其它文章
- Useful zero friction simulations for assessing MBS codes Pascal’s formula giving wheelsets frequency for zero wheel-rail friction
- Importance of induced magnetic field and exponential heat source on convective flow of Casson fluid in a micro-channel via AGM
- Optimal thermal design of anisotropic plates with arbitrary cutouts using genetic algorithm
- Optimal patching locations and orientations for maximum energy harvesting efficiency of ultrathin flexible piezoelectric devices mounted on heart surface
- Similarity solutions of Prandtl mixing length modelled two dimensional turbulent boundary layer equations
- Numerical simulation of droplet coalescence based on the SPH method
