Rolling contact fatigue nondestructive testing system for a bearing inner ring based on initial permeability
2019-10-15DaiXianzeShuaiLiguoLiuJie
Dai Xianze Shuai Liguo Liu Jie
(College of Mechanical Engineering, Southeast University, Nanjing 211189, China)
Abstract:Due to the fact that rolling contact fatigue is not easily detected, and residual life is not easily evaluated in the early stage of bearing life, a nondestructive testing method based on initial permeability is proposed. By analyzing the crack propagation mechanism, a fatigue state detection system based on differential signals is designed. A simulation model of the detection of the inner ring of the pulse signal is established by using the electromagnetic field simulation software. The effects of the height of the coil, the inner and outer diameter, the number of coil turns, the diameter and the height of the ferrite core of the probe on the differential value of the detection signal are simulated. The parameter combination of the maximum difference value of the signal is used as the structural size of the sensor, and the detection sensor is designed and fabricated. Moreover, the bearing fatigue test system is designed, and the bearing is tested. The results show that the system has good detection ability for rolling contact fatigue and verifies the mechanism and trend of crack propagation in the inner ring of the bearing.
Key words:initial permeability; nondestructive testing; rolling contact fatigue.
Rolling element bearings (REBs) are some of the most important parts in rotating machines, and any unexpected faults may result in great economic losses and serious casualties; therefore, REBs require a high reliability performance[1]. Fault diagnosis and life prediction of REBs have been major topics of research for over 20 years[2], and the rolling contact fatigue (RCF) of the bearing inner ring is considered to be the main reason for REB failure. RCF is a surface fatigue failure phenomenon, which means that the surface of a workpiece has been subjected to repeated pressure changes. In addition, the high repeated pressure on the surface leads to crack initiation and propagation[3]. There are two main types of fatigue failures, including subsurface-origin fatigue and surface-origin fatigue. The initiation and propagation of surface cracks will cause pitting, while the subsurface cracks will lead to spall. In addition, there is a linear relationship between crack propagation and the fatigue cycle. Under favourable working conditions, bearing inner ring fatigue generally arises from changes in surface roughness or lack of lubrication. Apart from the influence of the surface quality, the residual stress generated on the surface of the inner ring can also affect the fatigue life of the bearing. If the applicable conditions are met, the life of the bearing is limited by the process of crack initiation and expansion.
Since the first paper published by Palmgren et al.[4], researchers have conducted extensive research on bearing fatigue life models. The L-P model of bearing life jointly proposed by Lundberg and Palmgren is based on dynamic shear stress theory and laid the foundation for fatigue life assessment of the entire bearing[5-6]; all current theories are derived from this basic theory. The model was amended and written into ISO281:2007[7]and was analyzed by Ioannides et al[8]. Li et al.[9-11]studied the influence factors. However, researchers often monitor the health status of a particular bearing during its use due to the uncertainty of bearing life.
A number of established testing methods are used to detect bearing inner ring defects and predict inner ring life[12-16]. Featuring low cost, non-contact and reliability[17], nondestructive testing methods are superior to other evaluation methods. However, they are generally applied to pristine specimens without prior history of fatigue damage. In summary, a reliable estimation of damage before crack initiation and during crack propagation through nondestructive testing remains a formidable challenge.
Eddy current nondestructive evaluation involves the detection of electromagnetic field irregularities due to non-conducting inhomogeneities in an electrically conducting material, which makes it possible to reveal various kinds of defects, evaluate various physical characteristics, monitor chemical composition and thermal treatment[18-19], etc. The research presented here examines a pulsed eddy current testing method.
In the present work, the above mentioned model of crack propagation is analyzed. By analyzing the principle of initial permeability detection based on a pulsed eddy current, a new type of electric differential sensor is proposed, and its optimal parameters are determined by simulation. The main contents of this paper include the description of the method, presentation of the results, and a series of validation tests.
1 Modelling and Simulation
1.1 Crack propagation mechanism
Under the condition of constant amplitude cyclic stress, the damage process is summarized into a linear logarithmic function considering the fatigue crack growth curve.
D=A+Clg(a)
(1)
whereAreflects the initial state of the cracked body;Cdefines the crack propagation behaviour; andais the crack depth. The derivative of formula (1) is given as
(2)
whereDis still small in the initial stage of crack propagation. Formula (2) shows the basic relationship in the damage process. Although da/dDis small, the life consumption ΔDcorresponding to the unit crack increment Δais very large.
In RCF, the cracks are mainly expanded by the open mode and the slip open mode. The crack propagation rate can be calculated by

(3)
whereBis the Hertz contact half-width;C1,C2,m1, andm2are all the empirical constants; and ΔU1and ΔU2are the open numbers of the open mode and the slide open mode, respectively.
The above mentioned model based on crack propagation[20]shows that micro-cracks formed on the surface or the subsurface of bearing inner rings do not immediately result in the fatigue of large pieces or cause the bearings to fail; instead, a crack expands at a very slow rate in the early stages. When the crack grows to a certain size, it expands rapidly, causing large pieces of material to peel off and the bearing to fail. There is a critical crack length in the process of crack propagation at which the crack propagation speed takes a minimum value. When the crack length is greater than the critical value, the expansion speed will increase with bearing usage.
1.2 Principle of pulse eddy current testing based on initial permeability
Magnetic permeability is an important property of ferromagnetic materials, and the generation and expansion of cracks are accompanied by changes in the magnetic permeability of ferromagnetic materials. By detecting the change of the magnetic permeability of the bearing inner ring, the crack generation and expansion process of the bearing inner ring can be analyzed.
In eddy current testing, a pair of coils is often used as a sensor. The driving coil in the sensor generates the primary induced magnetic field. Then, the pick-up coil detects the sensing signal of the workpiece for the inducted magnetic field. The model is shown in Fig.1. Constructing a magnetic circuit and applying an excitation, the magnetoresistive change of the workpiece to be tested reflects on the voltage output of the pick-up coil. Then, the crack on the workpiece can be detected.

Fig.1 Detection schematic
According to Ampere’s circuital law,
∮lHdl=∑i
(4)
Ohm’s law for magnetic circuits is
(5)
The second equation of Maxwell is
(6)
Thus, we obtain
(7)
whereiis the excitation current;φis the magnetic circuit flux;μ1,μ2, andμ3are the magnetic permeabilities of ferrite, air gap and the workpiece to be tested, respectively;h1,h2, andh3are the lengths of ferrite, air gap and measured area (h3is a small value), respectively;N1andN2are the numbers of driving coils and pick-up coils;Sis the cross-sectional area of the magnetic circuit; anduoutis the output signal of the pick-up coil.
From Eq.(7), it can be seen that when the workpiece to be tested has cracks or crack expansion, the magnetic permeability of the workpiece changes, and the internal defect of the workpiece can be judged by analyzing the change in the output voltage amplitude.
Due to the different magnetic reluctances of ferromagnetic materials, the magnetic permeability is not constant, and the linear relationship between the crack and magnetic reluctance is not guaranteed. The magnetization curve is shown in Fig.2.
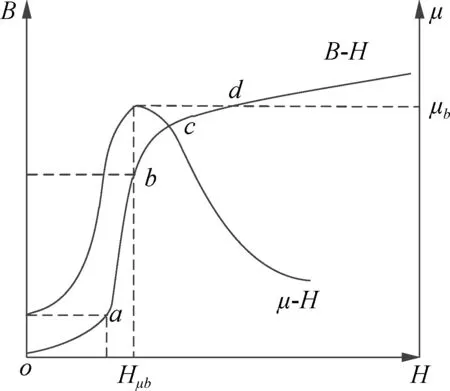
Fig.2 Ferromagnetic material magnetization curve
Theoasegment is an initial magnetization zone, in which the magnetic induction intensityBof the ferromagnetic material is linearly related to the magnetic field strengthH. When the applied magnetic field disappears, the magnetic domain returns to its original size and does not exhibit magnetic properties. The magnetic permeability at this stage is called the initial permeabilityμi.
The detection method based on the initial magnetic permeability refers to an electromagnetic non-destructive detection method, in which the magnetic field strength is always in the initial magnetization region during the detection process. Compared with magnetic flux leakage detection, the initial permeability detection method does not require demagnetization, eliminating the magnetization and demagnetization process. In addition, the above mentioned process does not cause any damage to the workpiece. Moreover, in the initial magnetization zone, it is also guaranteed that the workpiece to be tested satisfies the requirements of detection.
For a bearing made of material GCr15 and with the initial magnetization requirementB<1 mT,
(8)
It can be seen from Eq.(8) that crack detection for this bearing requires weak excitation and high sensitivity. The detection scheme, as shown in Fig.1, is susceptible to noise interference under the small signal, so it is changed to the electric differential mode, as shown in Fig.3. Since the signal interference of the two detection coils is a common mode interference, they cancel each other out, and the output does not contain a noise signal. When the excitation coil contains a crack in the region, the difference between the output signals of the two pick-up coils is not zero; hence, crack detection is realized.
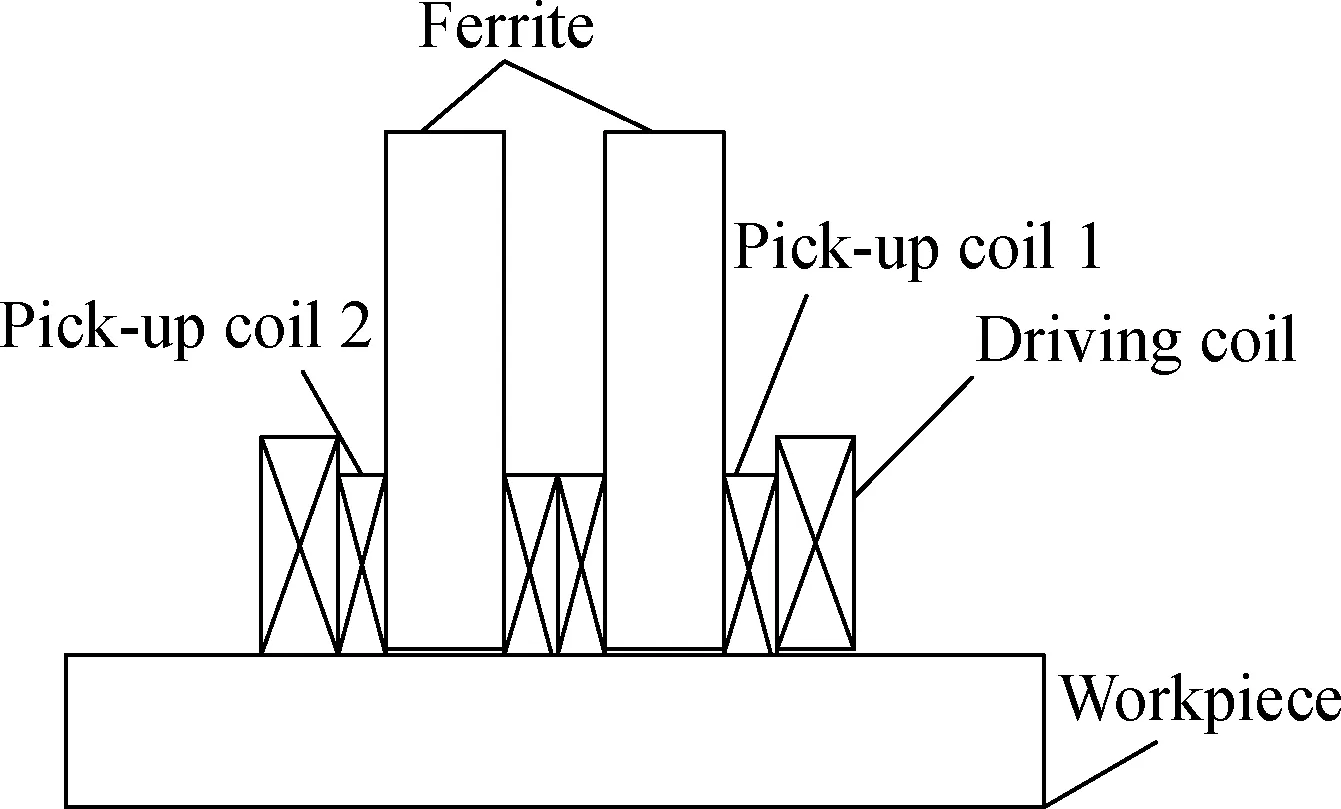
Fig.3 Differential detection schematic
Traditional eddy current detection excites the magnetic induction coil by applying a sinusoidal signal, and detection is conducted by changing the amplitude and phase of the induction coil.In the eddy current testing method proposed in this paper, a pulse signal is applied. A typical pulse signal is shown in Fig.4.

Fig.4 Typical pulse signal
Assuming thatUOL= 0, the FFT of the pulse period signal is
(9)
The pulse signal can be decomposed into the superposition of each harmonic signal through the Fourier transformation, so that the induced signal through the pulse excitation contains the inductive component of each harmonic. Surface and deep defects can be detected simultaneously by the spectral analysis of the pulse signal[21].
The sensor transmits the pulse signal to the driving coil. The alternating current in the driving coil stimulates a primary induced magnetic field, which induces a secondary induced magnetic field inside the workpiece through the surface. The secondary induced magnetic field reveals the characteristics and performance of the material in the workpiece, and the differential detection process is shown in Fig.5.

Fig.5 Principle of differential detection
1.3 Simulation and analysis of sensor model
The 3D finite element model consists of a bearing inner ring with a surface defect, a driving coil, pick-up coils, ferrites and air. A 0.5 mm ×0.5 mm (wide× thick) groove was created on the bearing surface of the simulation model to simulate a defect. The capability to detect this defect was used as a criterion for sensor parameter optimization. The material of the bearing, ferrite and coil in the 3D model are GCr15, PC40, and Cu, respectively. The magnetic dense scalar distribution simulation effect is shown in Fig.6.

Fig.6 Simulation model
In the simulation model, an excitation loop is constructed and placed into the driving coil. The driving coil which is loaded with a pulsed signal has an excitation voltage of 3.3 V and a frequency of 300 Hz. The induction coil is set to be a current source of 0 A. The simulation work aims to detect the sensor’s ability to monitor defects by checking the peak value of the pick-up coil voltage. In addition, the relative position of the bearing inner ring being tested to the probe position remains fixed, and the bearing inner surface has a high surface roughness; thus, the lift-off effect of the eddy current detection has little impact on the detection result during the detection process[22].
Since there are many sets of variables in the experiment, it is implemented by fixing some values and changing other variables. The parameters of the driving coil should be determined first. With the increase in the inner diameter, the sensor is no longer sensitive to the detection of minor defects. The magnetic field generated by the excitation coil becomes stronger with the increase in height, but if the height of the driving coil is too high, the induced magnetic field caused by a defect will be weakened. The wire diameter is also an important factor affecting the performance of the sensor. The magnetic field generated by the driving coil becomes stronger with an increase in the wire diameter. However, in the case of a certain number of turns, the volume of the sensor increases, which may lead the sensor to be less sensitive to defects. At the same time, changing the wire diameter without too many turns will reduce the sensitivity of the defect.
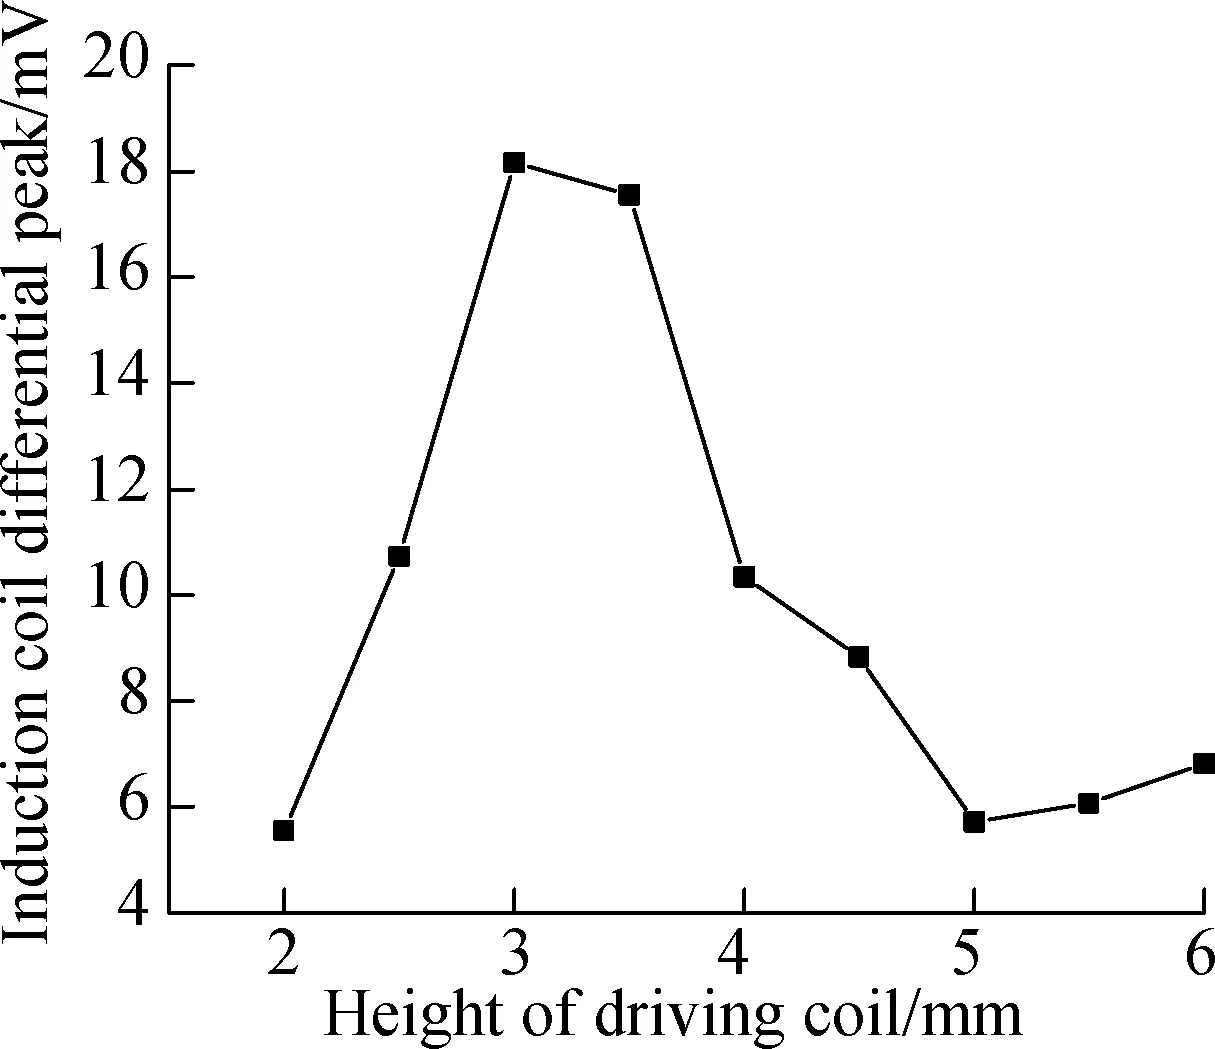
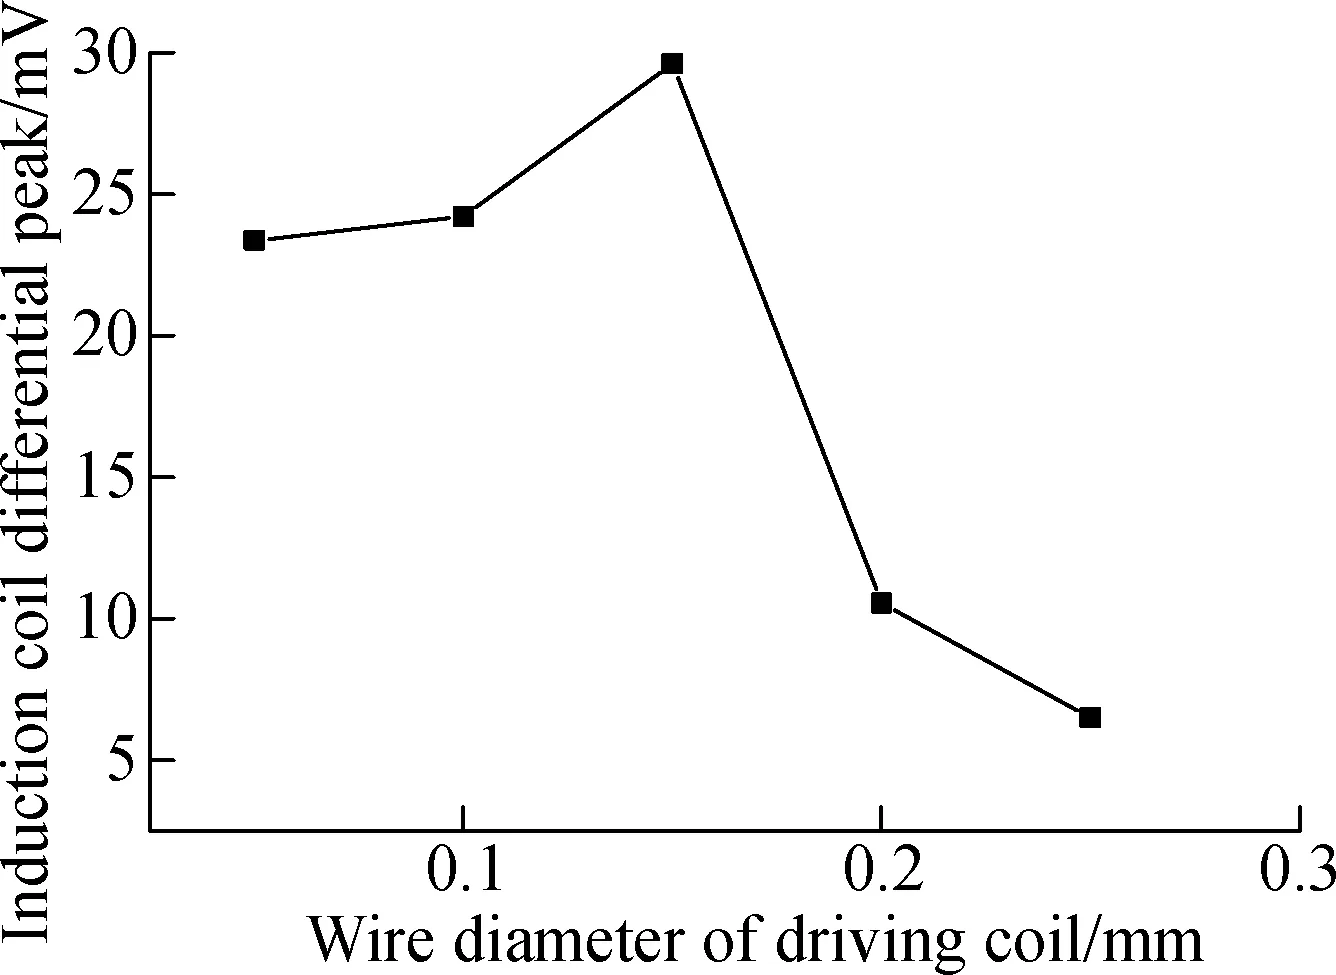
Through the above analysis, it is found that there are mutual restrictive couplings to be determined among the parameters of the excitation coils. Although the mechanism is not yet clear, the influence of the parameters of the excitation coil on the signal amplitude can still be obtained after many experiments, as shown in Fig.7.

(a)
(b)
(c)
(d)
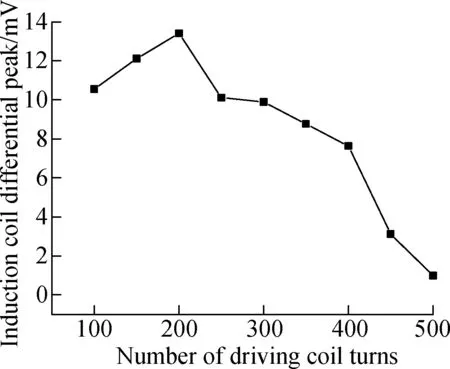
Fig.7Simulation results of the effect of driving coil parameters on signal’s differential peak. (a) With a differential inner diameter of the driving coil; (b) With differential height of driving coil; (c) With a differential wire diameter of the driving coil; (d) With a differential turns number of the driving coil
The signal amplitude changes under different conditions are shown in Fig.7. Fig.7(a) shows that when the inner diameter of the driving coil is set between 6 to 10 mm, the other variables are kept constant. Fig.7(b) shows that when the height of the driving coil is set between 2 to 6 mm, the other variables are kept constant. Fig.7(c) shows that when the wire diameter of the driving coil is set between 0.05 to 0.25 mm, the other variables are kept constant; and Fig.7(d) shows that when the number of the driving coil turns is set between 100 to 500, the other variables are kept constant.
Soft ferrite has a very high magnetic permeability, which can greatly increase the magnetic induction of the induced magnetic field. Soft ferrite is primarily divided into two kinds of manganese: zinc ferrite and nickel zinc ferrite. Due to its high electrical conductivity, manganese-zinc ferrite is mainly used in low-frequency applications and nickel-zinc-ferrite in high-frequency applications. Here, PC40 material manganese-zinc ferrite developed by Japan TDK Corporation is used. Through simulation experiments, it can be found that for small defect detection, the sensor’s detection ability becomes weaker as the ferrite diameter increases. Based on the simulation results, the final sensor parameters are shown in Tab.1.

Tab.1 Eddy current sensor parameters
A sensor with the parameters shown in Tab.1 is used to simulate the bearing inner ring of the same series with different outer diameters, and the results are shown in Fig.8. As the outer diameter decreases, the signal amplitude increases, but the sensor is also sensitive to the detection of minor defects, thus showing that the sensor is effective.

Fig.8 Simulation results with different bearings’ inner ring outer diameters
Since the width of the inner ring of the bearing is 17 mm, an independent group of sensors cannot completely cover the surface of the inner ring of the bearing. Therefore, the sensor arrangement includes two sets of sensors, one on each side of the bearing, to achieve fatigue detection. The detection mode is shown in Fig.9.
2 Experiment Set-Up
2.1 Eddy current pulse detection system
A testing system for RCF based on initial permeability is shown in Fig.10 and includes three key units: a signal generator unit, an inner ring with defect, as the sample, and a sensor unit with data acquisition module.

Fig.9 Sensor arrangement and detection area
To set up the system, a penetration depthδof 3 mm is selected first. Then, the excitation frequencyf=310.9 Hz is calculated by the principle of plane electromagnetic wave attenuation into the semi-infinite metal conductor, considering a selected frequency of 300 Hz.
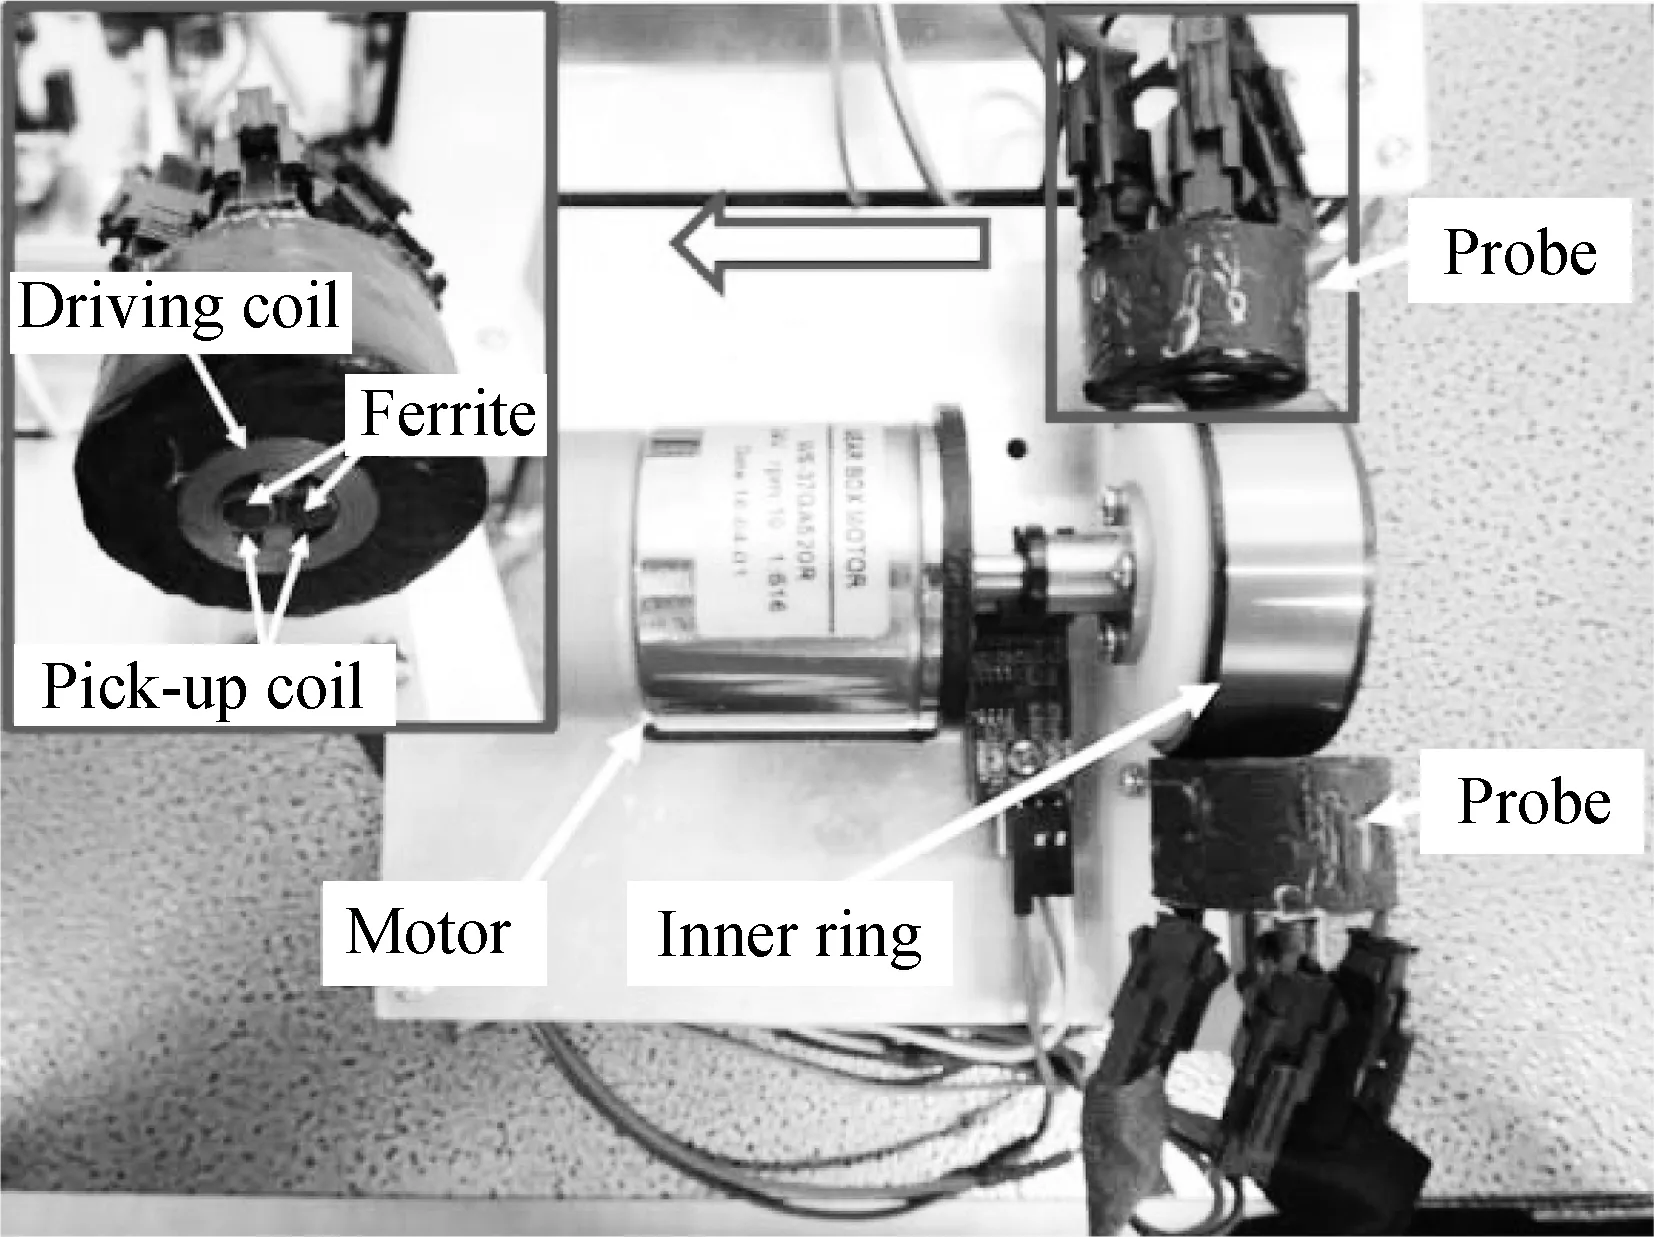
Fig.10 Eddy current pulse detection system
The entire acquisition system is at the command of the control board. By sending instructions, a pulse signal created by DDS is sent to the detection sensor through power amplification. The upper computer saves the data detected by the sensor in the database through a data acquisition card. The overall process is shown in Fig.11.
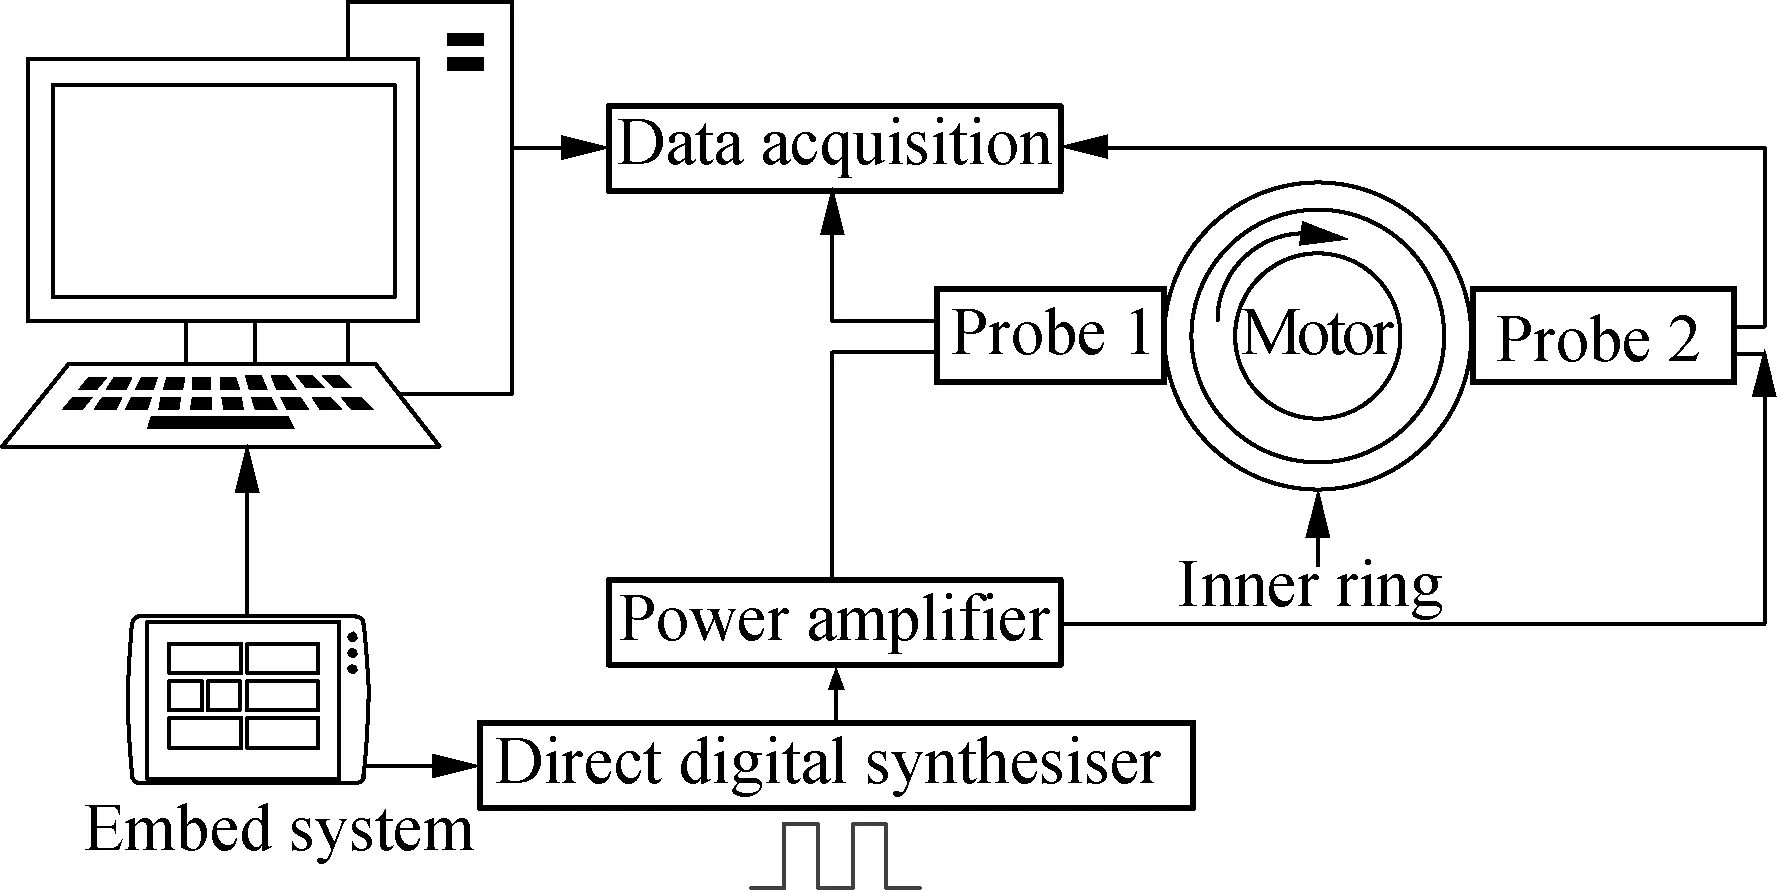
Fig.11 System data flow chart
2.2 Rolling contact fatigue test system
This paper chooses a cylindrical roller bearing as the experimental object of rolling contact fatigue and simulates the usage condition of the bearing under the operating condition by loading the radial basic dynamic load rating. The selected bearing is a NU207EM cylindrical roller bearing. The basic parameters are shown in Tab.2.

Tab.2 NU207EM bearing parameters
The designed bearing fatigue test system is shown in Fig.12. From right to left, bearings No.1, No.2, No.3, and No.4 in sequence, and four bearing seats are used with the bearings. To match the use of the right-most motor, matching motor frames and DC brushless motor controllers are selected. The motor controller can drive the brushless DC motor and adjust the speed through the external control port potentiometer. During the experiment, the tester was brought to the preset speed by adjusting the controller. The life status data of the bearing is collected at intervals of one million revolutions.
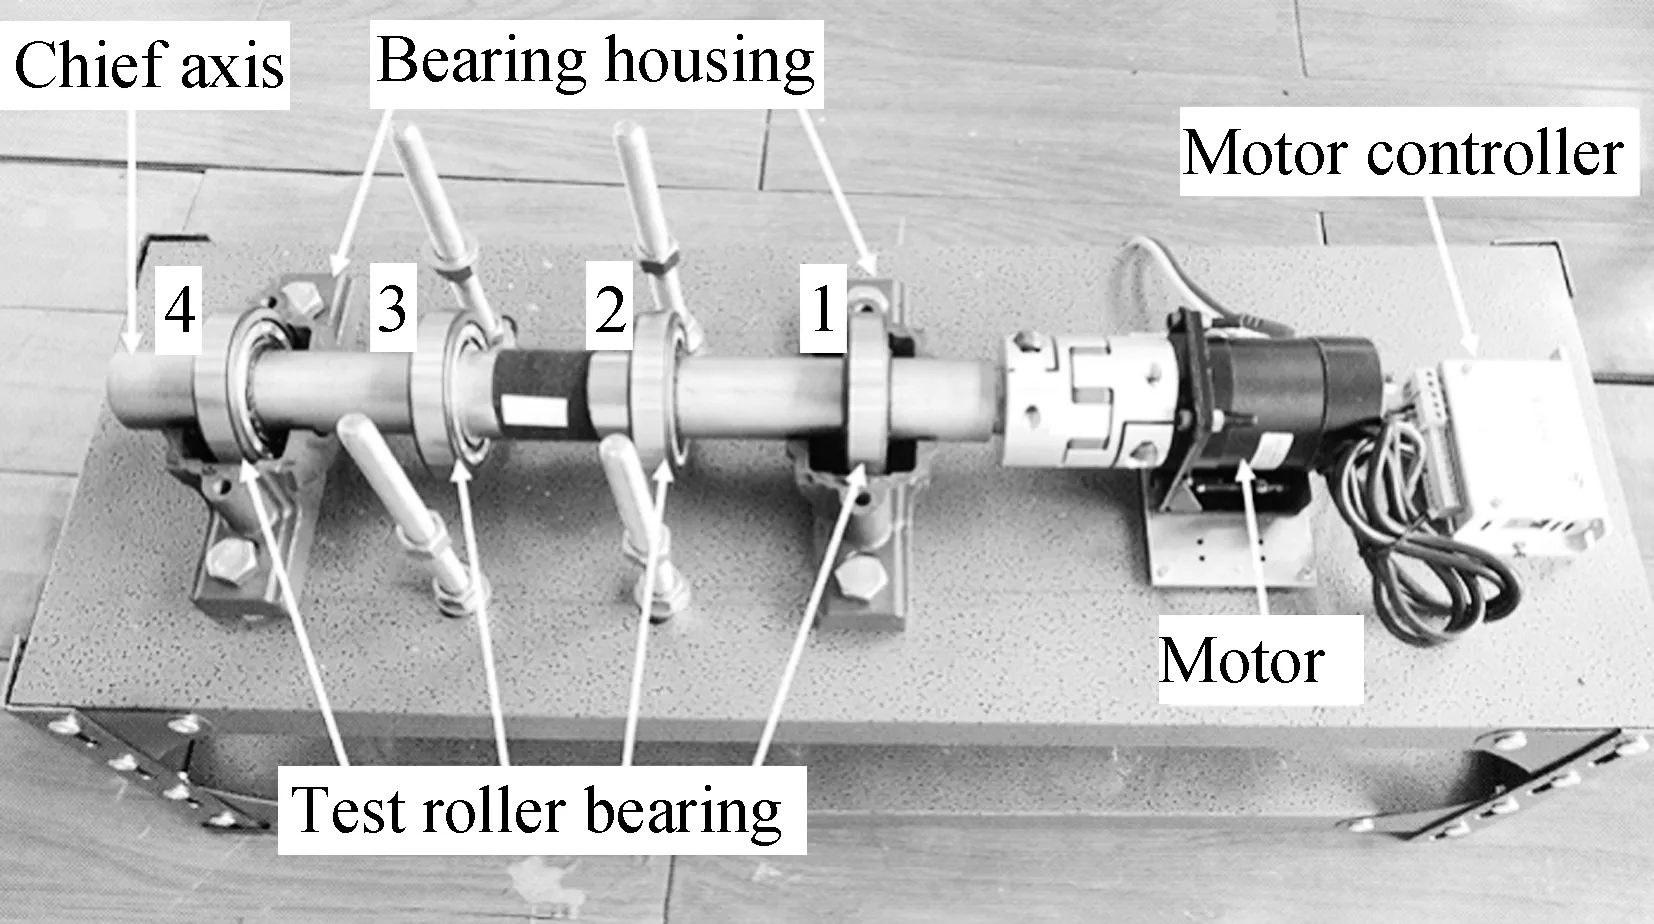
Fig.12 RCF test system
3 Results and Discussion
In the experiment, a circular defect with a diameter of 0.5 mm is etched on the bearing inner ring’s surface by electric discharge machining to represent a fatigue crack. The crack propagation is simulated under the working condition by loading the radial basic dynamic load. The test results of the initial state of the bearing are shown in Fig.13.
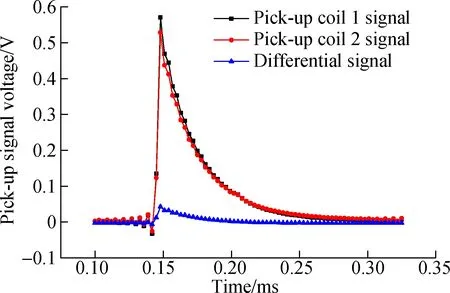
Fig.13 Bearing initial detection status
The bearing life is characterized by the number of revolutions of the bearing. By analyzing the typical detection signal for the six rotation cycles (each rotation cycle is 106 revolutions) of the same bearing inner ring, it can be seen that the presence of defects can significantly increase the differential signal so that their presence can be visually seen through the time domain image.The collected data is processed and analyzed. It is found that as the fatigue time increases, the intensity of the response curve of the pulse signal also increases, as shown in Fig.14.
The peak of the differential value of the pulse signal varies with the fatigue lifetime, as shown in Fig.15. It can be seen that with the increase in the number of revolutions, the initial cracks have a slow initial expansion speed, while the speed increases later. Using the method of frequency spectrum analysis, FFT is performed on the pulsed eddy current response difference signal, and the power spectral density of the low frequency part is taken as the detection index. As shown in Fig.15, as the number of bearing revolutions increases, the magnitude of power density increases, which corresponds to faster crack propagation.

Fig.14 Pulse differential signals with different usage times
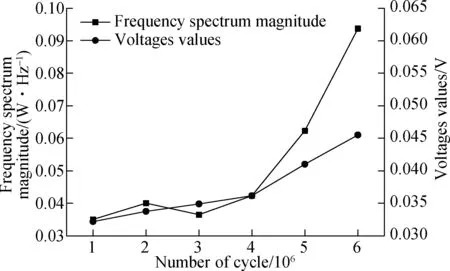
Fig.15 Differential signal amplitude and power spectral density amplitude at different fatigue times
4 Conclusions
1) The crack propagation mechanism, including the principle and advantages in pulse eddy current testing, is analyzed. To evaluate the health of the bearing, a rolling contact fatigue test system for a bearing inner ring with an existing crack is designed and manufactured.
2) Using the model simulation data to calculate the sensor characteristic parameters can effectively detect the surface and subsurface cracks and wear caused by rolling contact fatigue. By analyzing the amplitude of the differential signal and the power spectral density, the current health status of the bearing can be effectively evaluated. Hence, this approach is beneficial for evaluating the remaining service life of the bearing.
3)The results commendably verify the mechanism and trend of crack propagation. However, there are still many problems requiring further investigation. Further studies will redesign the sensor parameters in practice to accommodate multiple defect detection in RCF and find differential thresholds to quantify bearing life.
杂志排行
Journal of Southeast University(English Edition)的其它文章
- Tensile behaviors of ecological high ductility cementitious composites exposed to interactive freeze-thaw-carbonation and single carbonation
- Delay-performance optimization resource scheduling in many-to-one multi-server cellular edge computing systems
- Image denoising method with tree-structured group sparse modeling of wavelet coefficients
- Travel time prediction model of freewaybased on gradient boosting decision tree
- Projection pursuit model of vehicle emission on air pollution at intersections based on the improved bat algorithm
- Experimental investigation of oil particles filtration on carbon nanotubes composite filter
