An improved wall shear stress measurement technique using sandwiched hot-film sensors
2018-05-19XuanheLiuZhuoyueLiNanGao
Xuanhe Liu, Zhuoyue Li, Nan Gao*
School of aeronautics and astronautics, Dalian university of technology, Dalian 116024, China
Wall shear stress is an important parameter in turbulent wall bound flows; it not only determines the viscous drag force but is also used to scale the near wall velocity profiles. There are different existing techniques to measure the wall shear stress, e.g. direct measurements on or near the wall, optical methods such as the oil-film interferometry [1–4] and the microelectromechanical systems (MEMS) sensors such as surface flush-mount hot-film sensors, reviewed in Refs. [5–7]. Among these techniques, MEMS thermal sensor is of great practical importance and was used in many aerospace applications such as aircraft wing and compressor blade in gas turbine. Recent development of thermal sensor technique was discussed in Refs. [8, 9]. Analysis of heat and momentum balance over the hot-film sensor [10–13] suggested that the total Joule heating Q from the sensor film and the time average shear stressover the sensor satisfy

Here,,is the heat flux transfers to the cold air andis the heat transfers to the cold wall by conduction as illustrated in Fig. 1; constants A and B varies withand,and both can be determined by a calibration [10]. In a typical calibration process, the sensor was positioned at a location where the mean wall shear stress could be adjusted and measured directly using a more reliable method, usually on the wall of a fully developed pipe or channel flow. An in-situ calibration is preferred to remove some of the effects such as alignment, temperature, electrical resistance of cables and connectors, etc. However, an in-situ calibration is not always practical. Performance of the pre-calibrated sensors deteriorated as the ambient temperature, surface condition might change with time. Therefore, it is highly desirable to develop a wall shear stress measurement technique with reasonable accuracy and does not require a calibration.
Inspired by the heat shield used in Refs. [14–16], a guard heater film with the same size and operated at a same temperature to the sensor film was positioned between the sensor film and the wall, as shown in Fig. 2(a). A non-electrical conductive thin membrane with a thickness of d and thermal conductivity ofwas used to separate the two metal films, in this way the con-duction heat transfer from sensor film through the membrane as the guard heater film temperaturewas set to equal to the sensor film temperature. Here, l and w are the length and width of the metalfilms,respectively. Therefore,and the constant Bin Eq. (1) vanishes as Hanratty and Campbell [5]found that B linked to heat loss, and Eq. (1) becomes
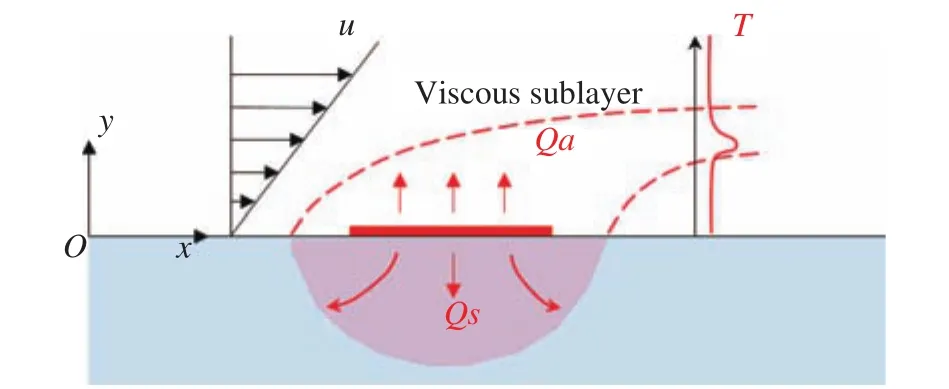
Fig. 1. Schematic of a single hot-film sensor.
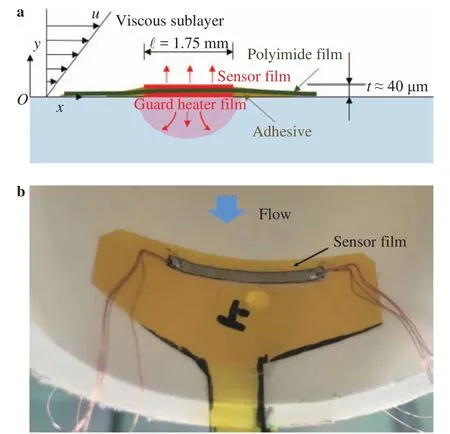
Fig. 2. a Schematic and b Picture of the sandwiched hot-film sensors.


Following an approach based on the integral momentum and energy balances in the thermal boundary layer outlined in Bellhouse and Schultz [10], an analytical solution of A in Eq. (3)for air as the medium is found to be

assuming the thermal boundary layer is within the viscous sublayer of a turbulent boundary layer; and the temperature profile is parabolic inside the thermal boundary layer. Here,is the film temperature for both sensor and heater films;is the air temperature; k,,, andare the thermal conductivity,density, specific heat and absolute viscosity of air, respectively,which are weakly temperature dependent and were evaluated using the average of sensor film and air temperatures,In thisway,can be estimated using Eqs.(3) and(4) without a requirement of calibration as long as the assumption of thickness ofthermal boundary layer () is located within 5 wall units (). The analytical solution of the thermal boundary layer thickness at the downstream edge of the film is

The sensor assembly is made of two 2 μm thick, 22 mm wide(w), and 1.75 mm long (l) films made of Nickel (GOODFELLOW NI000120), as shown in Fig. 2(b). The length and width of both Nickel films were measured under a microscope at 40 × magnification. The uncertainty was less than 0.01 mm (0.6% of film length). The two thin films formed a sandwich structure separated by a 40 mm long, 40 mm wide, and 25 μm thick polyimide membrane (DUPONT KAPTON 10 with a thermal conductivity of kf=0.12 W/(m·K)). The metal films were attached to the membrane using adhesive. The total thickness of the sensor assembly t was less than 40 μm. The thickness was t+≈0.6 and 2.0 in terms of wall unit in the cases of ¯τw≈ 0.05 Pa and 0.45 Pa,respectively, and can be regarded as weakly intrusive in this wall shear stress range.
Two edges of each film were connected to fine gauge copper wires by soldering. Both films were kept at a temperature 50°C above the air temperature by supplying DC current to the films using a multi-channel DC power supply (KEITHLEY 2231A-30-3)and monitoring their electrical resistances R. The total heat flux generated by the sensor film was the product of the voltage and current across the film. Both voltage and current were measured using a multi-meter on the power supply with uncertainties of ±1 mV (0.2% of typical voltage) and ±1 mA (0.1% of typical current), respectively. The relations between resistance R and the average film temperatureis

Here,is the cold film resistance at the room temperature,the temperature coefficient of resistance of Nickel isaccording to the manufacturer’s data. The ambient temperaturewas measured using a PT100 of each film was evaluated using. Following Coleman temperature sensor with a uncertainty of ±0.1 °C. The resistance and Steele [17], the uncertainty of film resistance was found to be 0.3% of typical value (±1.5 mΩ); the uncertainty of the temperature difference Tf-Tgwas 0.4% of typical value (±0.2°C). The mean wall shear stress was then estimated using Eq. (3)with A given in Eq. (4). The largest uncertainty in the estimatedarises from the heat conduction through the membrane due to the uncertainty in Tf-Tg, which can be as large as 12.0% of Q.It is noted that the wall will be heated by the guard heater film as indicated in the red shaded area in Fig. 2; the pre-heating leads to an error as the air arrives at the sensor film with a temperature larger than the freestream temperature. This error could be minimized by limiting the operating time.
The wall shear stress near the exit of a long pipe shown in Fig. 3 was first measured using the sandwiched hot-film sensors and the method described above. The results were then compared to those measured directly using a pressure transducers. The air was supplied using a centrifugal fan and a 10 kW motor with a manually adjusted variable-speed drive. The air enters a 0.5 m ×0.5 m × 0.5 m settling chamber with layers of honeycombs and wire meshes to condition the flow. The air then enters the 52.0 mm inner diameter 11.0 m long (equivalent to 211.0D) circular pipe made of polypropylene. A pressure tap (0.8 mm inner diameter stainless steel tubing) was mounted at 8.0 m (154.0D)downstream of the entrance of the pipe where the flow can be considered to have a fully developed turbulent profile. The distance from the pressure tap to the exit of the jet was L=3.0 m(57.7D). The mean static pressure at the tap (P) was measured using a pressure transducer which was calibrated using a water manometer. The uncertainty in the pressure measurement was±1.0 Pa. The signal from the pressure transducer was acquired and averaged using a 16 bit National Instruments PCI-6014 data acquisition card with LabView routines. The sampling frequency was 1024 Hz and the sampling time was 10 seconds. The wall shear stress near the exit of the pipe was evaluated using

Experiments were performed for Reynolds numbers() of 1.2 × 10⁴to 4.1 × 10⁴. Here, U is the centerline velocity at the pipe exit measured using a pitot tube. The uncertainties inmeasured in this way was less than ±8.0% in the case of Re=1.2 × 10⁴and decreased to ±0.8% in the case of Re=4.1 × 10⁴.
The comparisons of the wall shear stresses of pipe flows for different Reynolds numbers obtained using the two methods described above are shown in Fig. 4. The results suggested that the proposed technique over-predicted the wall shear stress, particularly in the large Re cases, by 15% to 20%. The discrepancies may be linked to the following factors. Firstly, conduction heat transfer through the substrate membrane separating the two metal films caused uncertainty in Q by as large as 12% of total heat flux; secondly, the viscous sublayer was thinner in the high Reynolds number cases and the thermal boundary layer could extend outside the viscous sublayer, e.g. the thickness was≈16.1in terms of wall unit when=0.45 Pa. This can be improved by using sensors with smaller length and will be investigated in the future.

Fig. 3. Schematic of the long pipe facility.
A calibration process outline above [10] was also performed to verify the validity of the 1/3thpower law. The calibration curve is shown in Fig. 5. The data can be linearly fitted to obtain a set of A and B. It is evident that 1/3thpower law applies to the current data suggesting the model in Eq. (4) is still valid despite thermal boundary layer extended out of the viscous sublayer and reached the middle of the buffer layer. Moreover, B obtained from fitting the experimental data approaches zero suggesting the heater film was effective in insulating the sensor film. B was not exactly zero because there were uncertainties in the measurements of electrical resistance of metal films, and in the current case the guard heater film appeared to have a larger temperature than the sensor film so that B was negative.
Comparisons of A obtained from two methods can be made by examining their ratio

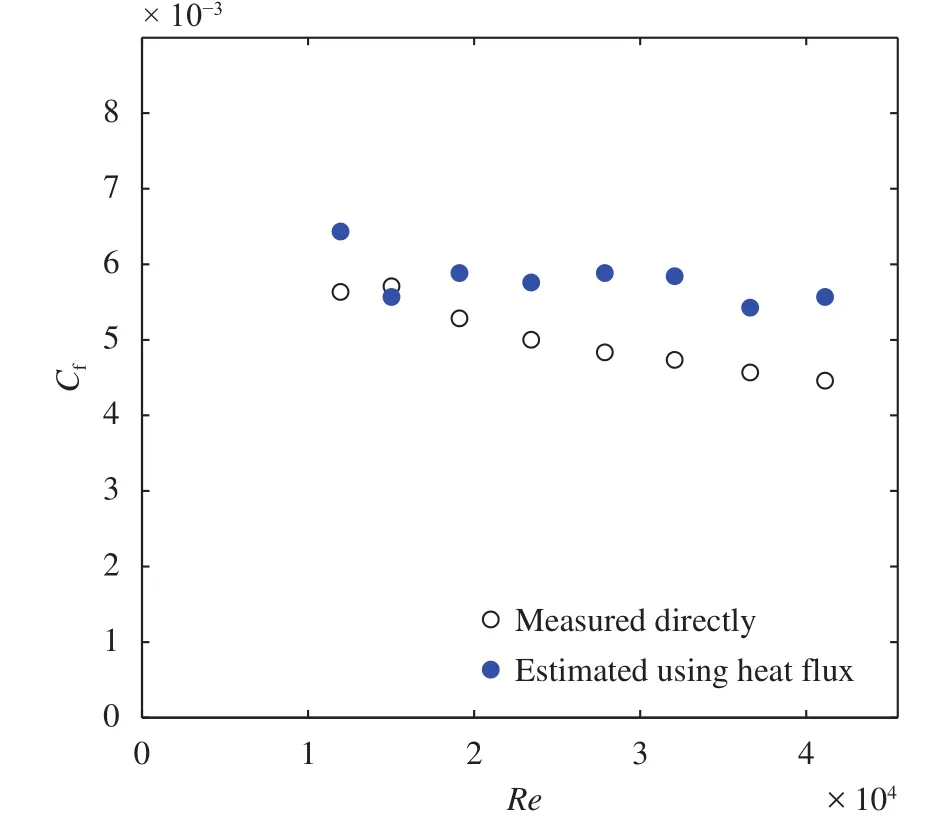
Fig. 4. Comparisons of · the estimated skin friction using heat flux and ° those measured directly using a pressure transducer.
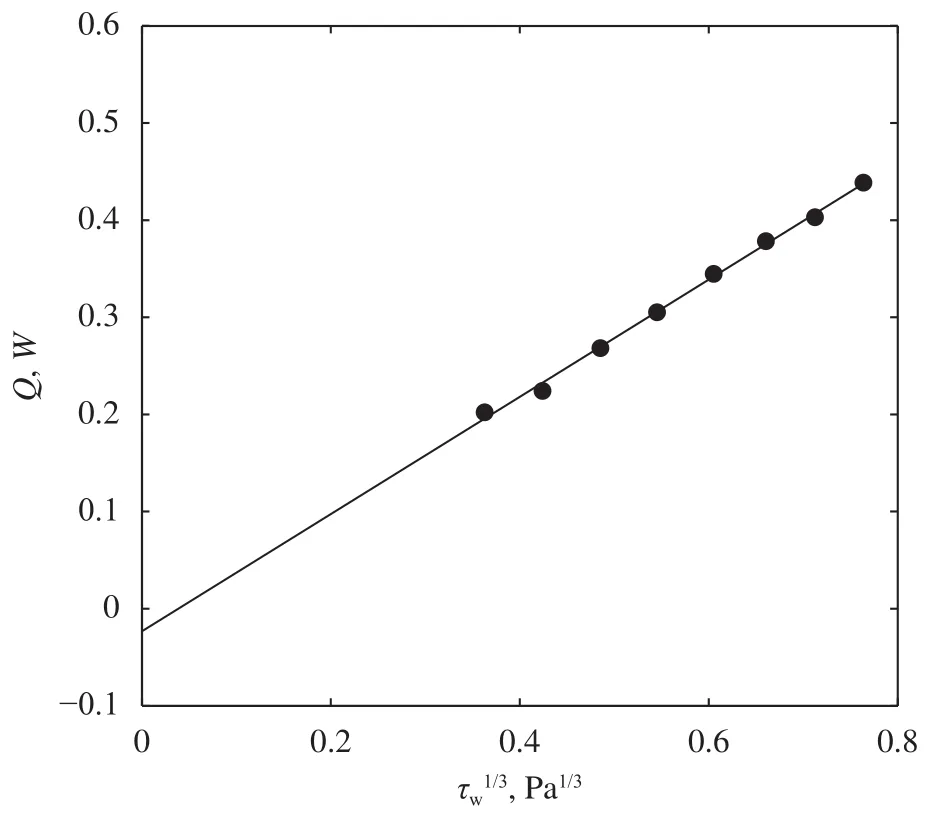
Fig. 5. The distributions of the heat flux generated by the sensor film and the wall shear stress measured using pressure transducer.
Here, A was obtained from fitting experimental data presen-ted in Fig. 5 andis the effective width of the sensor, defined by

The effective widthsare shown in Fig. 6 for different Reynolds numbers. The ratio of the effect width to the actual width was less than 1.1 for all Reynolds numbers indicating again the analytical model was effect in predicting the wall shear stress of the pipe flows.
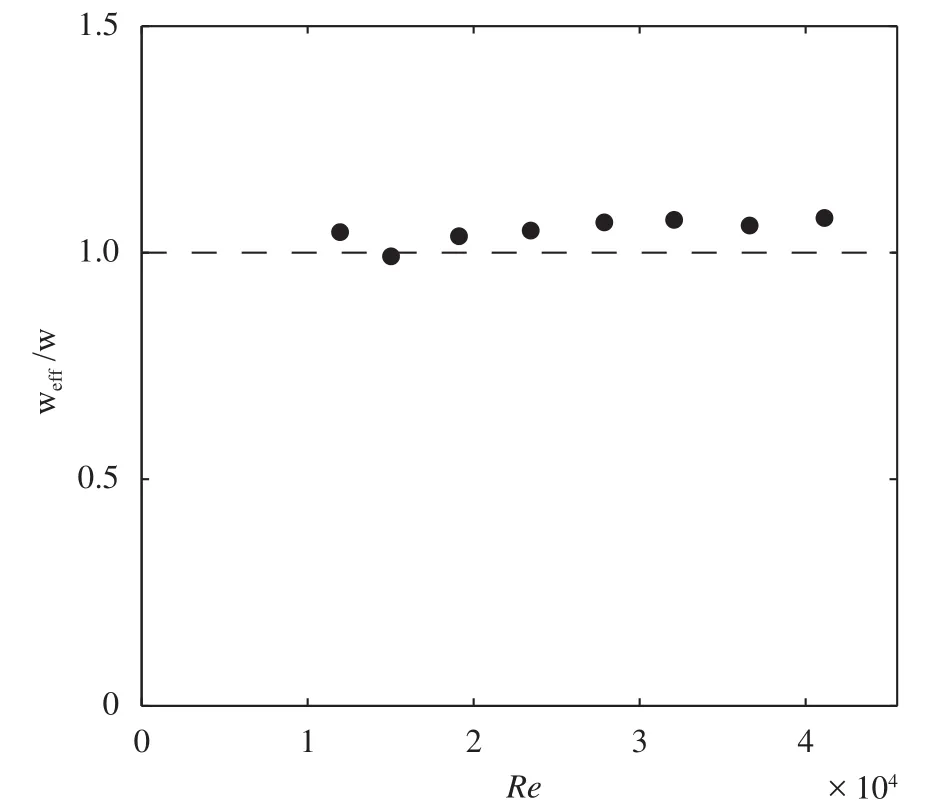
Fig. 6. Distribution of the effective sensor width for different Reynolds numbers.
It is noted that the method described in this paper was based on the flow in the viscous sublayer in a turbulent boundary layer with a zero pressure gradient, i.e. the velocity profile used in obtaining Eq. (4) was linear and did not consider the effect of pressure gradients,. This method can be used in the case of a laminar boundary layer and can also be used in a boundary layer with modest pressure gradient, as long as thermal boundary layer thickness was small enough so that the force due to shear stress was much larger than that due to pressure gradient

In this case, the impact of the pressure gradient on the velocity profile within the thermal boundary layer was negligible.
There are limitations in applying this “calibration-free”method due to the assumptions used in obtaining the analytical solutions ofandusing Eqs. (4) and (5), respectively. After obtaining the analytical value of, the film thickness ()should be checked to evaluate whether the sensor was intrusive to the flow in the viscous sublayer. The exact threshold thickness was not known and needs further investigation; the boundary layer thickness () should also be checked to evaluate the position of the thermal boundary layer relative the the viscous sublayer. The current investigation suggested the results were relative accurate for a thermal boundary layer thickness as large as. This method will likely to be invalid for a largerbut the detailed effects were not clear and also needs further investigation. The pressure gradient should also be monitored if this method was applied to a surface with large curvatures to check whether Eq. (10) applies. Furthermore, the films have to be positioned perpendicular to the incoming flow so the application of this method is limited by a prior knowledge of flow direction.
Acknowledgements
The research was funded by the National Natural Science Foundation of China (11572078 and 91752101) and 973 Plan(2014CB744100).
References
[1]N. Gao, C. Y. Ching, D. Ewing, et al., Heat transfer and flow measurements of a planar offset attaching jet with a co-flowing jet, Int. J. Heat Mass Tran. 78 (2014) 721–731.
[2]J. W. Naughton, M.D. Hind, Multi-image oil-film interferometry skin friction measurements, Meas. Sci. Technol. 24(2013) 124003.
[3]J. W. Naughton, M. Sheplak, Modern developments in shear stress measurement, Prog. Aero. Sci. 38 (2002) 515–570.
[4]J.W. Naughton, S. Viken, D. Greenblatt, Skin friction measurements on the NASA hump model, AIAA J. 44 (2006) 1255–1265.
[5]T. J. Hanratty, J. A. Campbell, Measurement of wall shear stress,In Goldstein R.J., editor, Fluid Mechanics Measurements,chapter 11, CRC Press, Florida, US, 2 edition, 1996.
[6]J. C. Klewicki, W. S. Saric, I. Marusic, et al., Wall-bounded flows,In Cameron C., Yarin A., and Foss J., editors, Handbook of Experimental Fluid Mechanics, chapter 12, pp 871-902. Springer,Berlin, 2007.
[7]L. Lofdahl, M. Gad el Hak, Mems-based pressure and shear stress sensors for turbulent flows, Meas. Sci. Technol. 10 (1999)665–686.
[8]B. Y. Sun, B. H. Ma, J. J. Deng, et al., Research progress on thermal wall shear stress sensors, J. Exp. Fluid Mech. 31 (2017)26–33. (in Chinese)
[9]Y. C. Yan, C. Y. Jiang, B. H. Ma, et al., Review of the calibration methods and devices for wall shear stress measurements, J.Exp. Fluid Mech. 31 (2017) 20–25. (in Chinese)
[10]B. J. Bellhouse, D. L. Schultz, Determination of mean and dynamic skin friction, separation and transition in low-speed flow with a thin-film heated element, J. Fluid Mech. 24 (1966)379–400.
[11]B. J. Bellhouse, D. L. Schultz, The determination of fluctuating velocity in air with heated thin film gauges, J. Fluid Mech. 29(1967) 289–295.
[12]B. J. Bellhouse, D. L. Schultz, The measurement of fluctuating skin friction in air with heated thin-film gauges, J. Fluid Mech.32 (1968) 675–680.
[13]A. N. Menendez, B. R. Ramaprian, The use of flush-mounted hot-film gauges to measure skin friction in unsteady boundary layers, J. Fluid Mech. 161 (1985) 139–159.
[14]A. Etrati, E. Assadian, R.B. Bhiladvala, Analyzing guard-heating to enable accurate hot-film wall shear stress measurements for turbulent flows, Int. J. Heat Mass Tran. 70 (2014) 835–843.
[15]A. Etrati, R.B. Bhiladvala, Frequency response analysis of guard-heated hot-film wall shear stress sensors for turbulent flows, Int. J. Heat Fluid Flow 46 (2014) 61–69.
[16]O.D. Osorio, N. Silin, Wall shear stress hot film sensor for use in gases, In I. Bove, C. Cabeza, A.C. Marti, and G. Sarasua, editors,Journal of Physics: Conference Series, volume 296, pp 012002.IOP Publishing, 2011.
[17]H.W. Coleman, W.G. Steele, Experimentation and Uncertainty Analysis for Engineers, second ed. John Wiley & Sons, New York, NY, 1998.
杂志排行
Theoretical & Applied Mechanics Letters的其它文章
- Graphical Abstract
- Sound absorption characteristic of micro-helix metamaterial by 3D printing
- An analysis of dynamic stability of an elastic column
- Local buckling of thin plate on tensionless elastic foundations under interactive uniaxial compression and shear
- Quantitative characterization of deformation and damage process by digital volume correlation: A review
- Forced vibration analysis of nano-composite rotating pressurized microbeam reinforced by CNTs based on MCST with temperature-variable material properties
