Residual stress measurement for injection molded componentsAchyut Adhikari∗,Thomas Bourgade,Anand Asundi
2016-09-21CentreforOpticalandLaserEngineeringSchoolofMechanicalandAerospaceEngineeringNanyangTechnologicalUniversity50NanyangAvenueSingapore639798Singapore
Centre for Optical and Laser Engineering,School of Mechanical and Aerospace Engineering,Nanyang Technological University,50 Nanyang Avenue,Singapore 639798,Singapore
Letter
Residual stress measurement for injection molded components
Achyut Adhikari∗,Thomas Bourgade,Anand Asundi
Centre for Optical and Laser Engineering,School of Mechanical and Aerospace Engineering,Nanyang Technological University,50 Nanyang Avenue,Singapore 639798,Singapore
H I G H L I G H T S
·Low birefringence polariscope(LBP)of higher resolution,accuracy,and precision.
·Calibration for residual stress of injection molded and 3D printed optics.
·Useful for characterization and quality testing in optics and lithography.
·Non-destructive residual stress quantification of wavelength dependent material.
·Comparison of commercial system with research oriented system.
A R T I C L EI N F O
Article history:
in revised form
28 January 2016
Accepted 27 April 2016
Available online 25 July 2016
Photoelasticity
Birefringence
Residual stress
Polymethyl methacrylate
Residual stress induced during manufacturing of injection molded components such as polymethyl methacrylate(PMMA)affects the mechanical and optical properties of these components.These residual stresses can be visualized and quantified by measuring their birefringence.In this paper,a low birefringence polariscope(LBP)is used to measure the whole-field residual stress distribution of these injection molded specimens.Detailed analytical and experimental study is conducted to quantify the residual stress measurement in these materials.A commercial birefringence measurement system was usedtovalidatetheresultsobtainedtoourmeasurementsystem.Thisstudycanhelpinmaterialdiagnosis for quality and manufacturing purpose and be useful for understanding of residual stress in imaging or other applications.
©2016 The Authors.Published by Elsevier Ltd on behalf of The Chinese Society of Theoretical and
Applied Mechanics.This is an open access article under the CC BY-NC-ND license(http://creativecommons.org/licenses/by-nc-nd/4.0/).
Injection molding is a popular technology for manufacturing of plastics.Benefits of injection molded parts are high production rate and low manufacturing cost[1].Optical molded materials need to be precise in size,shape,and form.Free mold shrinkage, stress induced distortion [2],temperature gradient,material characteristics are the problems which cause residual stress in molded components[3].Residual stress[4],which also affects the functional characteristic of injection molded components,is being investigated[5].This work aims to do a detail analysis on residual stress that causes difference in injection molded components[6-8].A low birefringence polariscope(LBP)[9]developed by us licensed by university spin-off company is used to quantify residual stress distribution by finding material constant values.The values are compared to commercial machine for validation.The advantage of LBP is its high resolution and whole full field measurement[9]capability avoiding conventional slow commercial scanning method.
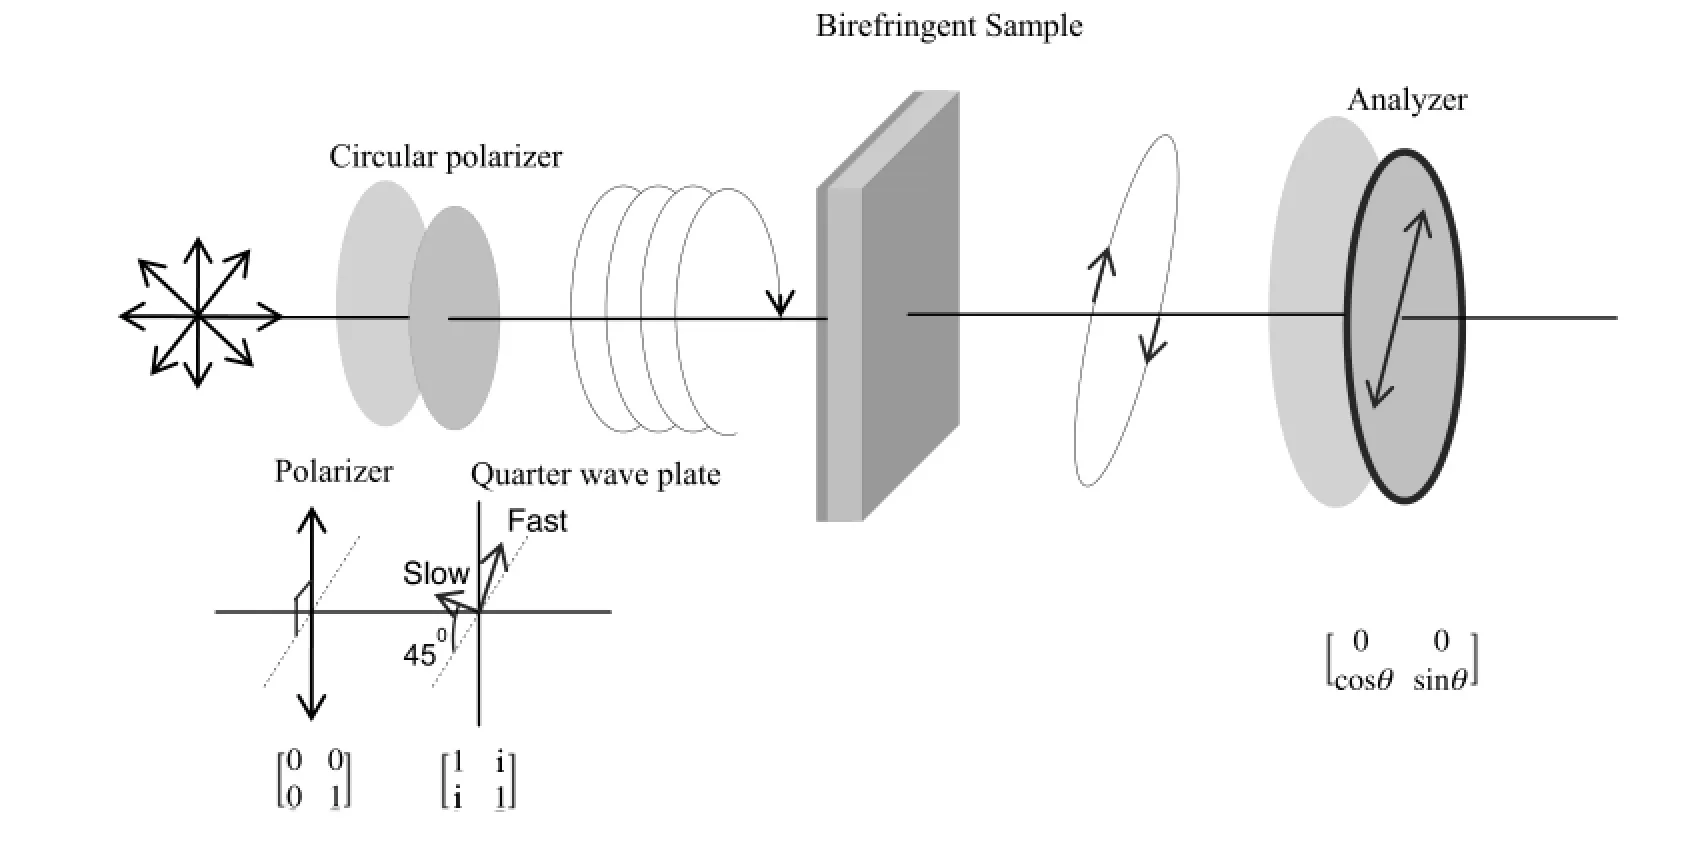
The schematic of LBP is shown in Fig.1.Changes in circularly polarized light passing through a birefringent sample are analyzed using a phase shift algorithm[10].
The Jones model for light transmitting through polarizer, quarter wave plate,specimen,and analyzer are represented by(U,V)as follows[11]

JP,JQ,JM,and JArepresent the Jones vector for polarizer,quarter wave plate,model specimen,and the analyzer respectively.By using matrix multiplication we get the equation given in Box I. Here,αis analyzer angular position,Δis the phase difference on birefringent sample,βis the fast axis orientation of light emerging from the sample,a is the amplitude of circularly polarized light, andwis the temporal angular frequency of the associated wave.
http://dx.doi.org/10.1016/j.taml.2016.04.004
2095-0349/©2016 The Authors.Published by Elsevier Ltd on behalf of The Chinese Society of Theoretical and Applied Mechanics.This is an open access article under the CC BY-NC-ND license(http://creativecommons.org/licenses/by-nc-nd/4.0/).

Fig.1.Principle of low birefringence polariscope.

Box I.
Intensity of light received at a point on the specimen is given as

By recording the intensity I1through I4at four different values of α,namely 0°,45°,90°,and 135°,the unknownΔandβcan be determined as

Phase difference between two waves after they emerge from the birefringent specimen will be

where t is thickness of specimen.
Maxwell formulated the stress optic law in 1853 which states that there is change in indices of refraction of material exhibiting double refraction due to state of stress in the material.He reported that change in indices of refraction were linearly proportional to theloadandthustostressesorstrainsforalinearlyelasticmaterial. The relation can be expressed as

whereσ1,σ2,andσ3are respective principal stresses,n0is the index of refraction at unstressed state,n1,n2,and n3are principal refractive indices at respective principal stress directions.c1and c2are constants known as stress optic coefficients.Equations(6)-(8)represent the fundamental relationship between stress and optical effect known as stress optic law.In case of plane stress(σ3=0), equations are reduced to

Similarly,

where C=c2-c1is the relative stress optic coefficient expressed in terms of brewsters(1 brewster=10-12m2/N).
Implementing Eq.(11)into Eqs.(6)-(8),we get

The relative angular phase difference can be expressed as
2.道德评价标准陷入相对主义。受价值标准多元化与文化多元化影响,道德评价标准滑向“自我”的深渊,以“我”的利益为标准,道德评价标准陷入相对主义。

where C is the stress optic coefficient,t is thickness of the material as per stress optic law.Thus,principal stress difference can be determined by measuring phase difference if stress optic coefficient for the material is known.Equation(13)represents the relationship between angular phase difference and principal stress difference of the material.Here,we found the principal stress difference which is equal to the maximum principal stress difference in the specimen.Calibration specimen is circular disk of diameter D and thickness t loaded in diametral compression.The horizontal and vertical stresses are principal stresses henceτxyvanishes because of symmetry.Sinceσ3=0,for planar stress,relationship of von Mises stress with principal stress can be deduced as


Fig.2.Low birefringence polariscope.

Since this is regular circular disk material so we used maximum principal stress though it is conservative than von Mises stress.
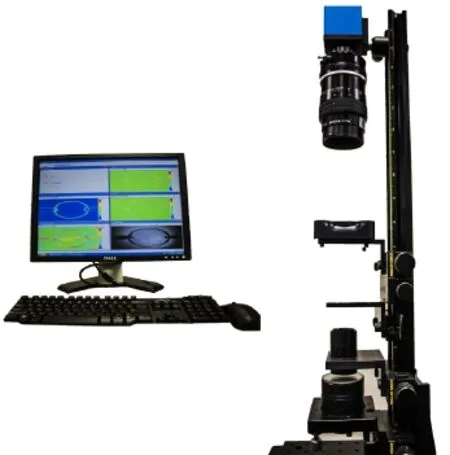
The LBP[12]that have been developed by us recently has been licensed by spin off company from the university d’Optron Pte Ltd.As can be seen in Fig.2 illumination part comprises of a tunable 400-700 nm light emitting diode(LED)source with holographic diffuser to obtain homogeneous light intensity.It includes two polarizers and one quarter wave plate from thorlabs designed for visible wavelength range.High resolution charge coupled device(CCD)camera DMK23U274 from imaging source was used for capturing the raw phase shifted images.Since system is not enclosed,the stray light present in surrounding will add error in the readings.Image processing algorithm is implemented to eliminate such unwanted artifacts.The system also includes calibration stage in order to get the stress optical coefficient of specimen.These values are necessary to get the residual stress quantitative values.Stress optical coefficient values obtainedfromoursystemwascomplyingwiththestandardvalues. The light passes through an integrated diffuser,polarizer,and quarter wave plate to obtain uniform circularly polarized light. The circularly polarized light is modified by birefringent specimen and analyzed by rotating the analyzer at prescribed angles.These phase-shifted images are captured by a high resolution CCD camera and processed as per the above equations to obtain phase difference and orientation of fast axis in the birefringent specimen. The system has a field of view of 50 mm square and the results are obtained in near real-time.In addition,the illumination of our system allows for multiple wavelength and thus testing of wavelength dependent material.Moreover,the system can be customized for residual stress visualization in Si-wafers deploying infra-red light source.
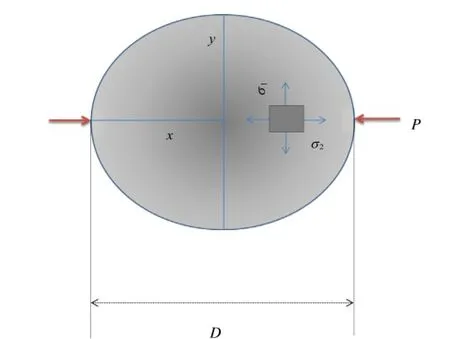
Thestress optical coefficient(C)isdetermined by applyingpredetermined stress to a sample by obtaining the phase difference(Δ).A typical calibration sample is a disk under compression as shown in Fig.3.For a given applied load,the principal stress components along the horizontal axes of symmetry can be determined from theory of elasticity[13,14],although there are some other

Fig.3.Disk in compression.
minor factors that contributes for residual stress like thermal gradient,free mold shrinkage and pressure obtained during manufacture.Here,we have not exceeded the yield stress(plastic zone)which is far high for polymethyl methacrylate(PMMA)material(62 MPa).Since we are looking for residual stress,we need to find principal stress difference in the elastic zone.Sample disk of diameter D and thickness t with applied load P results maximum principal stress difference at the center along the horizontal diameter given by
A series of load steps are applied to find an average value for the stress optic coefficient.For specimens,prepared using injectionmolding,thecalibrationsamplewouldalsohavesomein-built residual stresses.Hence,to calibrate such specimens,we need to first determine the phase difference(Δ0)at no load state as in Fig.4(b)and then determine the phase difference(ΔL)at applied load state as in Fig.4(c).The resultant phase difference(ΔR)would then be phase difference created due to load increment alone.This can be used to determine the stress optical coefficient of specimen.
Figure5showsthephasedifferenceforfourdifferentloadlevels in an injection-molded PMMA circular disk used for calibration.
Figure6showstheresultantplotsofphasedifferenceonvertical diameter,while Fig.7 shows difference of these plots from the one corresponding to zero load.Stress optic coefficient can then be determined using Eq.(17)for each of the loads and have been listed below in graphs.
The average value of stress optical coefficient(C)is 5.14× 10⁻¹²m2/N which agrees well with the generic value for PMMA i.e.6.0×10-12m2/N[15].
After determination of stress optic coefficient,residual stress in the injection molded disk can be found by calculating phase difference for zero load.Residual stress values along horizontal diameter can be obtained by finding the values as provided by Eq.(16)represented by phase difference plot in Fig.8(a)and(c).The residual stress distribution was also measured using a commercial system based on photoelastic modulator(PEM)principle from obtained phase difference values.Comparative residual stress plot along horizontal diameter of both system is shown in Fig.8(b).The residual stress values at the center of specimen from commercial system was compared with our LBP system.The residual stress value from the commercial system wasfound to be 5.45×10⁶N/m2whereas our algorithm values are 5.28×10⁶N/m2.Both system shows good correlation.However, minor disparities can still be noticed in the results due to its point to point measurement and small beam spot size.There are some abruptchangeinvaluesduetoitspointtopointmeasurement.This disparities is due to limiting resolution of commercial system only30µm beam spot size.Due to its full field nature,our system is not subject to this type of bias.We foresee that our method can have huge potential in industrial application where small changes can strongly affect end results for instance in application such as optics,imaging and lithography.

Fig.4.Phase difference for different loads.

Fig.5.Phase difference at different loads for an injection molded circular disk.

Fig.6.Phase difference along vertical diameter for four different loads.

Fig.7.Phase difference along vertical diameter by subtracting the phase difference due to zero load.

Fig.8.Comparison of commercial with LBP system.
However our system can be subject to external bias.During image acquisition,ambient light and inappropriate wavelength fromilluminationsitearesourcesoferrors.Thus,imageprocessing and error compensation is implemented to eliminate these unwanted artifacts.Relative retardation errors induced on the system due to inappropriate wavelength is given by

Assuming that matching wavelength for quarter wave plate isλmand the arbitrary wavelength present isλ.We found that the error values were±3%.Image processing for stray light was corrected using a blob analysis algorithm implemented in MATLAB.Those artifacts were corrected to ensure that the system deliver accurate and reliable results.
In this article,a low birefringence polariscope is implemented for full-field residual stress visualization and quantification of injection molded optics.A calibration process for samples with in-built residual stress is described.Experimental validation of the proposed method is demonstrated using an injection molded circular disk loaded in diametric compression.Stress optical coefficient determined using this approach is fairly constant for different load levels and is within the range provided in the handbook for PMMA.Residual stresses were then determined in the same disk using both LBP and PEM[16]based commercial system,results shows good agreement.However commercial system used has several shortcomings i.e.point to point measurement,longer measurement time,low lateral resolution that cannot go less than 30µm,reduction of stress magnitude accuracy,not able to map out the true curve and full field image of specimen.On the contrary,our LBP provides high resolution and rapid full field measurement with tunable LED light source that can measure various samples especially wavelength dependent material.Maximum residual stress occurs at input end of the injection-molded part which is to be expected as material inside provides different reactions to incoming material than the mold.Overall,wedemonstratethattheLBPsystemcanbeareliable tool for providing non destructive rapid measurement of residual stress present in injection molded materials.This is vital in quality control for low cost plastic and glass components produced by injection molding and especially the growing area of 3D printed plasticlens[17].Futureworkwillconsistinestimatingtheinduced birefringence due to residual stress in certain application which will have huge impact in optics,imaging and lithography.
[1]S.Bäumer,Metrology of Injection Molded Optics,John Wiley&Sons,2010, pp.67-122.
[2]C.H.Kim,J.R.Youn,Determination of residual stresses in injection-moulded flat plate:Simulation and experiments,Polym.Test.26(2007)862-868.
[3]X.Lu,L.S.Khim,A statistical experimental study of the injection molding of optical lenses,J.Mater.Process.Technol.113(2001)189-175.
[4]A.Adhikari,A.Asundi,Birefringence Characterization of Injection Molded Microplates,in:International Conference on Experimental Mechanics 2014. International Society for Optics and Photonics,2015:93022Q-93022Q-9.
[5]G.Horn,J.Lesniak,T.Mackin,et al.,Infrared grey-field polariscope:A tool for rapid stress analysis in microelectronic materials and devices,Rev.Sci. Instrum.76(2005)045108.
[6]R.Pantani,Validation of a model to predict birefringence in injection molding, Eur.Polym.J.41(2005)1484-1492.
[7]T.H.Wang,W.B.Young,Study on residual stresses of thin-walled injection molding,Eur.Polym.J.41(2005)2511-2517.
[8]A.Adhikari,A.Asundi,Modeling,simulation,and analysis of birefringent effects in plastic optics,in:SPIE Optical Systems Design,International Society for Optics and Photonics,2015.
[9]W.Pin,A.Asundi,Full-field analysis of a liquid crystal cell using a low birefringence polariscope,in:Photonics Europe,International Society for Optics and Photonics,2008.
[10]A.Lien,H.Takano,Cell gap measurement of filled twisted nematic liquid crystal displays by a phase compensation method,J.Appl.Phys.69(1991)1304-1309.
[11]A.Asundi,L.Tong,C.G.Boay,Phase-shiftingmethodwithanormalpolariscope, Appl.Opt.38(1999)5931-5935.
[12]Doptronpolariscope,http://www.doptron.com/dpolariscope.html.
[13]J.W.Dally,W.F.Riley,Experimental Stress Analysis,McGraw and Hill,New York,1991.
[14]J.W.Phillips,Photoelasticity,UniversityofIllinoisatUrbana-Champaign,1998, 6-2-6-62.
[15]S.Bäumer,Handbook of Plastic Optics,John Wiley&Sons,2011.
[16]C.F.Wong,Birefringence measurement using a photoelastic modulator,Appl. Opt.18(1979)3996-3999.
[17]C.R.Garcia,J.Correa,D.Espalin,etal.,3dprintingofanisotropicmetamaterials, Prog.Electromagn.Res.34(2012)75-82.
9 October 2015
.Fax:+65 6790 5564.
E-mail address:adhi0005@e.ntu.edu.sg(A.Adhikari).
猜你喜欢
杂志排行
Theoretical & Applied Mechanics Letters的其它文章
- Editorial:Advances in Optical Techniques for Mechanical Measurements
- Fabrication of nanoscale speckle using broad ion beam milling on polymers for deformation analysisQinghua Wanga,∗,Satoshi Kishimotob,Yoshihisa Tanakab,Kimiyoshi Naitob
- Instantaneous phase-stepping interferometry based on a pixelated micro-polarizer arraySatoru Yoneyama∗,Shuichi Arikawa
- Visualizing surface strain distribution of facial skin using stereovisionNagisa Miura,Tsubasa Sakamoto,Yuichi Aoyagi,Satoru Yoneyama∗
- Fabrication of micro-scale gratings for moiré method with a femtosecond laserGaosheng Yana,Jianguo Zhua,∗,Yanlong Huanga,Wenfen Haoa,Yanjie Lib
- The mechanics and deformation of high temperature steel frame rapidly cooled by spray water in fire fightingYunchun Xia
