Pressure calibration and sound velocity measurement to 12 GPa in multi-anvil apparatus
2021-09-10WeiSongShuangmingShanQizheTangChangSuYonggangLiu
Wei Song• Shuangming Shan• Qizhe Tang• Chang Su• Yonggang Liu
Abstract We performed the pressure calibration to 12 GPa for 14/6 type (octahedron edge length/WC truncated edge length,in mm) cell assembly in DS 6 × 1400 multi-anvil apparatus by using the phase transitions in Bi (I-II 2.55 GPa,III-V 7.67 GPa)and ZnTe(LPP-HPP I 9.6 GPa,HPP I-II 12.0 GPa).As verification and application,sound velocity measurements on polycrystalline Al2O3 to 12 GPa at room temperature were conducted and the ultrasonic result is in good agreement with previous reports.It demonstrates the feasibility of performing sound velocity measurements close to the mantle transition zone pressure condition in our laboratory.
Keywords Pressure calibration · Sound velocity · Multianvil apparatus · Polycrystalline alumina
1 Introduction
Simulating the high-pressure and high-temperature conditions of the Earth’s interiors is crucial for the studies of Earth and planets since most of their mass is located at depths that are inaccessible to direct investigation.In general,the static high-pressure apparatus used to simulate can be divided into diamond anvil cell (DAC) and large volume press (LVP),multi-anvil apparatus (MAA) is the representative of the latter.Sound velocity measurements of millimeter-sized polycrystalline specimens in MAA play an important role in high-pressure science and geoscience because it can provide accurate measurements of compressional (P) and shear (S) wave velocity and hence the elasticity of rocks and minerals of geological importance and other materials.
Since sound velocities of minerals and rocks under high temperature and pressure are extremely important physical parameters for understanding the composition,structure,and thermodynamic properties of the Earth’s interior (Li et al.1998;Ritsema et al.2004;Gre´aux et al.2019;Marquardt and Thomson 2020).The deeper in the Earth’s interiors means the higher pressure.Many scientists attempted to extend the experimental pressure and get more accurate results for sound velocity measurements in MAA(Kinoshita et al.1979;Fujisawa and Ito 1984,1985;Kosuki et al.1986;Yoneda 1990;Song et al.2005).Baosheng Li and coworkers at Stony Brook University(USA)made an outstanding contribution to the progress of sound velocity measurements in MAA.Li et al.(1996)developed a new method for velocity measurement in MAA and applied it to dense fine-grained polycrystalline alumina velocity experiments at 10 GPa,which feature a stress-free transducer location and sample-friendly cell assemblies.Later,the X-ray diffraction (Liebermann et al.1998;Li et al.2001,2004) and X-radiography technique(Kung et al.2002,2004) were also utilized in MAA,allowing for simultaneous measurements of compressional and shear wave travel times,cell pressure,density and sample length under high-pressure experiments (Li et al.2005;Li and Liebermann 2014).Since then,state-of-theart techniques for sound velocity measurements in MAA were built and lots of subsequent velocity experiments in MAA were affected or benefitted by those techniques.At present,sound velocity measurements in MAA have already reached 27 GPa(Higo et al.2018)and 2375 K(Xu et al.2018),corresponding to the lower mantle P–T conditions,respectively.The current highest pressure and temperature of sound measurement in MAA and DAC are shown in Fig.1.More details of experimental techniques of sound measurement under deep mantle conditions are given by Marquardt and Thomson (2020).
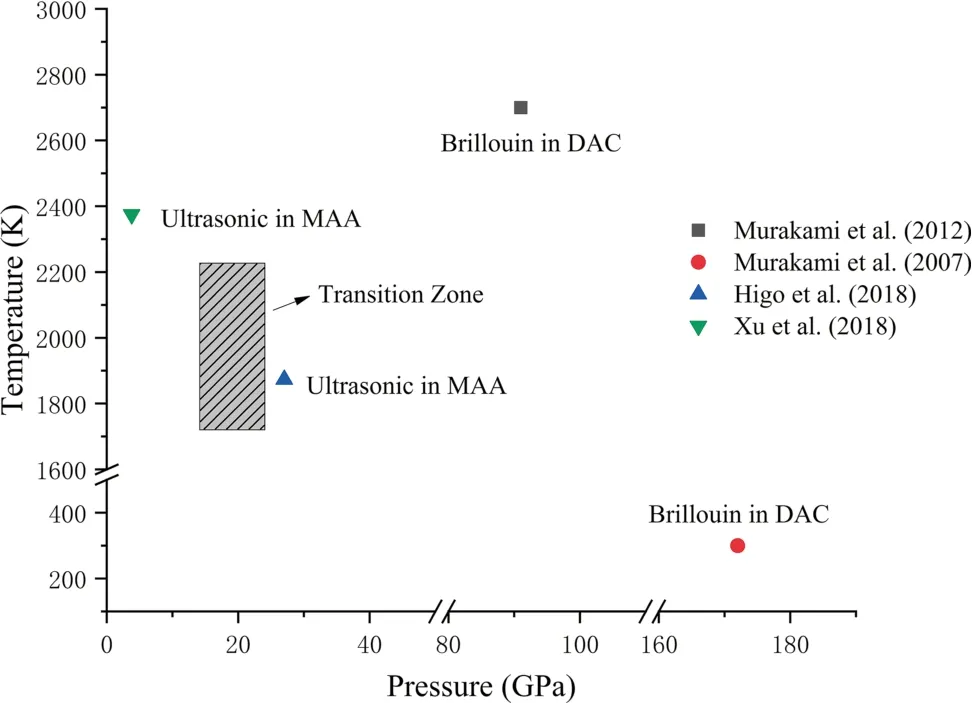
Fig.1 Current highest pressure and temperature of sound velocity measurement in MAA and DAC
In China,Prof.Hongsen Xie and his coworkers in the Institute of Geochemistry,Chinese Academy of Sciences pioneered the ultrasonic measurements in MAA and made great achievements(Xie et al.1993,1998,2002).However,no matter solid sample (Liu et al.2000,2002;Zhou et al.2011;He et al.2014;Xu et al.2014) or liquid sample experiments (Song et al.2011;Wang et al.2013;Su et al.2017),the sound velocity measurements in MAA in China are still usually limited to relatively low pressure (below 5.5 GPa),beyond the reach of the focused area in the mantle,for example,the transition zone (410~660 km,14–24 GPa),and the lacking higher pressure apparatus may account for this dilemma.Note that,when limited by the intrinsic properties of the first stage tungsten carbide(WC)anvil in MAA,the attainable pressure using the first stage anvil is normally several GPa.Consequently,the second stage anvil system is applied in MAA for the generation of higher pressure.In the last decade,more and more research institutes started to install MAA for scientific or industrial applications in China.Recently,Zhou et al.(2016)set up a new ultrasonic velocity measurements system in an MAA installed in China University of Geosciences (Wuhan) and measured the velocities of polycrystalline wadsleyite to 18 GPa.Ren and Li (2018) calibrated the pressure for 10/4 type cell assembly to 19 GPa in DS 6 × 1400 t multi-anvil apparatus installed in Institute of Geochemistry by using the transitions in ZnTe,ZnS,and GaAs,but no sound velocity experiment was conducted.
Also,methods for pressure determination in high-pressure apparatus generally include the so-called fixed-point calibration and continuous calibration,the former is based on phase transitions of metals and semiconductors(e.g.Bi,Ba,ZnTe,ZnS,and GaAs) and the latter is to build relationships between pressure and certain experimentally measurable properties of a calibrant,such as changes in resistance (e.g.manganin),unit-cell volume (e.g.NaCl,Au),peak shifts in fluorescence(Ruby)and Raman spectra(diamond,c-BN).It’s worth mentioning that travel times in calibrants also can be used for pressure calibration (Wang et al.2015;Song et al.2020).
In this paper,we presented the results of pressure calibration for 14/6 type cell assembly to 12 GPa in DS 6 × 1400 t multi-anvil apparatus installed in our laboratory by using the phase transitions in Bi and ZnTe,then applied it to the sound velocity measurements on polycrystalline Al2O3to 12 GPa at room temperature.
2 Experimental method
The experiments were performed in a 6–8 cubic-type MAA(DS6 × 1400t),which is capable of generating oil pressures up to 40 MPa,at the Key Laboratory for High-Temperature and High-Pressure Study of the Earth’s Interior,Institute of Geochemistry,Chinese Academy of Sciences,China.The press consists of six first-stage anvils made of WC,which enclose a cubic cavity of 44.5 mm edge length.The eight-second stage anvils used in this work are also made of WC,which have a 24 mm edge length and one corner truncated into a triangular surface with a 6 mm edge length.The truncations enclose an octahedral cavity holding the sample assembly.The second stage anvils are separated by pyrophyllite gaskets and insulated from the first stage anvils by epoxy resin sheets.The octahedron of the sample assembly has a 14 mm edge length and is made of MgO to transfer pressure.
In pressure calibration experiments,Bi wire and powdered ZnTe(both 99.99%purity)were used as samples and changes in electrical resistance associated with phase transitions in Bi (I-II 2.55 GPa,III-V 7.67 GPa,Decker et al.1972) and ZnTe (LPP-HPP I 9.6 GPa,HPP I-II 12.0 GPa,LPP:Low-Pressure Phase;HPP:High-Pressure Phase,Kusaba et al.1993)served to calibrate the pressure.Figure 2 shows the schematic diagram of sample assemblies for resistance measurements in the DS 6 × 1400 t apparatus.The pressure calibrant placed in MgO octahedron is connected to a multimeter (Agilent 34410A,USA)to measure resistance continuously by sets of copper wires,and the two diagonally opposite WC second anvils served as conducting medium.The resistance was measured by the four-wire method in Bi experiments and the two-wire method in ZnTe experiments,respectively.
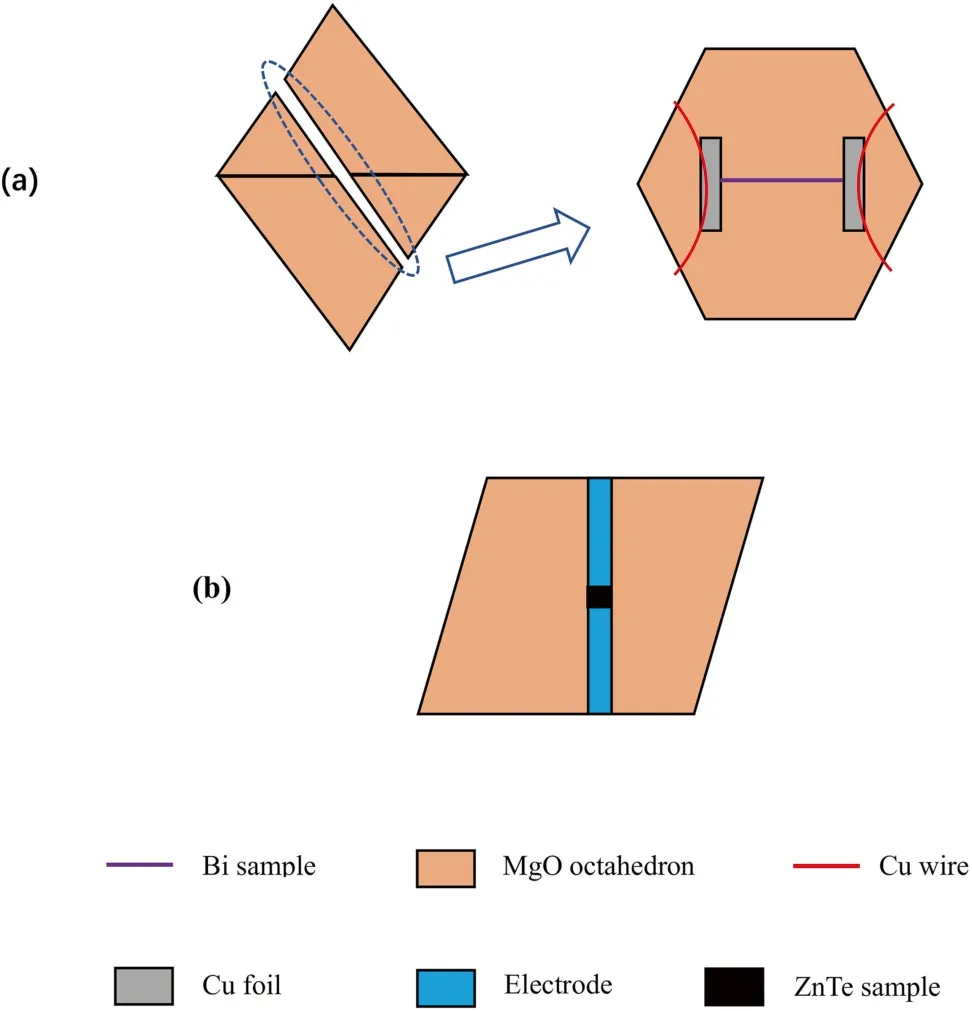
Fig.2 The schematic diagram of sample assemblies for resistance measurements in DS 6 × 1400 t apparatus:(a) is for the resistance measurement of Bi,in which a whole MgO octahedron was cut into two halves along the midpoint of edges(left)in which the Bi calibrant and conducting unit were placed (right);(b) is for the resistance measurement of ZnTe
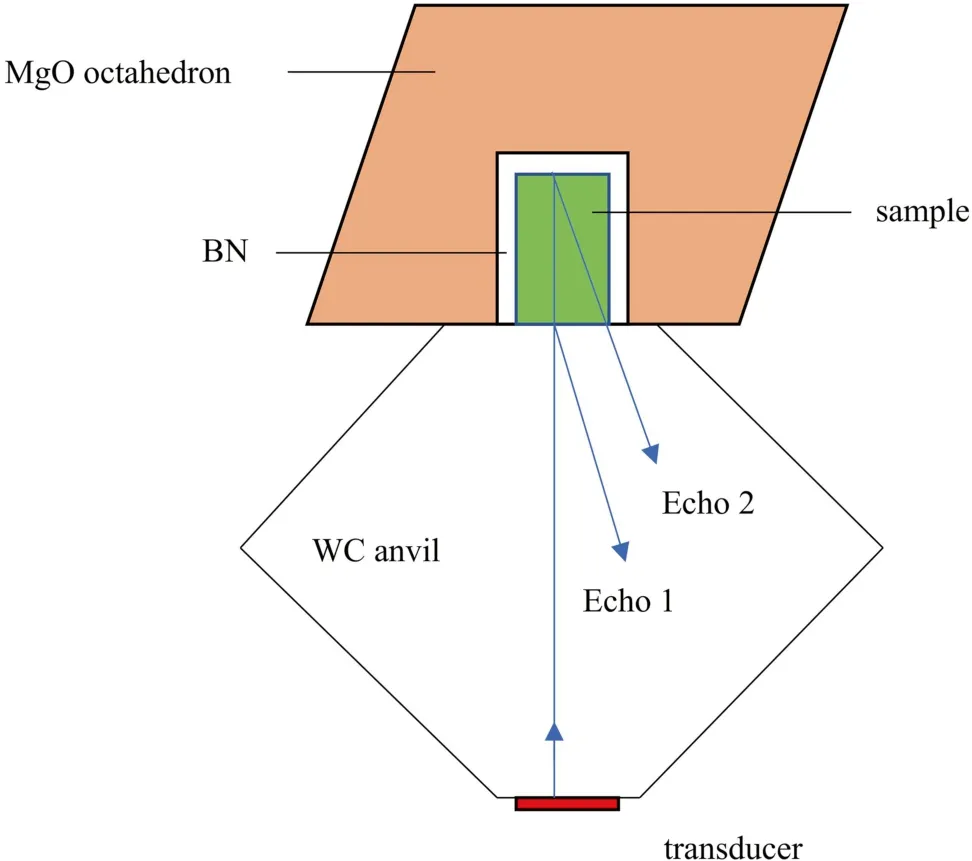
Fig.3 The schematic diagram of sample assembly for ultrasonic measurements in DS 6 × 1400 t apparatus.Echo 1:WC buffer rod;Echo 2:sample
Figure 3 shows the schematic diagram of sample assembly for velocity measurements at room temperature used in this work.The transducer was mounted on one truncation of the second anvil and this anvil thus served as the buffer rod to transmit the acoustic signal.The dense polycrystalline Al2O3sample (99.99% purity,3 mm in length,2 mm in diameter) was positioned flush with the surface of the octahedron and surrounded by boron nitride(BN,1 mm wall thickness),thereby providing a pseudohydrostatic pressure condition to prevent the sample from cracking at high pressure.A thin copper foil (0.01 mm thickness) was inserted between the WC buffer rod and sample to enhance mechanical coupling.To minimize the acoustic energy loss,all contact interfaces include the buffer rod and sample were well polished before the measurements.Al2O3was chosen as a test sample for the following reasons:(1) commercially available (2) high elastic moduli thus stable under high pressure (3) suitable acoustic impedance (4) known elastic properties in literature satisfies comparison of results.
The ultrasonic travel times were measured with the classical pulse-echo method by using a longitudinal wave 20 MHz LiNbO3transducer (BPO INC.USA),a digital oscilloscope (Tektronix DPO2024B,USA),and an ultrasonic pulse generator/receiver unit (Panametrics 5077PR,USA).A typical longitudinal wave signal observed under high pressure is shown in Fig.4.In Figs.3 and 4,Echo 1 and Echo 2 represent the longitudinal wave signal reflected from the buffer rod–sample and the sample–BN interfaces,respectively.The travel time in the sample was determined by the interval between the two corresponding peaks shown in Fig.4.The travel time measurement sensitivity is 1 ns,the travel time in the sample is about 0.5 μs,and so the relative error of the travel time in the sample is about 0.4%(considering the two values obtained from the two corresponding signals,respectively).
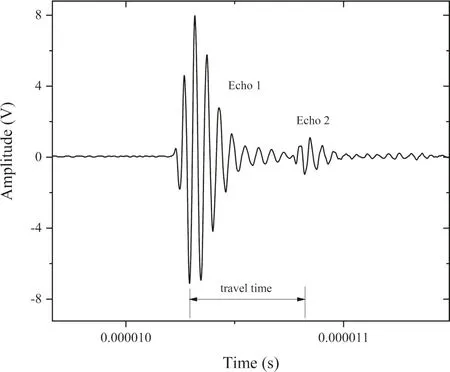
Fig.4 A typical longitudinal wave signal observed at 4 GPa.Echo 1:WC buffer rod;Echo 2:sample
3 Results and discussion
The results of electrical resistance measurements are shown in Fig.5 for Bi and Fig.6 for ZnTe,from which the phase transitions can be easily recognized directly.As can be seen in Fig.5,it is obvious that around oil pressure 2.48(±0.1) MPa and 8.48(±0.2) MPa,the resistance starts to decrease sharply,corresponding to the phase transitions of Bi I-II and III-V,respectively.
For the criteria of phase transition points,it normally consists of the turning point and the midpoint method,which may have little difference as the process of phase transition is quick enough.Some investigators suggested that the pressure at which the phase transition starts is slightly higher than the thermodynamic equilibrium pressure of phase transition,which is the fixed-point pressure scale of a given pressure calibrant (Xie 1997).In this situation,the midpoint method seems to be more accurate.In this way,we used the midpoint method to determine phase transition points in Fig.5.But even so,it may have little effect on the pressure calibration.
In Fig.6,the behavior of resistance change of ZnTe was quite similar to that in the previous studies (Ohtani et al.1980;Kusaba et al.1993;Nishiyama et al.2008),a turning point appears at oil pressure 9.45(±0.3)MPa,at which the electrical resistance started increasing,corresponding to the phase transition of ZnTe LPP-HPP I.The phase transition of ZnTe HPP I-II is determined by the midpoint of a large resistance decrease of four orders of magnitude,that is 15.68(±0.2)MPa oil pressure.Different from the processes of phase transitions of Bi in Fig.5,the processes of phase transitions of ZnTe in Fig.6 are relatively slower,especially the ZnTe LPP-HPP phase transition,at which the turning point of resistance increasing is quite clear.On the other hand,when focusing on the part where the resistance decreases fastest in the ZnTe HPP I-II transition,the phase transition point becomes clear and accurate.In this way,we routinely used the turning point method in the ZnTe LPPHPP transition and midpoint method in the ZnTe HPP I-II transition to determine phase transition point,respectively.
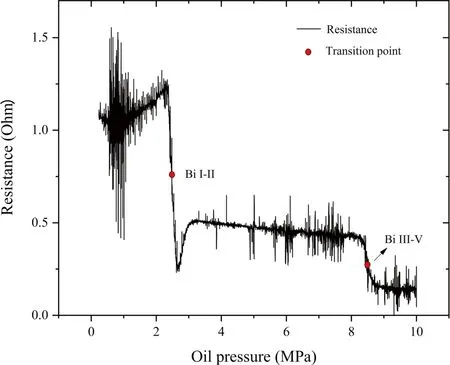
Fig.5 Resistance change of Bi as a function of oil pressure
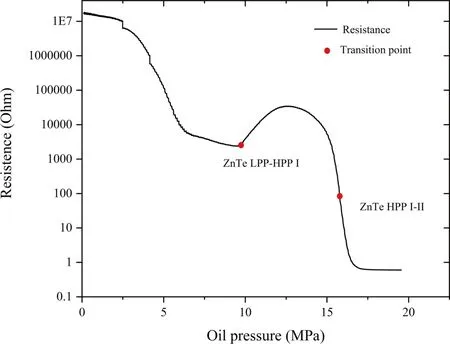
Fig.6 Resistance change of ZnTe as a function of oil pressure
In addition,there is another anomaly around 6.4 MPa,at which the trend of reduction in resistance is noticeably slower.But compared with the two other higher-pressure anomalies,which could be explained by volume change at phase transitions in ZnTe,this anomaly was attributed to a change of band gap in the zinc blende type ZnTe and there is no phase transition occurs near this anomaly.
Consequently,with the known phase transition pressure of Bi and ZnTe calibrants,combining the four observed points and the zero-pressure value,the pressure can be calibrated and the result is shown in Fig.7.After polynomial fitting,the pressure calibration curve is expressed asP(GPa)=-0·0293P2oil+1·2374Poil-0·1456,wherePoilis oil pressure in MPa.According to Decker et al.(1972)and Kusuba et al.(1993),the errors of phase transitions pressure were 0.006 GPa for Bi I-II,0.18 GPa for Bi III-V,0.2 GPa for ZnTe LPP-HPP I,and 0.2 GPa for ZnTe HPP I-II,so the maximum pressure error in this study is estimated to about 3%,as the system error is also taken into account.
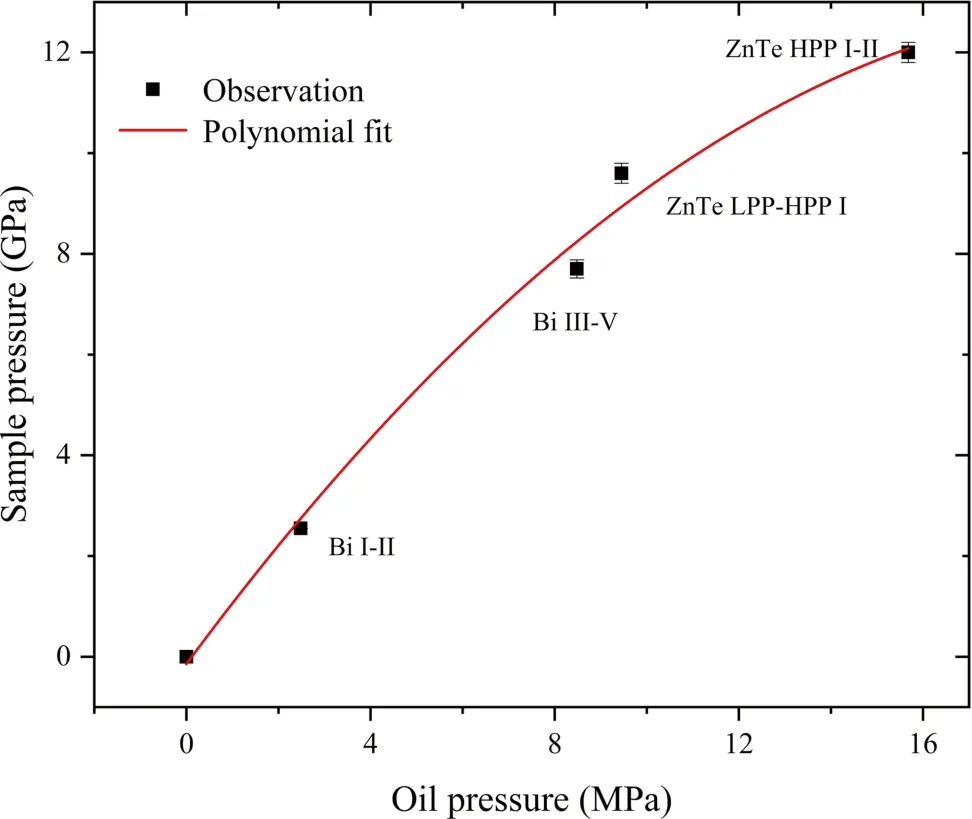
Fig.7 The relation between sample pressure and oil pressure
Note that,when using ZnTe as calibrant for pressure determination,the grain size effect of the starting material should be given attention,since the ZnTe HPP I-II phase transition pressure is 12 GPa for powdered ZnTe and 13 GPa for single crystal ZnTe,respectively.The ZnTe LPPHPP phase transition pressure is independent of such a grain size effect (Kusuba et al.1993).
While ultrasonic experiments can obtain precise measurements of travel times,the length of the sample is needed for the calculation of wave velocities at high pressure.In the case of lacking X-ray sources (X-radiography),the length of the sample at high pressure is dependent on correct computing.Normally,with the measured P and S wave travel times in the sample,the length change of the sample at high pressures can be obtained by an approach known as Cook’s method (Cook 1957;Li and Liebermann 2014).Cook’s method has been frequently used in high-pressure ultrasonic studies when direct sample length measurements were not available.But in this work,we only installed a longitudinal wave transducer that cannot obtain shear wave travel time.Alternatively,we can use a method that comprises the following empirical equation to correct the elastic shortening of the sample at high pressure (Ito et al.1977):
wherel,l0are sample length at high pressure and zero pressure,Pis pressure,KT0is zero pressure isothermal bulk moduli.Then we can use the following well-known equations to calculate the sample length:

whereKS0is adiabatic bulk moduli,α is the thermal expansion coefficient,γ is the Grüeisen parameter,T is absolute temperature,ρ0is the density at zero pressure,Vp0andVs0are compressional and shear wave velocity at zero pressure,which was measured separately at benchtop with a larger diameter sample.We found that the calculatedKS0value in this work is 1.7%less than that of Li et al.(1996),but in close agreement (<0.2%) with those of Kung et al.(2000) and Higo et al.(2006).Accordingly,the sound velocity of polycrystalline Al2O3sample at high pressure can be calculated(the used relevant parameters are listed in Table 1) and the results are shown in Fig.8.As compared with previous ultrasonic results in Fig.8,our measured results are in good agreement with those of Li et al.(1996)and Kung et al.(2000) and slightly higher than those of Higo et al.(2006).After linear fitting,the sound velocity results from this work are expressed asVp(km/s)=10·875+0·063P(GPa),R2=0.99.The average pressure derivative ofVpfrom this study is slightly higher than those previous results in Fig.8,and this is probably the combined effect of error of pressure calibration and deviator stress.The uncertainty of velocity measurement is related to the determination of sample length,travel time,and pressure.According to the above formula referring toVp,the effect of pressure error(3%)on theVpis estimated to have a maximum error of 0.2% at the highest pressure.On the other hand,when using empirical Eq.(1)to evaluate sample length at high pressure,the uncertainty of length is estimated to be about 0.2%.Then combining the uncertainty of travel time (0.4%),we believed that the whole uncertainty of sound velocity is about 1%.Therefore,it confirms not only the validation of the pressure calibration in this work but also the ability to perform sound velocity measurements close to the pressure condition of the mantle transition zone in our laboratory.
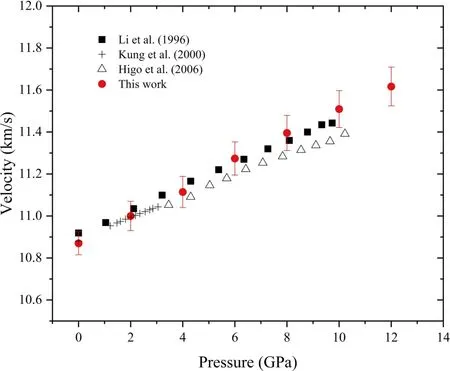
Fig.8 Comparison of sound velocity of polycrystalline Al2O3 under high pressure

Table 1 The zero pressure isothermal bulk moduli(KT0)of polycrystalline Al2O3 sample and the used relevant parameters at ambient condition for calculation
4 Conclusion
In this work,we performed the pressure calibration to 12 GPa for 14/6 type cell assembly in DS 6 × 1400 multianvil apparatus using the phase transitions in Bi (I-II 2.55,III-V 7.67 GPa) and ZnTe (LPP-HPP I 9.6 GPa,HPP I-II 12.0 GPa) at room temperature.A subsequent sound velocity experiment of polycrystalline Al2O3was conducted to test the validation of the results of the pressure calibration.Since the tested result is positive,it makes our lab become one of the few domestic labs which can perform sound velocity measurements in MAA close to the mantle transition zone pressure condition and it should be valuable to later studies of the elastic properties of mantle minerals.However,so far,there is no synchrotron X-ray source in the sound velocity measurements in MAA in China,the pressure calibration work has to be usually performed under ex situ conditions.Pressure calibration under in situ conditions should in principle get more accurate results and this is our object in the future.Meanwhile,temperature,higher pressure,andVsmeasurement also needs to be placed on the agenda for the improvement of experimental techniques.
AcknowledgementsThis work was supported by the National Natural Science Foundation of China under Grant No.41873075 and the West Light Foundation of The Chinese Academy of Sciences.
Declarations
Conflict of interestThe authors declare that they have no conflict of interest.
杂志排行
Acta Geochimica的其它文章
- Variations of methane stable isotopic values from an Alpine peatland on the eastern Qinghai-Tibetan Plateau
- Quantifying aluminosilicate manganese release and dissolution rates across organic ligand treatments for rocks,minerals,and soils
- Concentration determination of gold nanoparticles by flame atomic absorption spectrophotometry
- Evaluating soil erosion by water in a small alpine catchment in Northern Italy:comparison of empirical models
- Olivine and Cr-spinel as indicators of the petrogenesis and partial melting conditions of the high-MgO ultramafic volcanic rocks from NW Ad Dhala Province—Yemen
- Zinc,copper,and strontium isotopic variability in the Baiyangping Cu–Pb–Zn–Ag polymetallic ore field,Lanping Basin,Southwest China
