A method to interpret fracture aperture of rock slope using adaptive shape and unmanned aerial vehicle multi-angle nap-of-the-object photogrammetry
2024-03-25MingyuZhoShengyunSongFengynWngChunZhuDinzeLiuSiongWng
Mingyu Zho,Shengyun Song,*,Fengyn Wng,Chun Zhu,Dinze Liu,Siong Wng
a College of Construction Engineering, Jilin University, Changchun,130026, China
b College of Geo-Exploration Science and Technology, Jilin University, Changchun,130026, China
c Institute of Engineering Geology and Geohazards, Hohai University, Nanjing, 210098, China
Keywords: Unmanned aerial vehicle (UAV) photogrammetry High-steep rock slope Fracture aperture Interval effect Size effect Parameter interpretation
ABSTRACT The aperture of natural rock fractures significantly affects the deformation and strength properties of rock masses,as well as the hydrodynamic properties of fractured rock masses.The conventional measurement methods are inadequate for collecting data on high-steep rock slopes in complex mountainous regions.This study establishes a high-resolution three-dimensional model of a rock slope using unmanned aerial vehicle (UAV) multi-angle nap-of-the-object photogrammetry to obtain edge feature points of fractures.Fracture opening morphology is characterized using coordinate projection and transformation.Fracture central axis is determined using vertical measuring lines,allowing for the interpretation of aperture of adaptive fracture shape.The feasibility and reliability of the new method are verified at a construction site of a railway in southeast Tibet,China.The study shows that the fracture aperture has a significant interval effect and size effect.The optimal sampling length for fractures is approximately 0.5-1 m,and the optimal aperture interpretation results can be achieved when the measuring line spacing is 1% of the sampling length.Tensile fractures in the study area generally have larger apertures than shear fractures,and their tendency to increase with slope height is also greater than that of shear fractures.The aperture of tensile fractures is generally positively correlated with their trace length,while the correlation between the aperture of shear fractures and their trace length appears to be weak.Fractures of different orientations exhibit certain differences in their distribution of aperture,but generally follow the forms of normal,log-normal,and gamma distributions.This study provides essential data support for rock and slope stability evaluation,which is of significant practical importance.
1.Introduction
Discontinuities are widely distributed in rock masses and play a significant role in controlling the deformation and damage of the rock mass(Azarafza et al.,2017;Bostanci et al.,2018).Therefore,the comprehensive study of discontinuity properties is crucial for all types of rock engineering(Hammah and Curran,1998;Zheng et al.,2014;Cui et al.,2022).Accurately and efficiently obtaining parameters of rock structures is particularly vital for practical applications(Einstein et al.,1983;Eshiet and Sheng,2017;Li et al.,2017).Among various parameters of rock structures,fracture aperture is an essential indicator that describes the opening properties of discontinuities and is the most challenging to measure (Sun et al.,2020;Liu et al.,2021a).In addition to directly influencing the deformation and strength properties of rock masses,fracture aperture significantly controls the hydrodynamic properties of fractured rock masses (Gong and Rossen,2017;Frash et al.,2019).Thus,the study of natural rock fracture aperture is of significant practical importance for rock engineering (Wu et al.,2021).
Currently,the investigation methods for fracture aperture mainly include two types: field investigation (ISRM,1978) and indoor investigation (Kumar et al.,1997;Li et al.,2021;Reinhardt et al.,2022).Field investigation involves measuring the rock directly with feeler gauges or millimeter rulers.While this method is relatively simple,it is inefficient and vulnerable to subjective influences from the observer performing measurements.Moreover,the method is restricted by topography,making it challenging to measure fracture aperture on steep slopes.Indoor investigation mainly includes casting method (Hakami and Barton,1990;Yeo et al.,1998),injection method (Tsang and Tsang,1990;Hakami and Stephansson,1993),surface morphology method (Iwano and Einstein,1993),nuclear magnetic resonance (NMR) method (Xiao and Li,2011),computer aided tomography (CAT) (Keller,1998),and digital image processing technology (Mazumder et al.,2006;Torkan et al.,2022).This type of method mainly uses rock samples collected on-site or self-made samples and specialized equipment to obtain fracture aperture information (Gentier,1990).Its advantages lie in the ability to replicate or restore the morphology of fractures and the high accuracy of interpretation(Liu et al.,2021b).However,this type of method requires expensive equipment,complex operation procedures,and special requirements for the shape and size of rock samples (Song et al.,2021).With the continuous expansion of various rock engineering projects in terms of scale and quantity,higher demands have been placed on the acquisition of rock mass structural parameters (Bostanci et al.,2018;Zhan et al.,2021;Lan et al.,2022).Due to the inaccessibility of high-steep slopes,both field investigation and indoor investigation methods cannot meet the technical requirements of modern rock engineering for rapid construction.Therefore,there is an urgent need to research a new non-contact method for identifying and interpreting fine parameters of rock mass fractures.
In recent years,unmanned aerial vehicle (UAV) technology has become more mature,with significant improvements in attitude control and sensor performance (Johansen et al.,2019;Rahman et al.,2021;Xiu et al.,2021).This has enabled the use of UAV technology to acquire high-resolution images and interpret fine parameters of rock mass structure(Salvini et al.,2020).Lopes et al.(2022)employed UAV photogrammetry to obtain fracture aperture from orthophoto images of the study area.However,this method is limited in that it can only identify crack aperture on the horizontal plane and is unable to account for cracks on the side of the slope.This method is unable to interpret discontinuity orientation,resulting in limited types of obtainable rock mass structural parameters(Salvini et al.,2017;Bar et al.,2021).This indicates that the conventional UAV photography cannot fully meet the requirements of explaining the fine parameters of rock mass structure in highsteep slopes (Liu et al.,2022).Due to the limited research on fracture aperture measurement using UAV technology,further investigation is necessary to optimize UAV photography for identifying and interpreting complex structures on high-steep slopes.Additionally,exploring a new method for interpreting fracture aperture based on high-resolution UAV image is necessary for practical engineering applications.
This study proposes a UAV multi-angle nap-of-the-object photogrammetry that fully considers the terrain features of complex structures on high-steep slopes and the geometric characteristics of developed discontinuities,based on conventional UAV napof-the-object photogrammetry.A new method is presented for the identification and interpretation of linear discontinuities based on high-resolution three-dimensional (3D) real scene models of slopes.The aperture values are automatically calculated and analyzed in batches based on the edge feature points of the fracture,which is implemented through programming.In addition,the interval effect,size effect,probability distribution characteristics of fracture aperture in the study area,as well as their relationship with trace length and slope altitude,are investigated.This study has important practical engineering significance for the rapid acquisition of fine parameters of high-steep rock slopes,as well as the evaluation of slope stability and block stability.
2.Study area
The research area is located in Xiali Township of Changdu City,Tibet Autonomous Region,China(Fig.1a),and is characterized by a typical mountain-canyon geomorphology.The valley exhibits a typical V-shaped cross-sectional profile,and the vertical variation of the terrain is quite significant.The lowest point is about 3300 m above sea level and the highest point is about 4000 m above sea level.The strata exposed in the study area are mainly the Quaternary,the Jurassic,Triassic of the Mesozoic era,and the Permian of the Paleozoic era.The lithology of the strata mainly consists of three formations.The Middle Jurassic Marix Formation (J2m) is dominated by grey conglomeratic sandstone,purple-red conglomerate,and thinly interbedded grey limestone.The Upper Triassic Guzhutong Formation (T3gz) is mainly composed of light grey siliceous banded limestone,siliceous rock,and shale.The Permian Xijikar Formation(Pz2xj)is primarily composed of muscovite quartz schist,sodic greenish-brown clayey schist,crystalline limestone,and quartzite (Huo,2020) (Fig.1b).
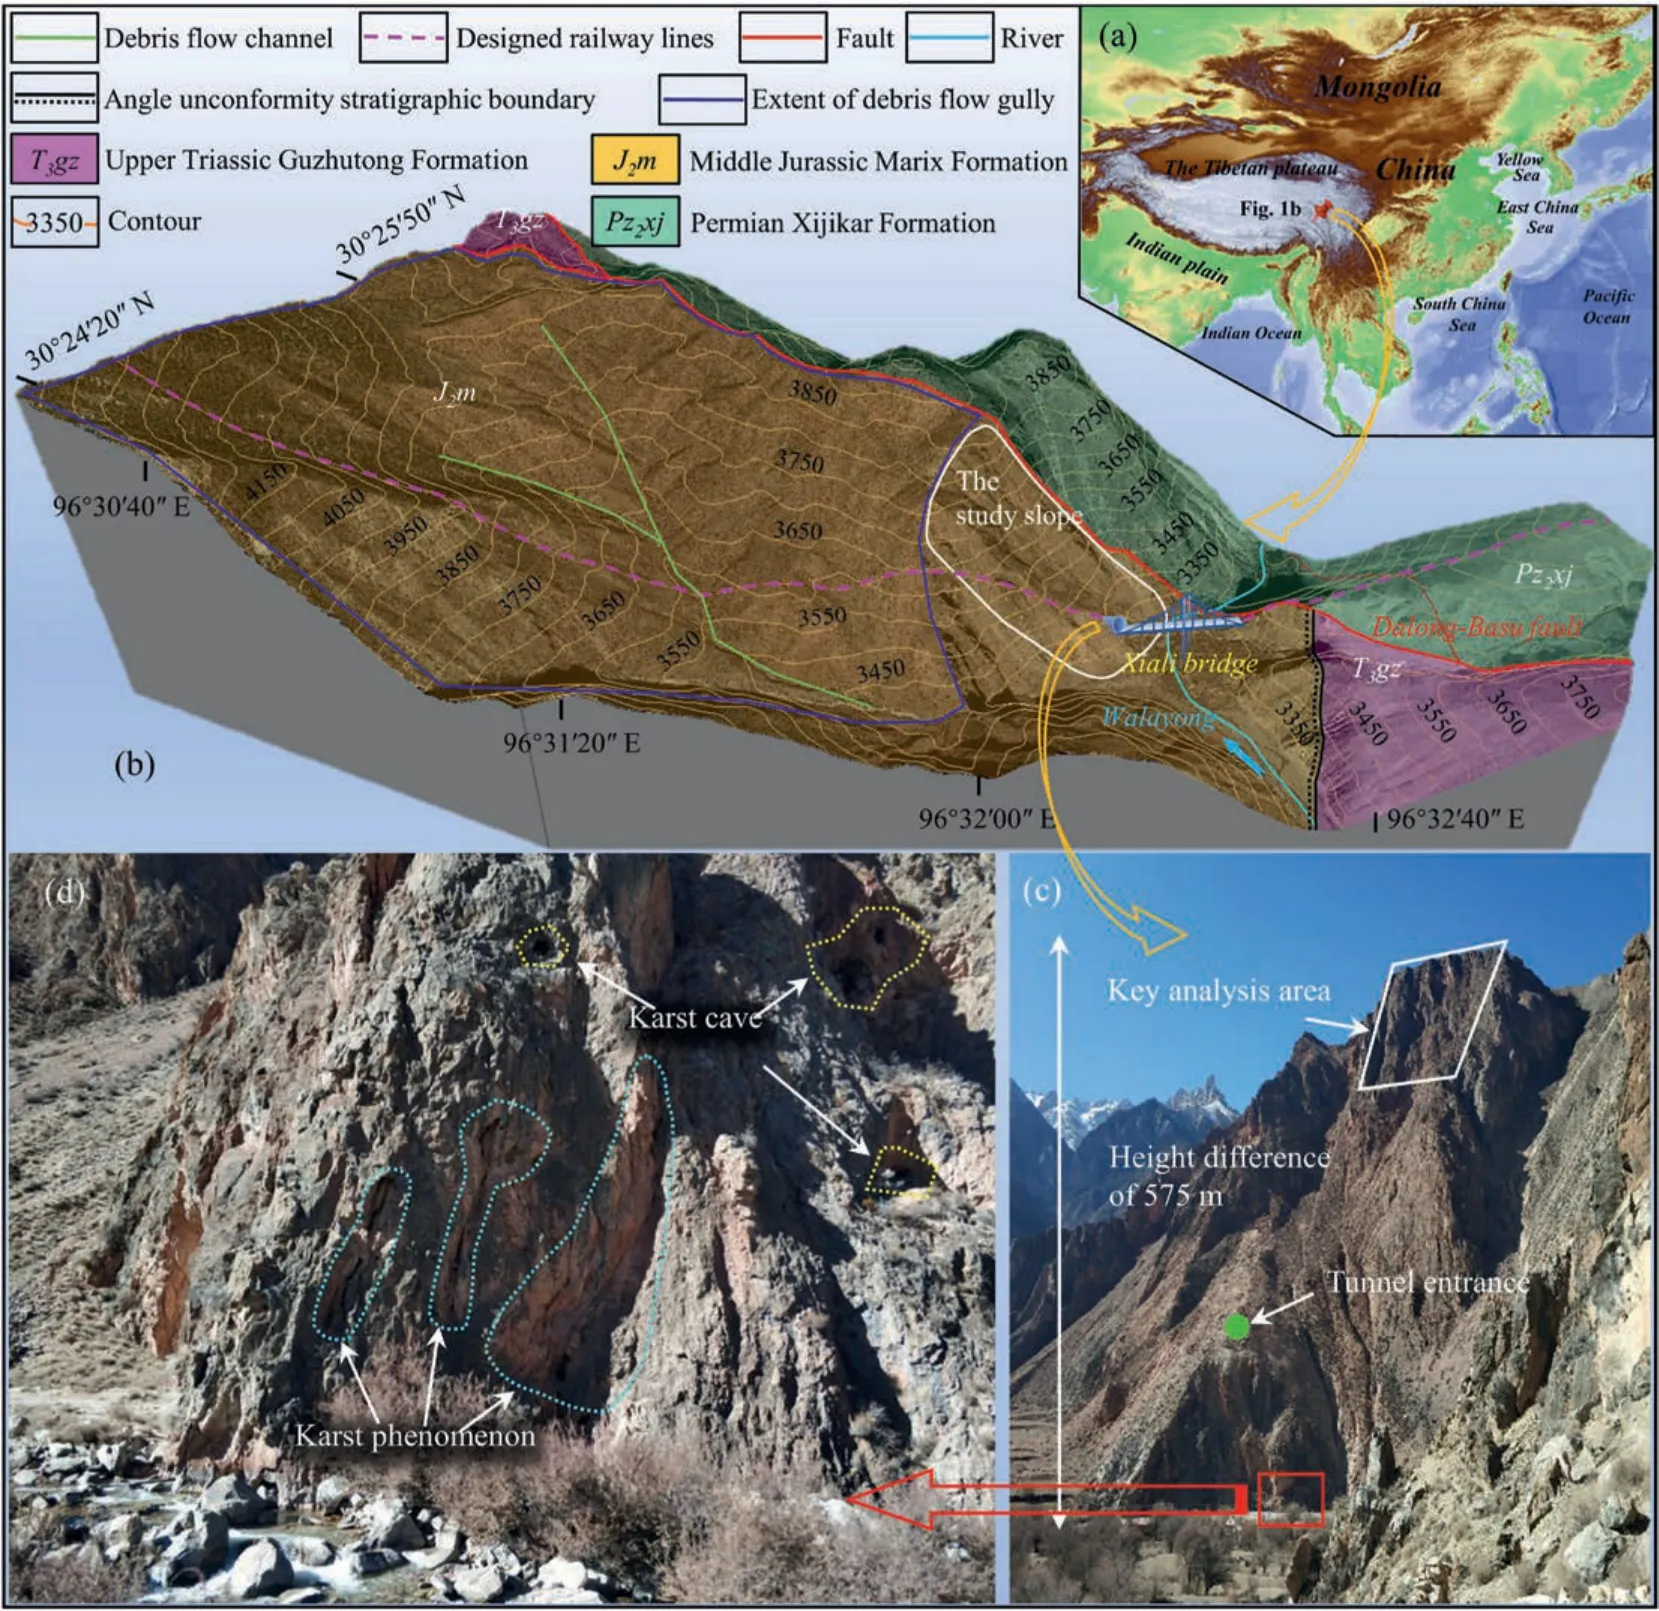
Fig.1.Geographical location and geological background of the study area:(a)The geographical location of the study area,(b)A 3D geological map of the study area,(c)An overall photo of the slope,and (d) The karst phenomenon developed at the bottom of the slope.
The Dalong-Basu Fault is developed in the study area,which is a large regional fault with a northwest bending extension.The fault fragmentation zone is about 200 m wide,and there are extrusion fragmentation zones ranging from 50 m to 350 m.Influenced by the uplift of the Himalayas,the tectonic stress in the study area gradually increases,and seismic activity is frequent.The seismic intensity in the study area is VIII,which is a medium-intensity seismic zone(Shi et al.,2021).The area is controlled by the climate of the Tibetan Plateau,with dry weather and low rainfall.The Walayong river passes through the study area from south to north and is mainly recharged by rainfall and snow melt water.The loose rock pore water is mainly stored in the alluvium,alluvium,broken residual layer,and moraine layer of the Quaternary System (Shi,2021).
On-site investigations revealed that the overall strike of the slope is approximately NE22°,with a slope angle of 51°and a height of 575 m (Fig.1c).The lithology of the slope location is mainly composed of conglomerate and limestone.The slope develops a large number of discontinuities,which can be roughly divided into four sets,among which the steeply dipping discontinuities with a dip direction of 45°are the most developed.The rock mass exhibited a blocky structure.The slope bottom is close to a river,and the groundwater level is relatively high.The development of laminated or platy structure in the rock mass facilitated the infiltration and dissolution of water,resulting in the discovery of multiple karst phenomena at the slope bottom (Fig.1d).A debris flow gully with a large watershed area is developed in the western part of the study area,which often causes different degrees of debris flow hazards to the downstream.
A railway is planned to be built in the study area,and a Xiali bridge will be constructed in the eastern gully to connect the tunnels on both sides.Investigating the stability of the rock mass above the tunnel entrance and analyzing the disaster-causing mechanism of high-level hidden collapse and rock fall are critical to the management and safe operation of the railroad.There is an urgent need for new and reliable methods to rapidly obtain structural parameters of rock masses for slope and block evaluation and analysis.This study aims to provide a new method for interpreting the aperture of fractures in complex and steep rock slopes in rock engineering.Thus,the focus of this study is on the collection and analysis of aperture of fractures in rock masses.
3.Methods
3.1.The multi-angle nap-of-the-object photogrammetry
To obtain high-resolution UAV images of high-steep rock slope,a multi-angle nap-of-the-object photogrammetry technique is proposed.The core technology includes four parts: site survey,acquisition of low-resolution 3D terrain in the survey area,multi-angle nap-of-the-object photography strategy design and image acquisition,UAV image quality enhancement and 3D modeling.Fig.2 shows the key technical steps of multi-angle nap-of-the-object photography.
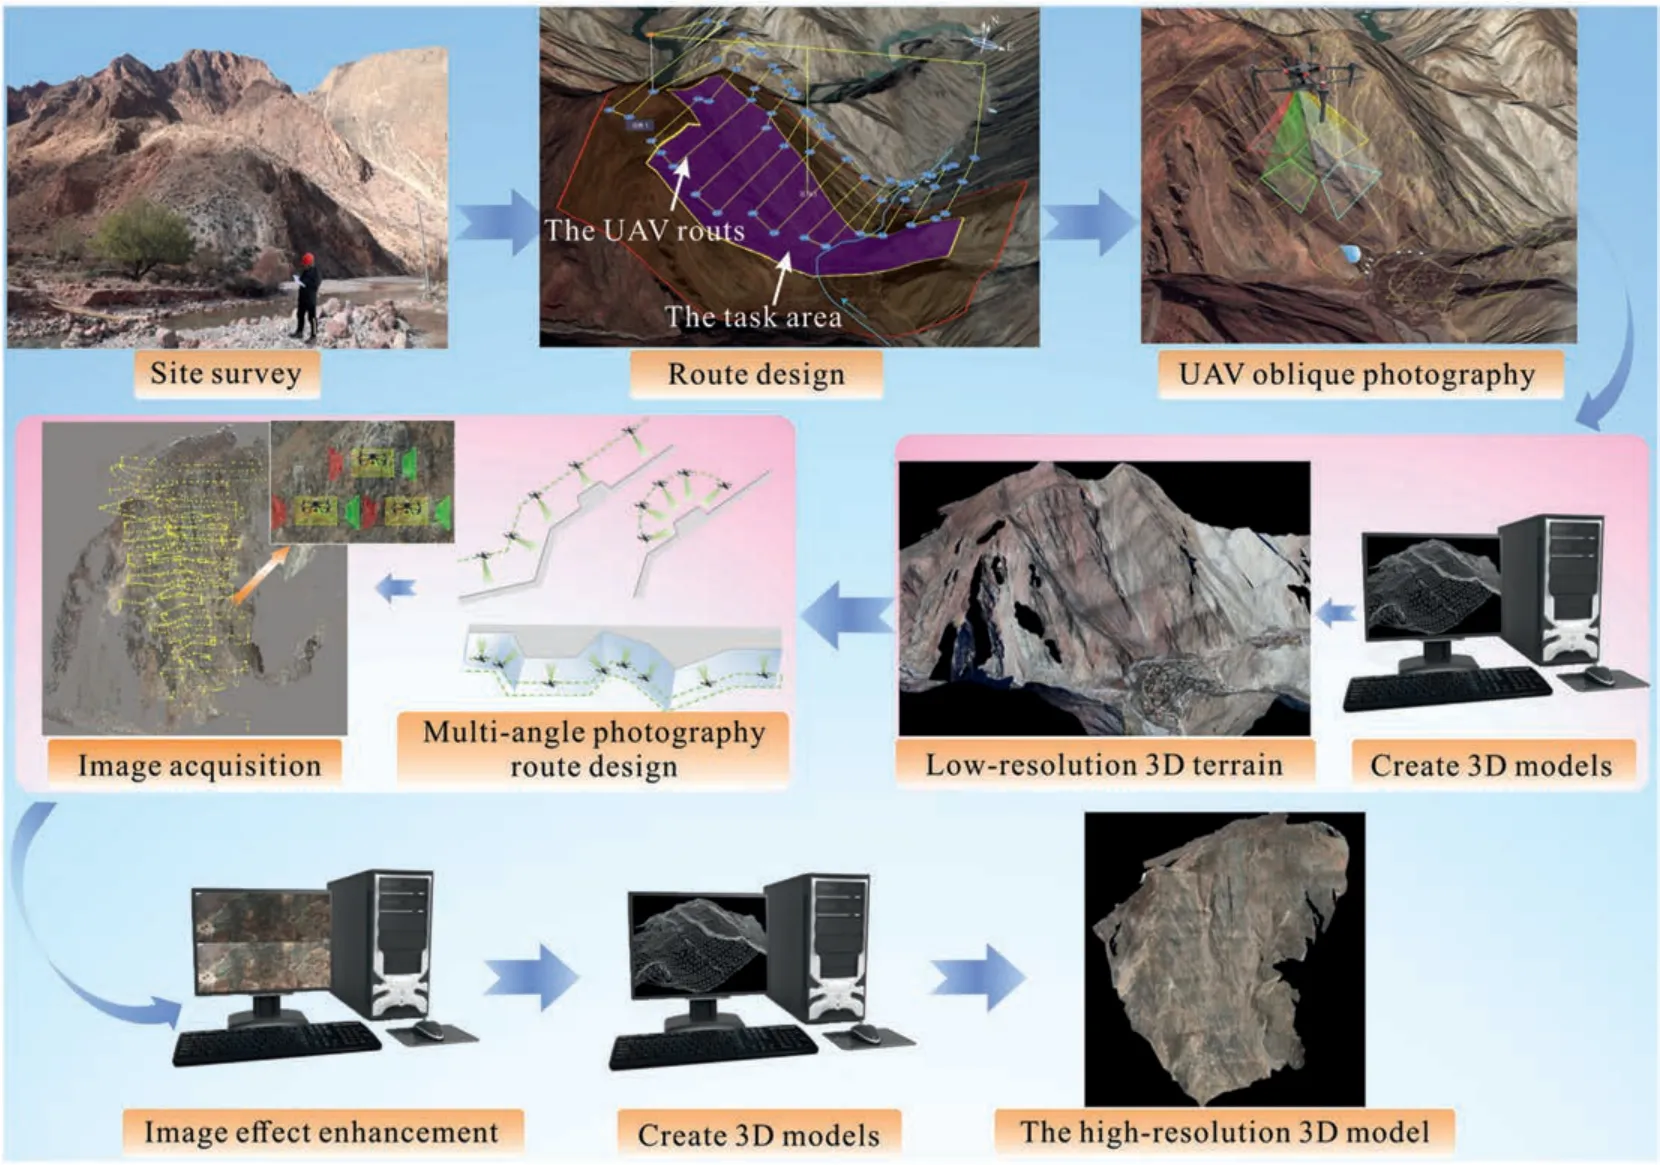
Fig.2.The technical process of multi-angle nap-of-the-object image acquisition.
The initial step involves a site survey to determine the slope morphology of the study area,collect fundamental parameters of the slope and rock structure,and identify the optimal landing site for on-site UAV photography.
The second step involves using oblique photogrammetry supported by terrain-following flight technology to obtain lowresolution 3D terrain data of the study area (Lee et al.,2022;Ren et al.,2022).These data serve as a crucial reference for designing multi-angle nap-of-the-object photogrammetry flight paths.
The third step involves designing a multi-angle nap-of-the-object photogrammetry strategy and acquiring images.The slope terrain and discontinuity features are analyzed using the 3D terrain data from the previous step.This includes measuring the slope height and width,determining the position distribution of key target areas,assessing the dominant orientation of discontinuities.Key target areas include complex raised blocks,reverse slope surfaces and areas prone to occlusion.Next,the position of each flight path is manually set in DJI Terra software based on the required photography distance and the undulating topography of the slope.It is recommended to design the flight paths in an S-shape from the foot to the top of the slope.The design of the photography angles should include both vertical to the slope surface and perpendicular to each set of discontinuities.For key target areas,additional photography angles and image overlap should be appropriately increased to achieve complete coverage.
The number of routes to be designed in the horizontal direction(x) can be calculated according to Eq.(1).Its flight speed in the horizontal and vertical directions (Vh,Vp) needs to be calculated according to Eqs.(2) and (3) (Fig.5a and c).
whereais the sensor pixel dimension;fis the focal length of the camera lens,his the frontal overlap,pis the side overlap,tis the time interval for the UAV to take pictures,His the slope height,Chis the number of pixels on the long side of the sensor,Cpis the number of pixels on the short side of the sensor,andDmeans the photography distance.
To fully exploit the potential of multi-angle nap-of-the-object images,partial image quality enhancement is required prior to 3D modeling.For multiple images with similar scenes and lighting conditions,the FeiMa company’s UAV Manger software can use one image as a template to achieve color and brightness consistency by adjusting the color space components of other images to match those of the template image.For a small number of images with different scenes and lighting conditions,the brightness and color characteristics of the images can be manually adjusted using Photoshop software.The goal is to achieve overall color balance within each individual image,minimizing significant differences in brightness.Enhanced images are more effective for identifying and interpreting fracture aperture,according to experimental results.Finally,a high-quality real scene 3D model of the slope is created in OSGB format using DJI Terra software,for use in interpreting rock mass structural parameters.
3.2.Fracture identification and aperture interpretation
3.2.1.Fracture identification and orientation calculation
Based on the basic characteristics of the naturally exposed discontinuities,they can be grouped into two categories.Planar outcrops can be divided into two forms: overall exposure and partial exposure(Fig.3a).Linear outcrops include linear and stepped types(Fig.3b).

Fig.3.The outcrop types of rock mass discontinuities and the selection of feature points: (a) Planar outcrop,and (b) Linear outcrop.
Theoretically,the discontinuity plane can be characterized by taking 3 non-collinear feature points on the discontinuity.However,when the roughness of the discontinuity is large,the location of the points will seriously affect the characterization results.Therefore,it is recommended to treat the visible exposed area of the discontinuity as an irregular polygon and to take the corner points of its edges as the feature points for measurement.Fig.4 shows the schematic diagram of the discontinuity orientation interpretation principle.
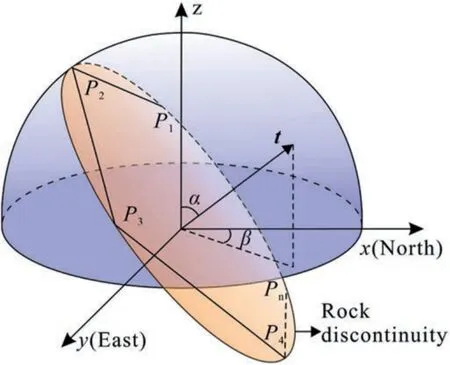
Fig.4.Representation of the rock discontinuity orientation.
Suppose thatn(n≥3)feature pointsPi(xi,yi,zi),(i=1,2,…,n)are measured on a discontinuity,the equation of the discontinuity can be expressed asz=Ax+By+C.Then,the dip direction(β)and the dip (α) of this discontinuity can be solved using the following algorithm (Song et al.,2022):
For linear outcrops,the principle of orientation solving is the same.When measuring feature points,the stepped outcrop requires measuring corner points at each corner.For linear outcrops,it is sometimes necessary to extend an additional point,within a controlled range,to determine that fracture plane.This requires the surveyor to have knowledge and experience of discontinuity development,otherwise,it will lead to large deviations.
3.2.2.Aperture interpretation algorithm with adaptive fracture shape
This study focuses on the identification and interpretation of linear fracture apertures.The specific processes are described as follows.
Step 1 is the feature points measurement.On the slope 3D model,measure all vertices of the irregular polygon along the open edge of the fracture(Fig.5a).To ensure the real shape of a fracture,the edge inflection points should be measured as much as possible.

Fig.5.The principle diagram for aperture interpretation:(a)Measurement and projection of open edge feature points for linear outcrops,(b)The conventional vertical line method,and (c-e) Adaptive fracture shape method with different measuring line spacing.
Step 2 is the Feature points projection.The opening of rock fractures has some undulation and is not a flat ideal state.To accurately interpret the vertical distance between two rock walls,all edge feature points of the fractures need to be projected onto a plane perpendicular to the fracture plane (Fig.5a).
Then,all edge feature points of the fractures are projected onto the projection plane.Assuming that the coordinate of the feature point isP(x0,y0,z0),a perpendicular line is drawn fromPto the projection plane,resulting in the footPt(xt0,yt0,zt0).ThePtis the projected point to be found.
In Step 3,although the projected feature points are on the same plane,they still represent a mathematical problem in 3D space.To simplify subsequent data processing and facilitate graphical representation,Wang et al.(2020)’s method is introduced for coordinate system transformation.After transformation,thez-coordinate of all feature points becomes 0,simplifying the mathematical problem from 3D space to a 2D plane.In the new coordinate system,the line connecting the two endpoints of the fracture is defined as thex-axis,and the direction perpendicular tox-axis passing through the third point is defined as they-axis.The specific procedure of coordinate system transformation is as follows:
(1) To achieve a transformation from coordinate systemO-XYZtoP1-X′′Y′′Z,the two endpoints of the fractureP1(x1,y1,z1)andP2(x2,y2,z2),and a non-collinear third pointP3(x3,y3,z3)are selected,and a translation(O→P1)and counterclockwise rotation around thez-axis by an angle εZis applied:
where 1/λ is the scaling.
When ΔX21=0,we have
(2) A transformation from coordinate systemP1-X′′Y′′ZtoP1-X′Y′′Z′′is achieved by rotating clockwise around theY′′axis by an angle εY:
where
(3) A transformation from coordinate systemP1-X′Y′′Z′′toP1-X′Y′Z′is achieved by rotating counterclockwise around theX′axis by an angle εX:
Step 4 is the determination of aperture under the vertical measuring line.Connecting the feature points at the beginning and the end of the edge of the fracture after coordinate transformation draws the sketch of aperture shape (Fig.5b).Dividing the fracture edge into upper and lower parts with the end points of the fracture as the boundary,each part can be expressed in the form of a segmented function.Specifying the measuring line spacingk,measuring linesL1are laid out in sequence along the positivex-axis direction.Then,the aperture at any position of the fracture is the distance between the intersection points of the measuring line and the upper and lower edges of the fracture.It should be emphasized that this method is only suitable for straight aperture shapes.For fractures with large undulations,large interpretation differences may occur (the purple ellipse in Fig.5b).In view of this phenomenon,it is necessary to further set up measuring lines adapted to the fracture shape to solve this problem.
Step 5 is the determination of aperture adapted to fracture shape.Extract the midpoints of all the vertical measuring lines in the fourth step and connect them end to end to obtain the central axis of the fracture composed of several line segments (the blue lines in Fig.5c-e).Then extract the midpoints of each section of the central axis,and make the perpendicular lineL2of the central axis through this midpoint (the green lines in Fig.5c-e).At this time,the distance between the measuring line and the intersection points of the fracture edge is the final required aperture.
Assume that the coordinates of the midpoint of the central axis areM(xi,yi)(i=1,2,3,…,n+1),the endpoint coordinates of each segment of the central axis areJ(xi,yi)(i=1,2,3,…,n+2),and the starting and ending coordinates of the fracture arePs(xs,ys)andPe(xe,ye).The coordinates of the intersection point of the measuring lineL2and the edge line of the upper part of the fracturePu(xui,yui)can be calculated according to the following equation:
WhenJ(yi+1)-J(yi)=0,we have
WhenJ(xi+1)-J(xi)=0,we have
WhenJ(xi+1)-J(xi)≠0 andJ(yi+1)-J(yi)≠0,we have
In the same way,the coordinates of the intersection point of the measuring lineL2and the edge line of the lower part of the fracturePl(xli,yli)can be calculated.Then the aperturedi(i=1,2,3,…,n+1)at the current position can be expressed as
Then the maximum aperturedimax,minimum aperturedimin,and average aperturediavgof the fracture can be calculated.
Based on the aforementioned algorithm,the authors developed an aperture interpretation and analysis software of adaptive fracture shape (AIA).The software provides automated batch calculation,analysis,and graphical representation of the aperture based on the feature points of the fracture edge.
3.3.Aperture probability distribution test
In the study,the Kolmogorov-Smirnov (K-S) test method is used to test the probability distribution form of the fracture aperture.The main idea of the method is as follows.
For a certain sample with n observations,a step-like cumulative frequency function can be constructed by sorting them from smallest to largest (Schellhaas,1999):
wherex1,x2,…,xnare the sorted sample values.
In the K-S test,the maximum difference betweenSnand the theoretical distribution functionFnover the entire test range(Dn)is the measure of the difference between the theoretical model and the observed data:
Theoretically,Dnis a random variable whose distribution depends on the size ofn.For a specific confidence level α,the K-S test compares the maximum value observed inDn=max|F(x)-Sn(x)|with the critical valueDαn(Schellhaas,1999;Zhang et al.,2010):
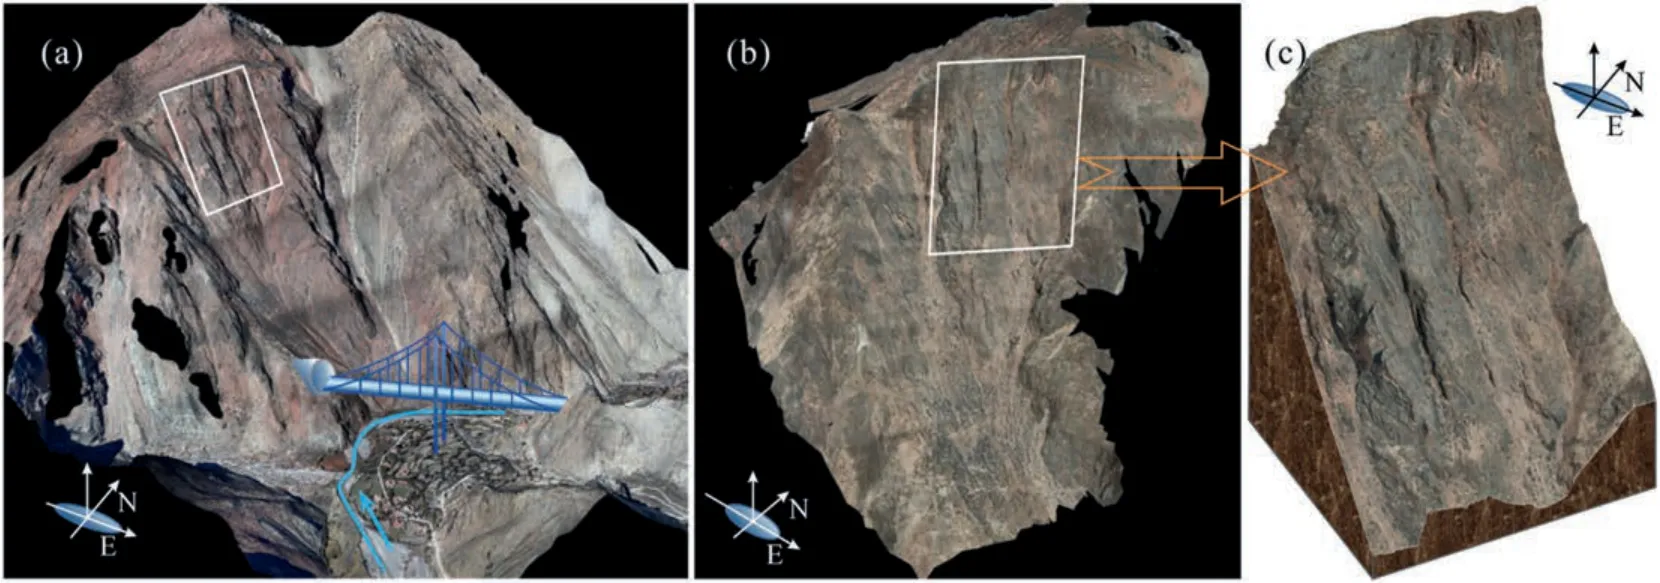
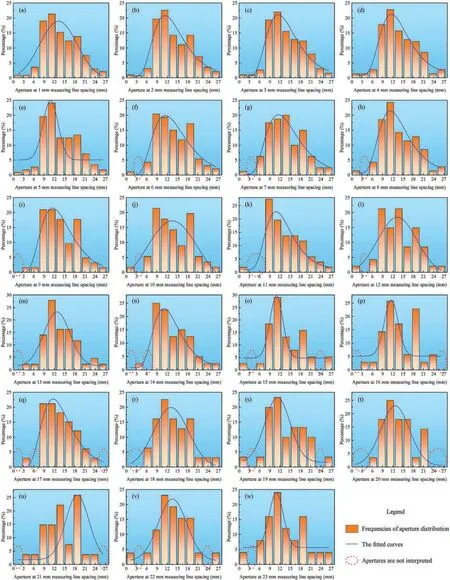
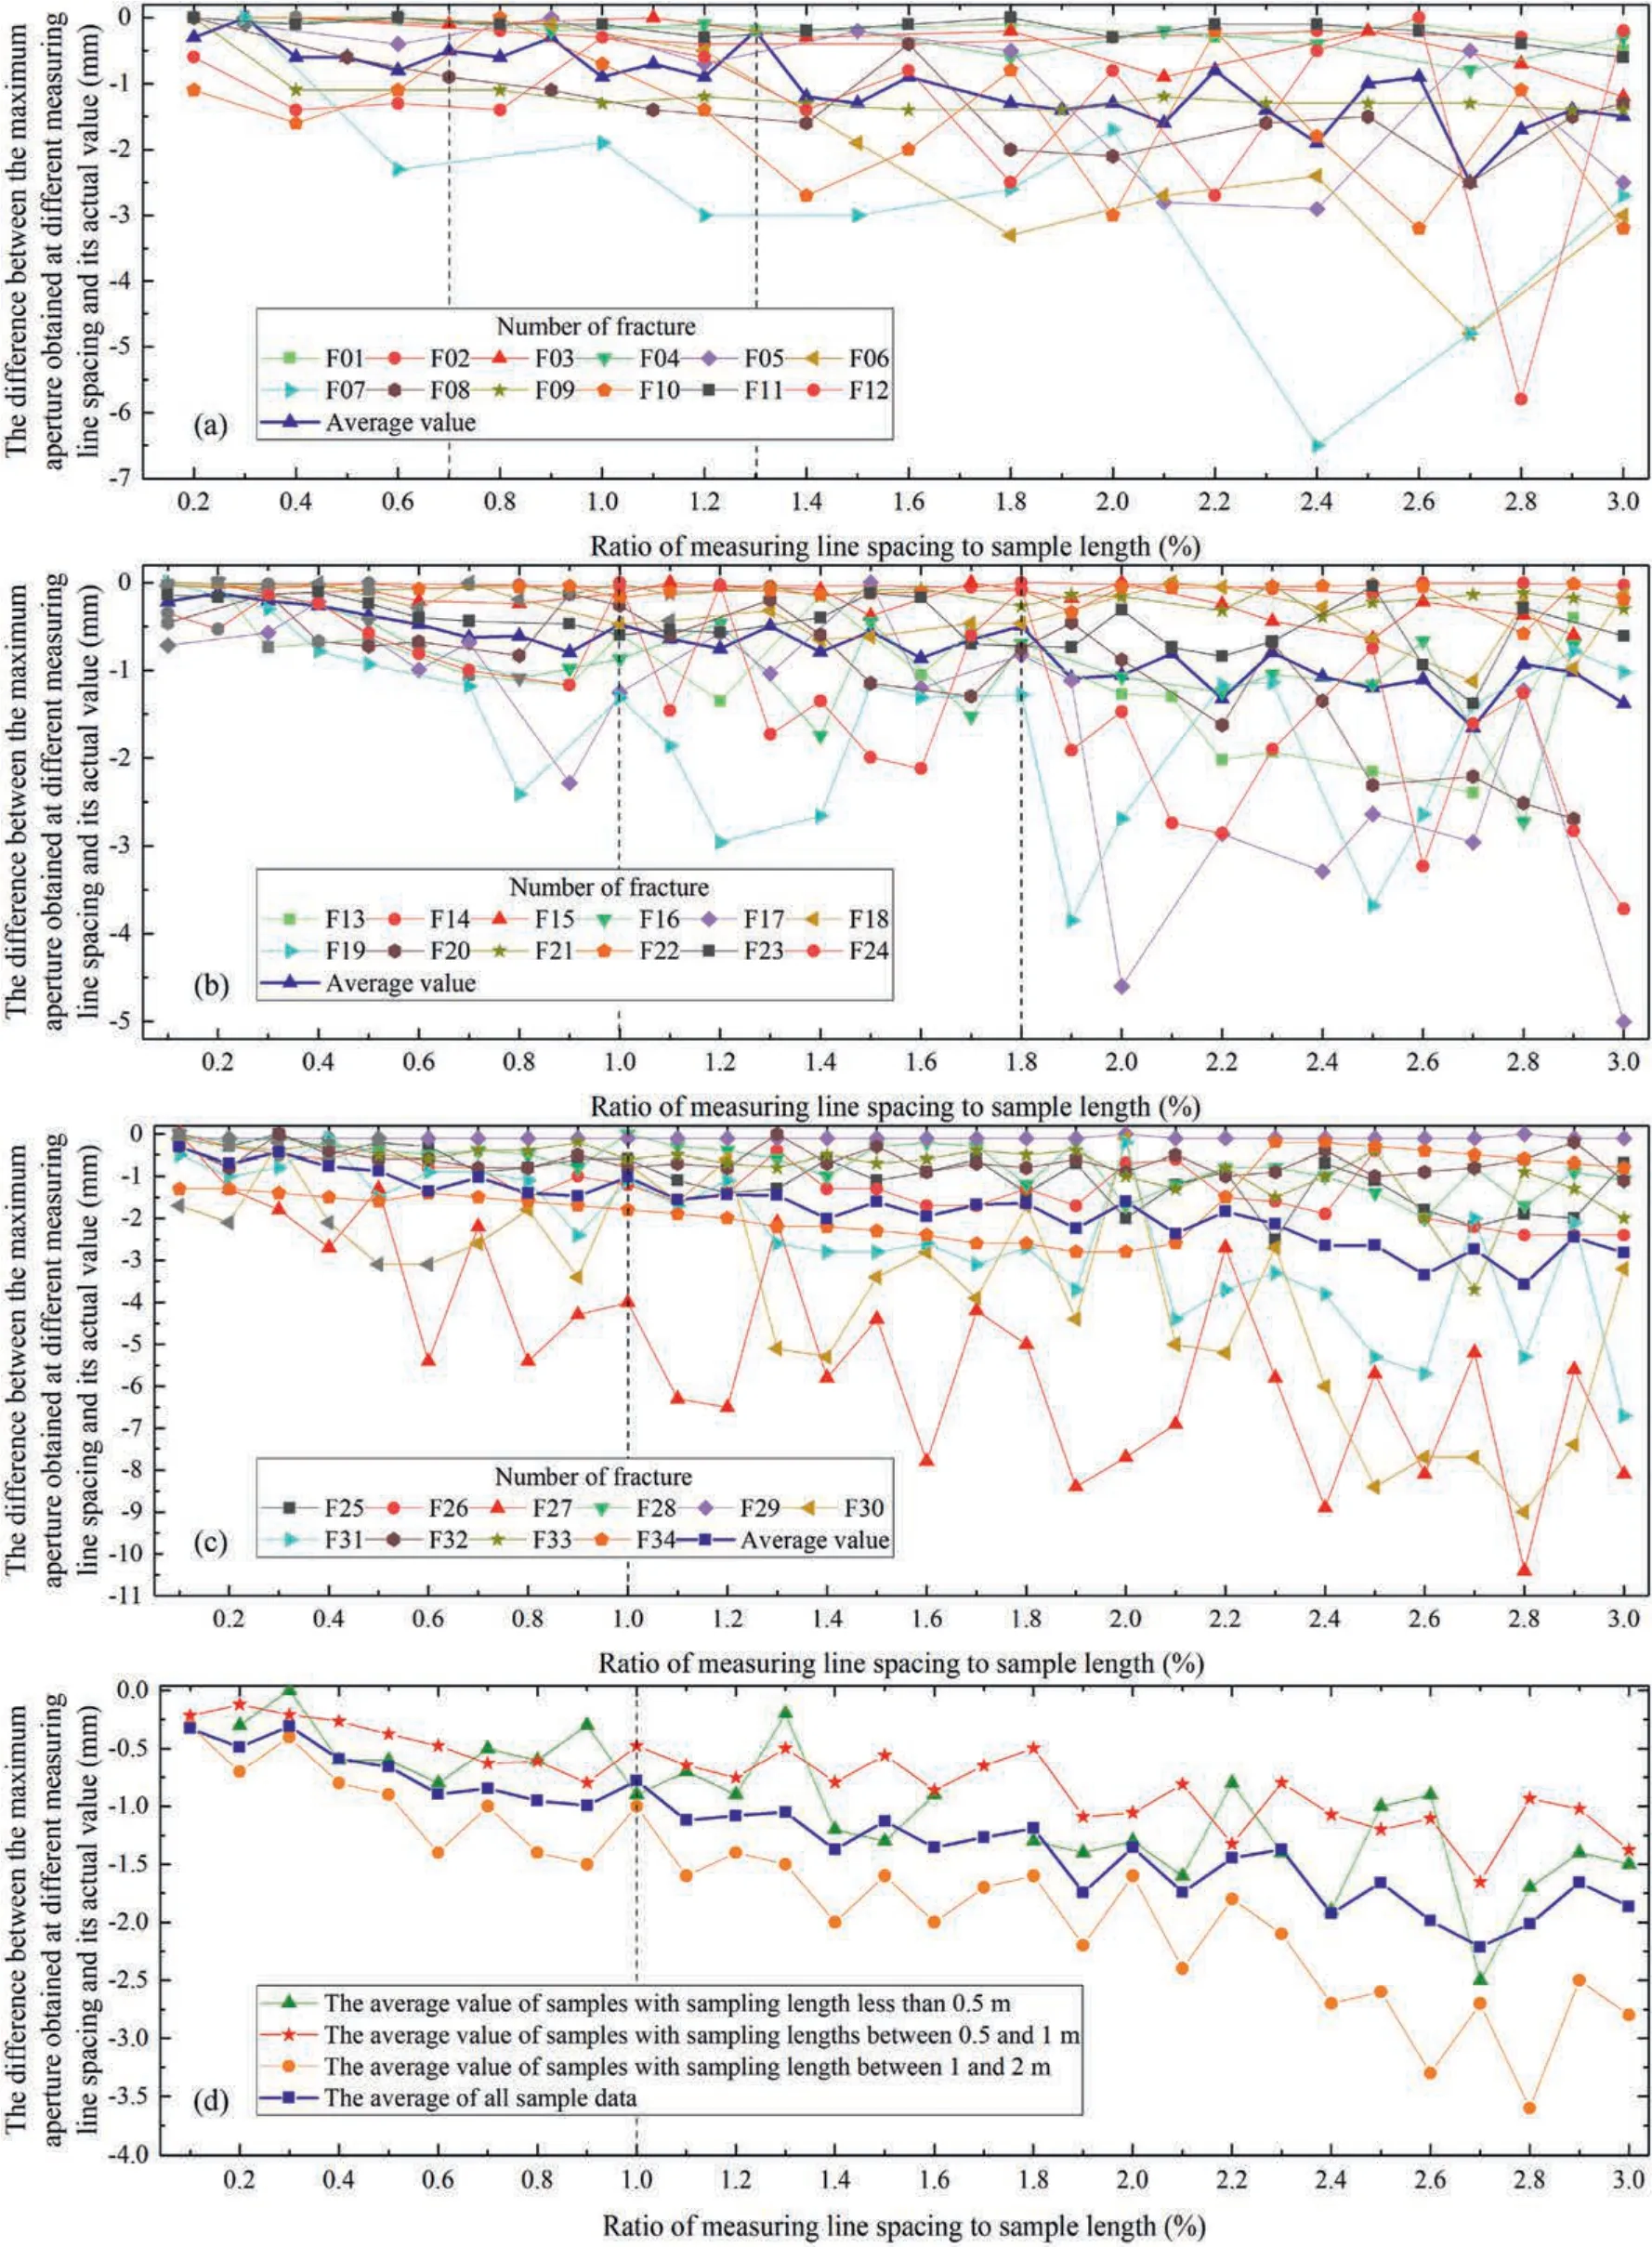
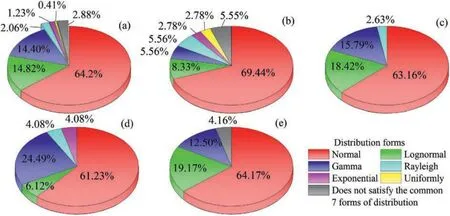
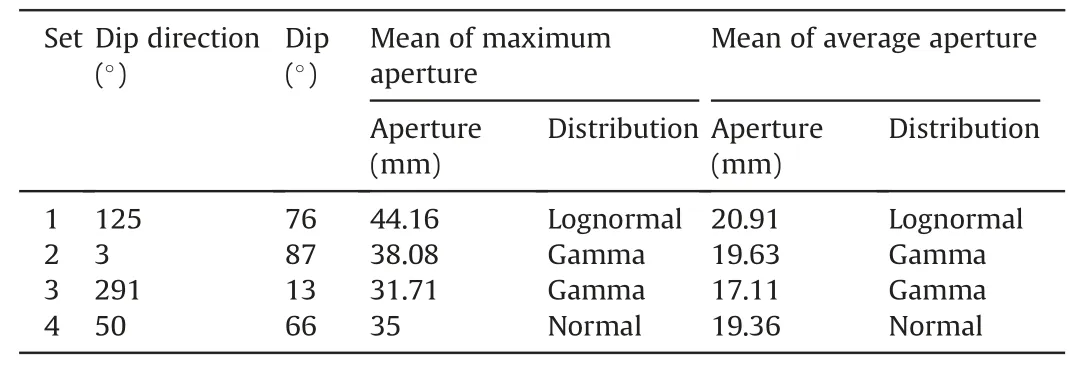
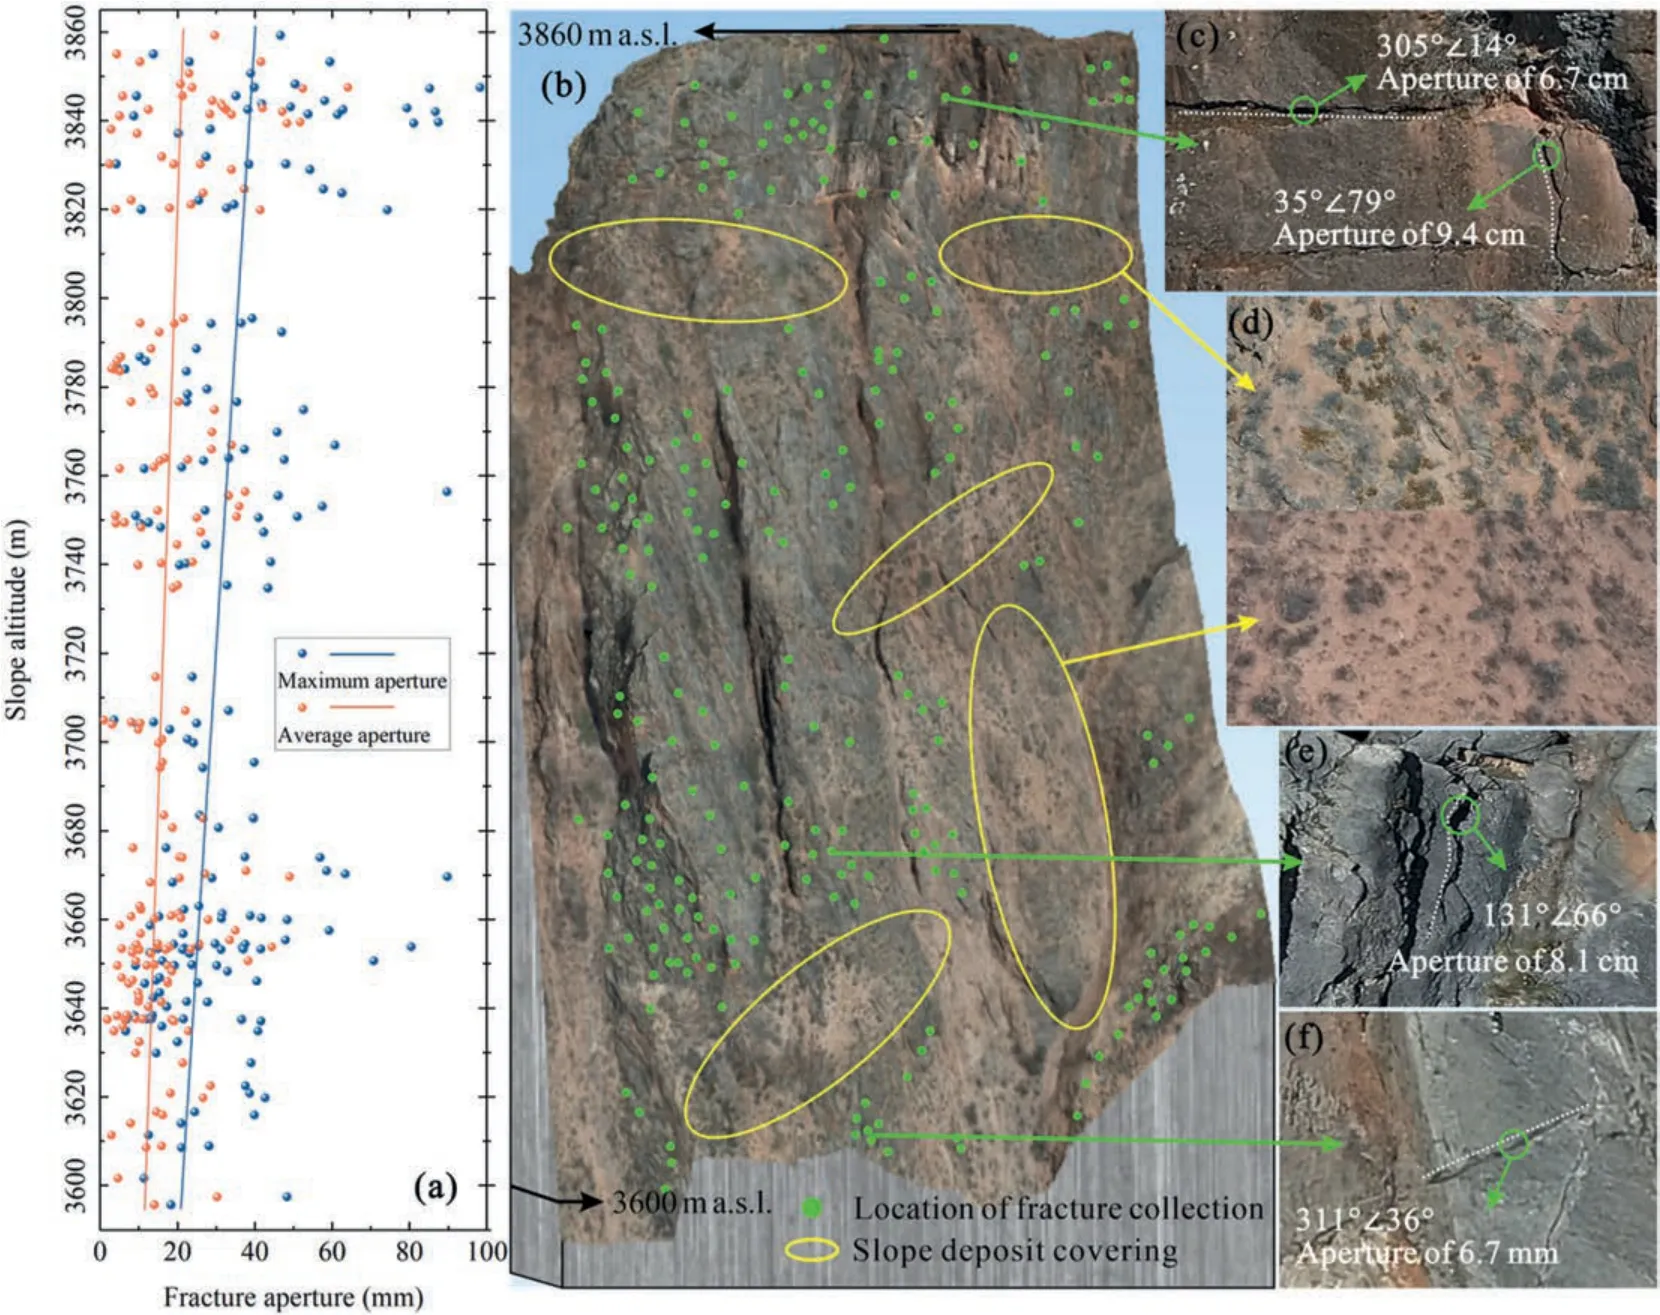
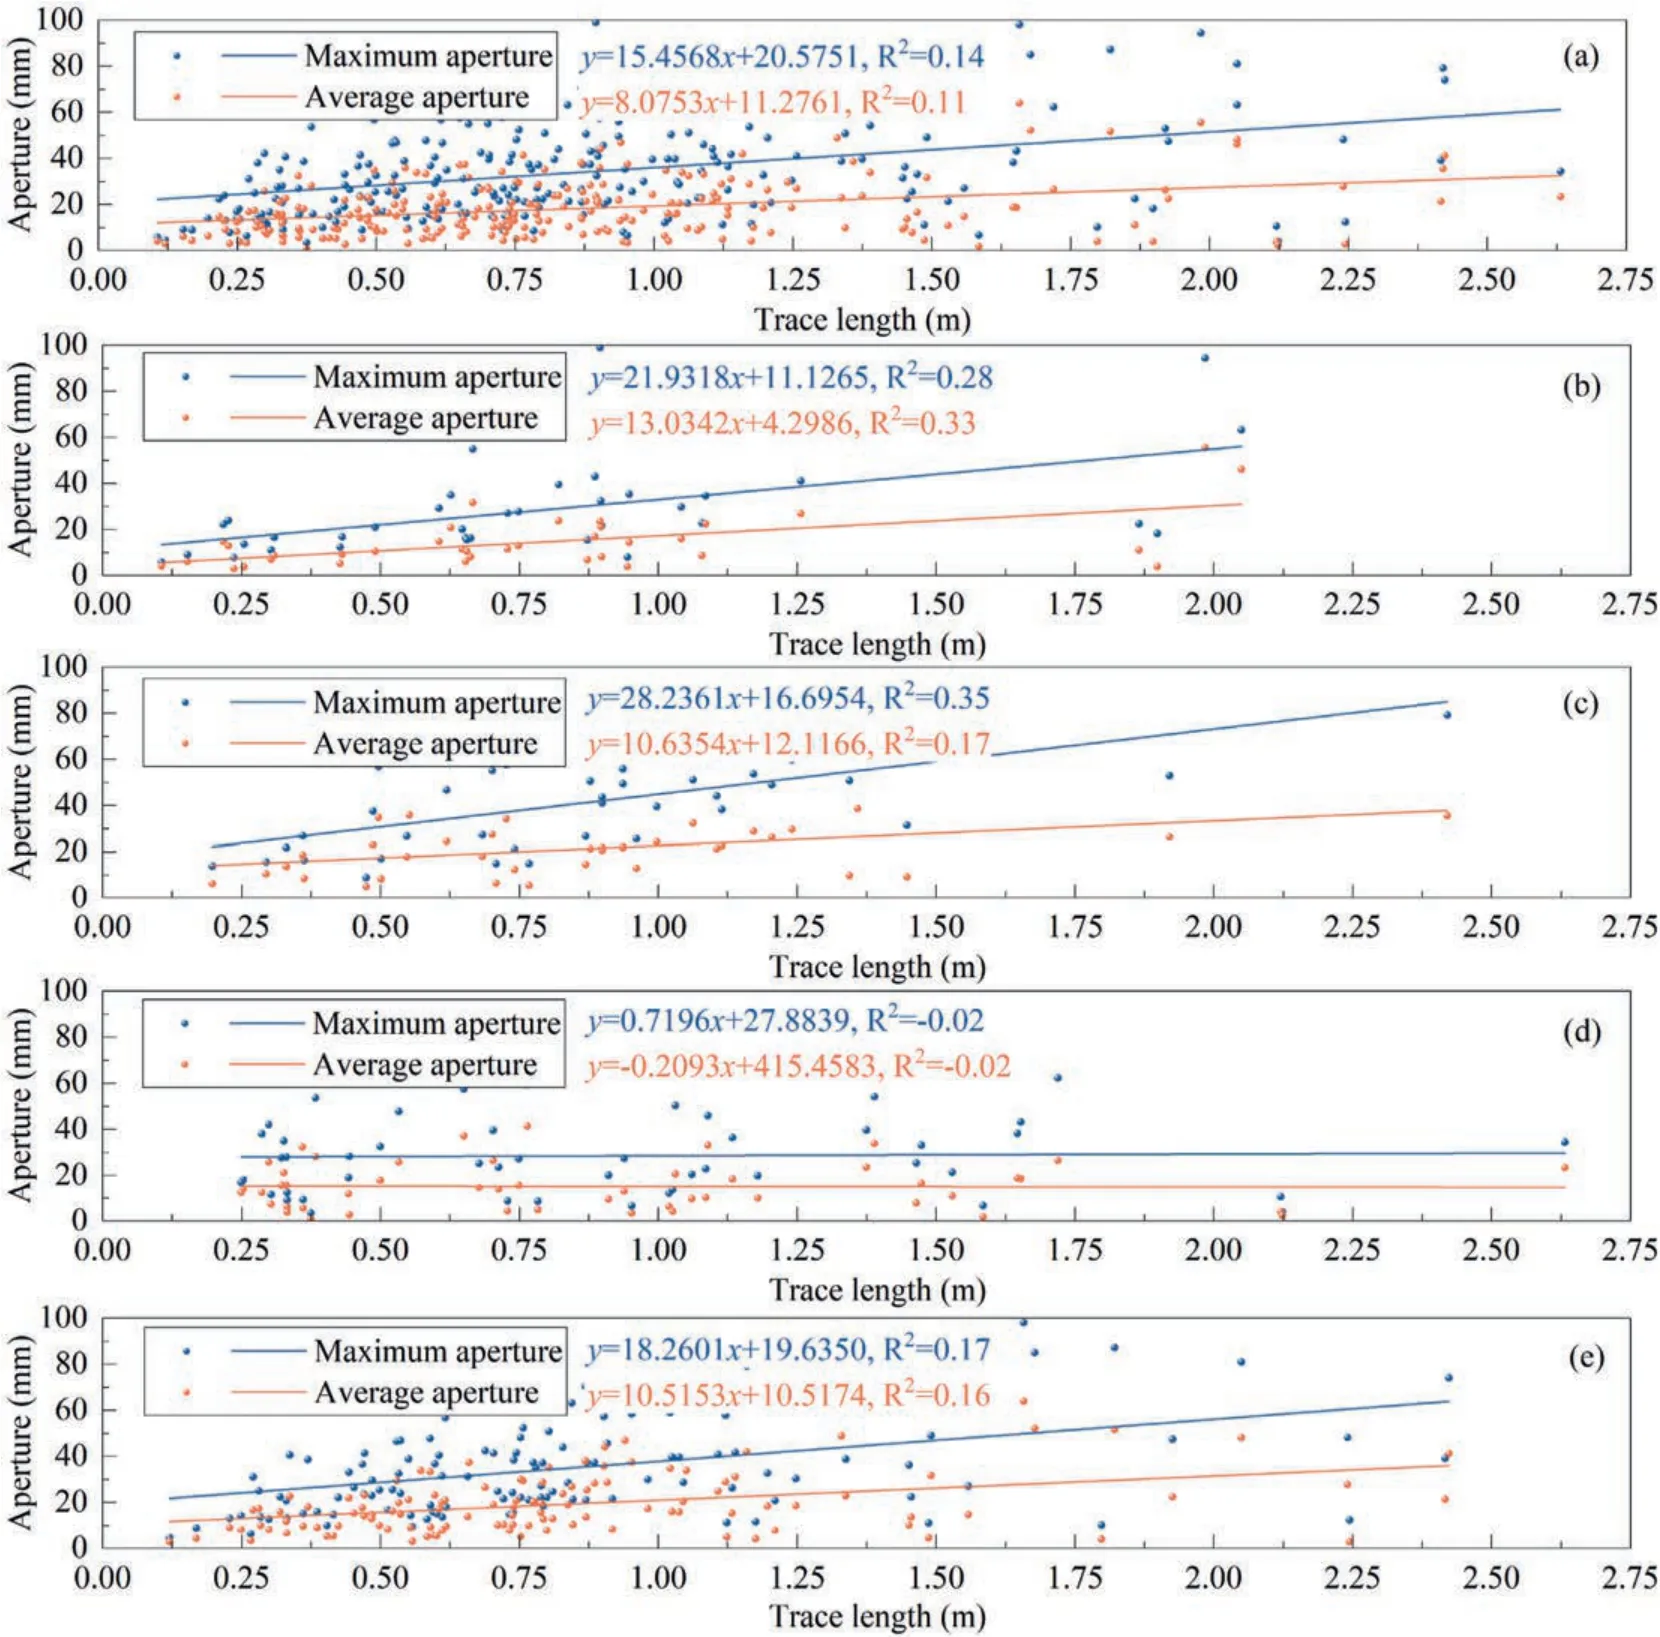
IfDn When there is a situation where several different hypotheses are accepted at the same time,it is necessary to determine a maximum level of acceptance that is consistent with the hypothesis of the original distribution.By the goodness-of-fit test method,the one with a large probabilistic fit (φ) is selected as the optimal form of the distribution: According to practical experience and existing research results,a certain parameter of the rock structure may obey a limited number of distribution forms (Priest and Hudson,1976,1981),for example,normal,log-normal,gamma and exponential distributions(Wu,1993;Jiang et al.,2021).In addition to the above four distribution forms,the more common uniform,Poisson,and Rayleigh distributions are added to the test analysis in this study.Although there are many distribution forms of data,this study does not analyze other distribution forms. In this study,a FeiMa D200 UAV with a 5-lens oblique photography module is used to acquire oblique UAV images of the study area by terrain-following flight.The UAV specifications and aerial photography task parameters are shown in Table 1.The aerial photography task takes about 30 min in total,and a total of 1355 images are acquired.Fig.6a shows the low-resolution 3D model of the survey area.Based on the above results,multi-angle nap-ofthe-object photography of the slope of the study area is carried out by using DJI M300 RTK UAV with a P1 camera.The specifications of the UAV and the aerial photography task are shown in Table 1.The aerial photography task takes about 108 min in total and 2277 images are acquired.Fig.6b shows the high-resolution 3D model of the studied slope. Table 1 UAV specifications and aerial photography task parameters. Fig.6.The 3D models of the study area: (a) The oblique 3D model,(b) The multi-angle nap-of-the-object 3D model,and (c) The key analysis area. Both of the above-mentioned UAVs are equipped with GPS positioning systems and integrated with RTK modules to provide real-time centimeter-level positioning data.This ensures that image metadata with centimeter-level absolute positioning accuracy,as well as live 3D models,can be obtained with little or no ground control points applied (Liu et al.,2019;Kersten et al.,2022). A total of 1017 discontinuities are collected within the key analysis area of the slope,including 243 linear discontinuities.Using the AIA software developed in this study,the aperture of these 243 linear discontinuities is interpreted and analyzed.To verify the accuracy of the discontinuity parameters interpreted based on the 3D model,they are compared with the results of onsite manual investigation.The results show that the maximum difference of the discontinuity dip direction between the two methods is 9°,with an average of 2°;the maximum difference of dip is 5°,with an average of 2°(Table 2);the maximum difference of trace length is 2.6 cm,with an average of 1.3 cm;the maximum difference of aperture is 1.7 cm,with an average of 9 mm(Table 3).The interpretation differences of these parameters meet the engineering requirements. Table 2 A comparison of the orientation obtained by the two methods. Table 3 A comparison of the trace length and aperture obtained by the two methods. The QPSO optimized C-means algorithm (Song et al.,2017) is used to group the discontinuity sets for the study area(Table 4).The orientation pole diagrams of 1017 discontinuities and 243 fractures are given in Fig.7. Table 4 Results of discontinuity grouping in the study area. From the grouping results,the first set of discontinuities is outward steeply sloping.The second and fourth sets both steeply dip and intersect the slope at a large angle.The third set is within the gently dipping inside.From the cutting relationship between the discontinuity of each set and the slope (112°∠51°),it will not form a potential block that slides outward to the slope.The third group of discontinuities exhibits a steep dip and runs nearly parallel to the free face.Additionally,examination of the 3D model reveals that many blocks display varying degrees of opening along their trailing edges.Consequently,potential geohazards such as toppling deformation exist within the study area. The accuracy of identifying and interpreting fracture aperture in a high-steep slope is dependent on the resolution of the 3D model.To verify the interpretability of the 3D model,a selection of fractures are randomly chosen from the high-resolution 3D model of the slope. As shown in Fig.8,the minimum aperture that can be directly identified for shear fractures is approximately 5 mm,and smaller apertures cannot be directly identified.For tensile fractures,the minimum aperture that can be directly identified is about 8 mm.Fractures with apertures less than 1 mm,known as “closed” fractures,have little effect on shear strength unless the fracture surface is very smooth.However,the presence of water can significantly alter this situation.In the unloaded zone above the tunnel entrance,particularly at the top of the slope,the aperture scale is typically above millimeter level.Therefore,the resolution of the slope 3D model produced in this study is capable of meeting the interpretation requirements for millimeter-scale fracture apertures.However,the method is currently unable to identify submillimeter openings. Fig.8.Interpretable scales of the 3D model. The aperture interpretation algorithm proposed in Section 3.2 is used to interpret the fracture aperture.The distribution form of the aperture is tested at the significance level α=0.05 by using the KS test.It is found that the maximum and the average aperture of the fracture are different when setting different measuring line spacings,and the distribution form of the aperture is not exactly the same. The fracture numbered Jt-01 is taken as an example for discussion.Its length is 0.557 m,the orientation is 10°∠81°,and the morphology of the fracture is shown in Fig.9.The maximum,average and distribution form of the aperture under different measuring line spacings are solved in 1 mm increments,respectively.To ensure that the obtained aperture samples are statistically significant,the number of samples obtained during the aperture interpretation is more than 25,thus only the interpretation results with the measuring line spacing of 23 mm are counted. Fig.9.Morphological diagram of fracture No.Jt-01 (the ratio of the measuring line spacing to the fracture length is r=1%). There is no doubt that the shape of the fracture opening is varied.Because of this,under different measuring line spacings,there may be situations where the aperture of certain positions cannot be accurately identified and interpreted(Fig.10).In this way,the maximum aperture of the interpreted fracture and its actual maximum aperture will exist in a certain difference(w).This means that there is a significant interval effect of fracture aperture.This affects the results of the probability distribution test for fracture aperture.It can be seen from Fig.5c-e that with the decrease of the measuring line spacing,the adaptability of the measuring line to the fracture shape and the ability to correct the differenceware gradually enhanced.Therefore,in this study,the maximum aperture interpreted when the measuring line spacing is 1 mm is taken as the actual maximum aperture value. Fig.10.Histogram of aperture frequency obtained for Jt-01 fracture at different measuring line spacings. The statistical results indicate that as the measuring line spacing increases,the differencewalso gradually increases.The maximum difference occurs when the measuring line spacing is 20 mm,with a value of 4.81 mm.The interval effect of fracture aperture has little impact on the average aperture obtained through interpretation.The results show that the average aperture is the smallest(13.59 mm)at a spacing of 14 mm,and the largest(14.08 mm)at a spacing of 18 mm,with a difference of only 0.49 mm between the two. Although the actual maximum aperture can be obtained at 1 mm spacing,the apertures do not obey the common 7 probability distribution forms for a large number of fractures.In addition,the measurement difference in Fig.5b is actually a reflection of the interval effect of the aperture.This situation is better avoided by the aperture interpretation algorithm with adaptive fracture shape proposed in this study. In order to determine the most optimal sampling length and corresponding measuring line spacing,34 fractures are randomly measured in this study.The length range of the fractures is approximately 0.2-1.7 m,and is roughly divided into three length intervals: less than 0.5 m,0.5-1 m,and 1-2 m.To analyze the reliability of the interpreted results,the aperture is interpreted and the differencewis counted.Due to the inconsistent lengths of the fractures,the ratio(r)of the measuring line spacing to the fracture length is used to characterize the measuring line spacing for convenience of description.To ensure that the number of interpreted aperture samples is statistically significant,the sample size should be greater than 25,corresponding to anr-value of approximately 3%.Therefore,at the data interpretation and statistics stage,all fractures are counted up tor=3%. For fractures with a length less of than 0.5 m,it is not difficult to find that there are no data at many locations in Table A1(Appendix A).This is due to the limitation of the length of the fracture itself,which makes it impossible to obtain the aperture samples under somer.There are also a few cases where the apertures do not obey the 7 mentioned distribution forms in the study.It is obvious that the value ofwincreases gradually with the increase of the measuring line spacing (Fig.11).This is because the fracture morphology is complex and the location of the measured fractures varies at different measuring line spacings,which results in the phenomenon that there is always a fracture aperture somewhere that is not measured.Ideally,the aperture obtained at a certain line spacing has a reasonable probability distribution,while the differencewcan be controlled to a minimum.When the ratioris between 0.7% and 1.3%,the differencewis smaller and less fluctuating,basically stable within 1.5 mm,and the average value of differencewis less than 1 mm (Fig.11a). Fig.11.The difference of the acquired maximum aperture in different measuring line spacings. It can be seen in Table A2 (Appendix A) that the number of locations without data in the table is significantly reduced compared to fractures with a sampling length of less than 0.5 m.This shows that with the increase of sampling length,the number of cases where interpretation results cannot be obtained under certainrdecreases.This is a manifestation of the size effect of fracture aperture.It can be observed that fractures with apertures not following the above 7 common distribution forms still exist whenris less than 1%.In addition,there is a tendency for thewvalue to gradually increase with the increase of the measuring line spacing(Fig.11b).On the whole,when the ratioris between 1% and 1.8%,the differencewis smaller and less fluctuating,basically stable within 2 mm,and the average value of the difference is less than 1 mm.The overall results are more satisfactory. It is not difficult to find from Table A3(Appendix A)that there is no data missing.This further reflects the size effect of fracture aperture: with the further increase of sampling length,a statistically significant number of aperture samples can be obtained under anyr(take 0%-3%).The cases in which the apertures do not obey the 7 common forms of distribution mentioned above have also been reduced.Thew-value still increases gradually with the increase of the measuring line spacing (Fig.11c).Overall,when the ratioris about 1%,the differencewis smaller and less fluctuating,basically stable within 2 mm,and the average value of the difference is less than 1 mm.The overall results are more satisfactory. The above study shows that the fracture aperture has a significant size effect,i.e.the sampling length affects the interpretation results of the aperture.The differencewof the overall interpreting results is the largest when the fracture length is between 1 m and 2 m,and the overall differencewis the smallest when the fracture length is between 0.5 m and 1 m (Fig.11d).Meanwhile,it is not difficult to conclude that the differencewincreases with the increase of the measuring line spacing.Therefore,we conclude that when the fracture length is between 0.5 m and 1 m,it is more reliable to use the proposed fracture width interpreting method to obtain the fracture aperture.To make the interpreting result more ideal,i.e.the aperture has a reasonable probability distribution,and the differencewcan be controlled to the minimum,the measuring line spacing should be about 1% of the fracture length. Overall,64.2% of the 243 fractures have apertures that follow a normal distribution (Fig.12 a).This is followed by the log-normal(14.82%) and gamma (14.4%) distributions.Only less than 4% of the fractures have their apertures obeying the Rayleigh,exponential and uniform distributions.There is no fracture whose aperture follows Poisson distribution.Another 2.88%of the fractures do not obey the 7 common forms of distributions counted in the study atr=1%.Fig.12a indicates that the fracture aperture mostly(over 60%)follows a normal distribution,followed by lognormal (14.82%) and gamma (14.4%) distributions.However,there are certain differences in the distribution of fracture aperture among different fracture sets.For instance,all six common distribution types appear in the first set,while only three common distribution types are observed in the fourth set. Fig.12.The pie chart of distribution form for fracture aperture: (a) All 243 fractures,(b) Set 1,(c) Set 2,(d) Set 3,and (e) Set 4. Fractures in set 1 are all outside the steeply dipping slope.In terms of mechanical causes,these are mainly tensile fractures.Because of this,the apertures of this set are the largest (Table 5).Test results show that all six distribution forms are present except the Poisson distribution (Figs.12b),and 5.56% of the fractures do not obey the common 7 distributions atr=1%.Thus,it can be seen that for tensile fractures,the apertures of single fractures show diversity in the distribution forms.In addition,the maximum and average apertures of this set are taken as data samples respectively to examine the distribution forms of the overall data of tensile fractures.The results show that the maximum and average apertures of the tensile fractures as a whole obeyed log-normal distribution (Table 5). Table 5 Aperture statistics of each set of fractures. Fractures in Set 3 are within the gently dipping slope.In terms of mechanical causes,these are mainly shear fractures.Because of this,the apertures of this set are the smallest(Table 5).Test results show that all distribution forms are present except for uniform distribution (Fig.12d).It can be seen that for shear fractures,the apertures of single fractures also show diversity in the form of distribution.The maximum and average apertures of the shear fractures as a whole obey the gamma distribution (Table 5). The mechanical causes of fractures in Sets 2 and 4 are more complicated to classify simply.However,their dips are steeper,their dip directions are different by about 130°,and they intersect the slope at a large angle,thus they will be discussed as one type in this study.Overall,the apertures of these two sets are between the 1st and 3rd sets.The test results show that the distribution forms of apertures of these 2 sets are basically normal,log-normal andgamma distributions (Fig.12c and e).Among them,2.63% of the apertures in Set 2 obey Rayleigh distribution,and the other distribution forms are not present.It can be seen that the apertures of single fractures in these two sets have a strong similarity in the distribution forms,and both show concentration.The maximum and average apertures of all the fractures in Set 2 obeyed the gamma distribution,and all the fractures in Set 4 obeyed the lognormal distribution (Table 5). The collected fractures are uniformly distributed within the studied slope (Fig.13b).Their altitude lies between 3595 m and 3860 m above sea level.Sample data are not collected in some areas on the slope due to the slope deposit covering(Fig.13b and d).The maximum aperture as well as the average aperture of the 243 fractures on the slope tend to increase with the increase of the slope height (Fig.13a,c and f).However,the trend of maximum aperture with height is slightly larger than that of average aperture.Unsurprisingly,even at a lower altitude,there are still some tensile fractures with large apertures (Fig.13e). Fig.13.Schematic diagram of fracture aperture versus slope altitude:(a)Scatter plot of fracture aperture versus slope altitude,(b)Distribution of fracture sampling locations,(c,f)Larger aperture at higher locations and smaller aperture at lower locations,(d) Slope deposit covering,and (e) Larger aperture case at lower locations. From the different dominant sets,there is a trend that the aperture of each set of fractures increases with the slope altitude,and the trend of maximum aperture with height is slightly larger than that of average aperture.The 1st set is the tensile fracture with a steep dip angle and inclination out of the slope,and the aperture is generally larger(Fig.14a and b).However,the sample size of this set is small because the fracture surface is approximately parallel to the slope surface and not easy to identify and measure.The 3rd set is a gentle dip angle,and the overall aperture diameter is smaller than the other sets(Fig.14e and f).In contrast,the 2nd and the 4th sets are similar in that both are steeply dipping and intersect the slope at a large angle (Fig.14c and g).Therefore,the aperture size and its change trend are also similar for the two sets of fractures(Fig.14d and h). Fig.14.Analytical plots of fracture aperture with slope altitude for different sets:(a,c,e,g)Upper hemisphere projections of fracture orientation,fracture surface (Ji,i=1,2,3,4)and slope surface (P) for Sets 1-4,and (b,d,f,h) Scatter plots of fracture aperture with slope altitude for Sets 1-4. The multi-phase development of the debris flow gully on the west side of the slope is accompanied by the accompanying gently dipping fractures (Fig.1b).This is also the main cause of the fractures of Set 3 gently dipping inside the studied slope.The slope becomes gradually steeper during the different phases of river valley downcutting.Meanwhile,the slope unloading effect is always greater at the top than at the bottom,which causes the gently dipping fractures in the study area to show a trend of“steeper at the top and gently at the bottom”with the slope height.Moreover,the top of the slope is exposed earlier than the bottom,and experiences longer and stronger weathering.This makes the apertures of rock fractures at the top of the slope generally larger than that at the bottom.In addition,the vertical load on the bottom of the slope is greater than that on the top.This makes the aperture of the gently dipping fracture vary more obviously with the change of slope height.Of course,this trend is generally small. From Fig.15,a positive correlation between fracture aperture and trace length can be observed overall.However,differences exist when examining each set.For example,fractures in Set 1 are mostly tensile fractures,and their trace lengths are generally shorter than those of the other three sets.The trend of increasing fracture aperture with increasing trace length is also most significant in this set.The fractures in Set 3 are formed by shear,with generally longer trace lengths but smaller apertures.The data show that the aperture of shear fractures does not change significantly with the variation of trace length.For the other two sets of fractures,the trace length is comparable,and the trend of aperture change with trace length is roughly similar. Fig.15.Relationship between aperture and trace length of fractures in different groups: (a) All 243 fractures,(b) Set 1,(c) Set 2,(d) Set 3,and (e) Set 4. The multi-angle nap-of-the-object photography technique proposed in this study enables non-contact interpretation of fine parameters of complex rock structures on high-steep slopes.Additionally,the aperture interpretation method of adaptive fracture shape has strong adaptability to linear discontinuities with varying opening shapes.However,there is still room for improvement in this method. As the constructed 3D model of the slope is a surface model,it can only identify fractures that are exposed on the surface of the rock.Furthermore,the interpretation of aperture for planar discontinuities still poses challenges.Although UAVs are commonly used in surface rock engineering,it does not mean that the aperture interpretation method of adaptive fracture shape is only applicable to outdoor rock structures.If a 3D model of an underground tunnel is established using digital close-range photogrammetry,the proposed interpretation method can still be effective. Currently,the interpretation method for aperture proposed in this study is mainly constrained by the resolution of the 3D model of the slope.The resolution of the 3D model,in turn,depends on the quality of the UAV image.Therefore,further improvement of the photography technique and enhancement of the UAV image resolution and visual effects will be the focus of future research. The innovation of the study is to propose a new method for rock fracture identification and aperture interpretation based on UAV multi-angle nap-of-the-object images,taking the high-steep rock slope on the left bank of Xiali Station as the study area.The main research results are as follows: (1) The UAV multi-angle nap-of-the-object photogrammetry is capable of adapting to complex terrain,such as high-steep rock slopes,and provides millimeter-level image resolution.The aperture interpretation algorithm with adaptive fracture shape can effectively avoid measurement differences caused by the interval effect and size effect by determining the fracture central axis.This allows for fast and accurate acquisition of millimeter-level fracture aperture information,providing important technical support for fine data collection in rock engineering for safer and cleaner production. (2) The size effect of fracture aperture can affect the accuracy of its interpretation at different sampling lengths,while the interval effect of aperture can affect the comprehensiveness and accuracy of the apertures obtained at different measuring line spacings.In measuring the morphology feature points of fractures,it is recommended to use a sampling length of 0.5-1 m.When the ratio of measuring line spacing to sampling length is about 1%,the aperture interpretation effect is most satisfactory. (3) The results of this study indicate that among the fracture sets in the study area,both the maximum and average aperture are the highest in the 1st set and lowest in the 3rd set,which is closely related to their mechanical causes.Specifically,the 1st set is mainly composed of tensile fractures,while the 3rd set is mainly composed of shear fractures.The aperture of fractures also increases with the slope altitude,with tensile fractures showing a more obvious trend than shear fractures.The aperture of tensile fractures is generally positively correlated with their trace length,while the relationship between the aperture of shear fractures and their trace length is not clearly established.The probability distribution of aperture for fractures of varying orientations differs,with the primary distributions being normal,log-normal,and gamma distributions. Declaration of competing interest The authors declare that they have no known competing financial interests or personal relationships that could have appeared to influence the work reported in this paper Acknowledgments This work was supported by the National Nature Science Foundation of China (Grant Nos.42177139 and 41941017),the Natural Science Foundation Project of Jilin Province,China (Grant No.20230101088JC).The authors would like to thank the anonymous reviewers for their comments and suggestions. Appendix A.Supplementary data Supplementary data to this article can be found online at https://doi.org/10.1016/j.jrmge.2023.07.010.4.Data acquisition



5.Results and discussion
5.1.Interpretability of the high-resolution 3D model

5.2.Interval effect of the aperture

5.3.Optimal sampling length and optimal measuring line spacing for aperture interpreting
5.4.Probability distribution of fracture aperture
5.5.Relationship between fracture aperture and slope altitude

5.6.Relationship between fracture aperture and trace length
5.7.Applicability and limitations
6.Conclusions
杂志排行
Journal of Rock Mechanics and Geotechnical Engineering的其它文章
- Using deep neural networks coupled with principal component analysis for ore production forecasting at open-pit mines
- Sliding behaviors of the trapezoidal roof rock block under a lateral dynamic disturbance
- Real-time arrival picking of rock microfracture signals based on convolutional-recurrent neural network and its engineering application
- Failure characterization of fully grouted rock bolts under triaxial testing
- Nonlinear constitutive models of rock structural plane and their applications
- Mechanical behaviors of backfill-rock composites:Physical shear test and back-analysis
