Study on the time-grating sensor method of the static light field type based on timing-driven
2015-10-29MinFUXinghongZHANG
Min FU, Xing-hong ZHANG
(Engineering Research Center of Mechanical Testing Technology and Equipment,Ministy of Education Chongqing Key Laboratory of Time-Grating Sensing andAdvanced Testing Technology Chongqing University of Technology, Chongqing 400054, China)
Study on the time-grating sensor method of the static light field type based on timing-driven
Min FU*, Xing-hong ZHANG
(EngineeringResearchCenterofMechanicalTestingTechnologyandEquipment,MinistyofEducationChongqingKeyLaboratoryofTime-GratingSensingandAdvancedTestingTechnologyChongqingUniversityofTechnology,Chongqing400054,China)
A uniform scan coordinate system by using photosensitive element of timing driven is proposed to convert the displacement detection of the object into measured time difference. According to the conversion principle of relative motion coordinate systems of time grating, if the photosensitive element of linear CCD is regarded as a uniform scanning coordinate system and the spatial side by side and timing of mutually staggered on the two linear CCD is regarded as a stationary coordinate system, size and direction of the relative displacement of the object would be made by multiplying time difference variation and scanning speed after the time difference variation of the output electric signal on the different CCD for the same object are measured. With the calibration of the Renishaw laser interferometer for the developed linear CCD time grating sensor, the measurement errors could be controlled within ±2 μm after error correction is made for the effective measurement range of 600.05 mm. This realizes the idea of time measurement space in the field of optical.
Displacement measurement, Time grating displacement sensor, CCD displacement sensor, Timingdriven
1 Introduction
The time grating displacement (angular displacement and linear displacement) sensor is a novel sensor originated from the Chinese scientific and technical research work [1]. It is proposed to establish a reference coordinate system under “uniform” movement inside the sensor, where differential spatial displacement may be converted to a time difference movement on the reference coordinate system for indirect measurements. It works in a way that it is strikingly different from conventional sensors based on spatial grid (grating, magnetic grid, synchronous inductor etc.) of any kind that is characterized by precise division to achieve spatial measurements [2-3]. In less than two decades, the development of innovation makes it possible for the time grating to successfully gain a highlighted place among the precision measurement industry, and it shows a booming trend. Currently, the time grating sensor brings out its measurement accuracy that depends on the stability of the “motion coordinate system”, which has been changed from the mechanical rotation mode to the rotating magnetic field, with the measurement accuracy reached to that of grating [4-5]. The current existing problem is that the time grating based on magnetic field is made by coil winding, where the uniformity of the rotation of the magnetic field, subject to the Doppler effect, self-inductance and mutual inductance factors, it may have distortion in the high-speed dynamic measurement and could result in poor measurement accuracy [6]. To better solve similar problems, the research group turned the media for traveling wave of time grating to a more stable electric field. This is ready to achieve a higher accuracy the time grating with nano measurement accuracy. In this regard, the present studies have made very significant breakthroughs [7]. Nonetheless, studies also found that time grating involving electric field may present a measurement accuracy that is affected by non-linear distribution of the electric field, it becomes very sensitive to mounting distance. This could be a trouble in the sensor mounting and processing. Subject to various constraints during the study on time grating with magnetic field and electric field, the research work has found a way to light field with better performance to pursue further breakthroughs with regard to accuracy [8], speed and other parameters.
In this paper, the principle for time grating measurement is proposed to build a timing-driven “motion coordinate system”, aimed to reduce dependence on machining process level in optical measurement. By using linear CCD, a time grating displacement sensor was designed with static light field, where the uniform scanning method was employed to achieve the goal of a high frequency clock pulses for subdivides space, it will provide a novel solution for optical displacement measurement.
2 Principle for time grating measurement based on static light field
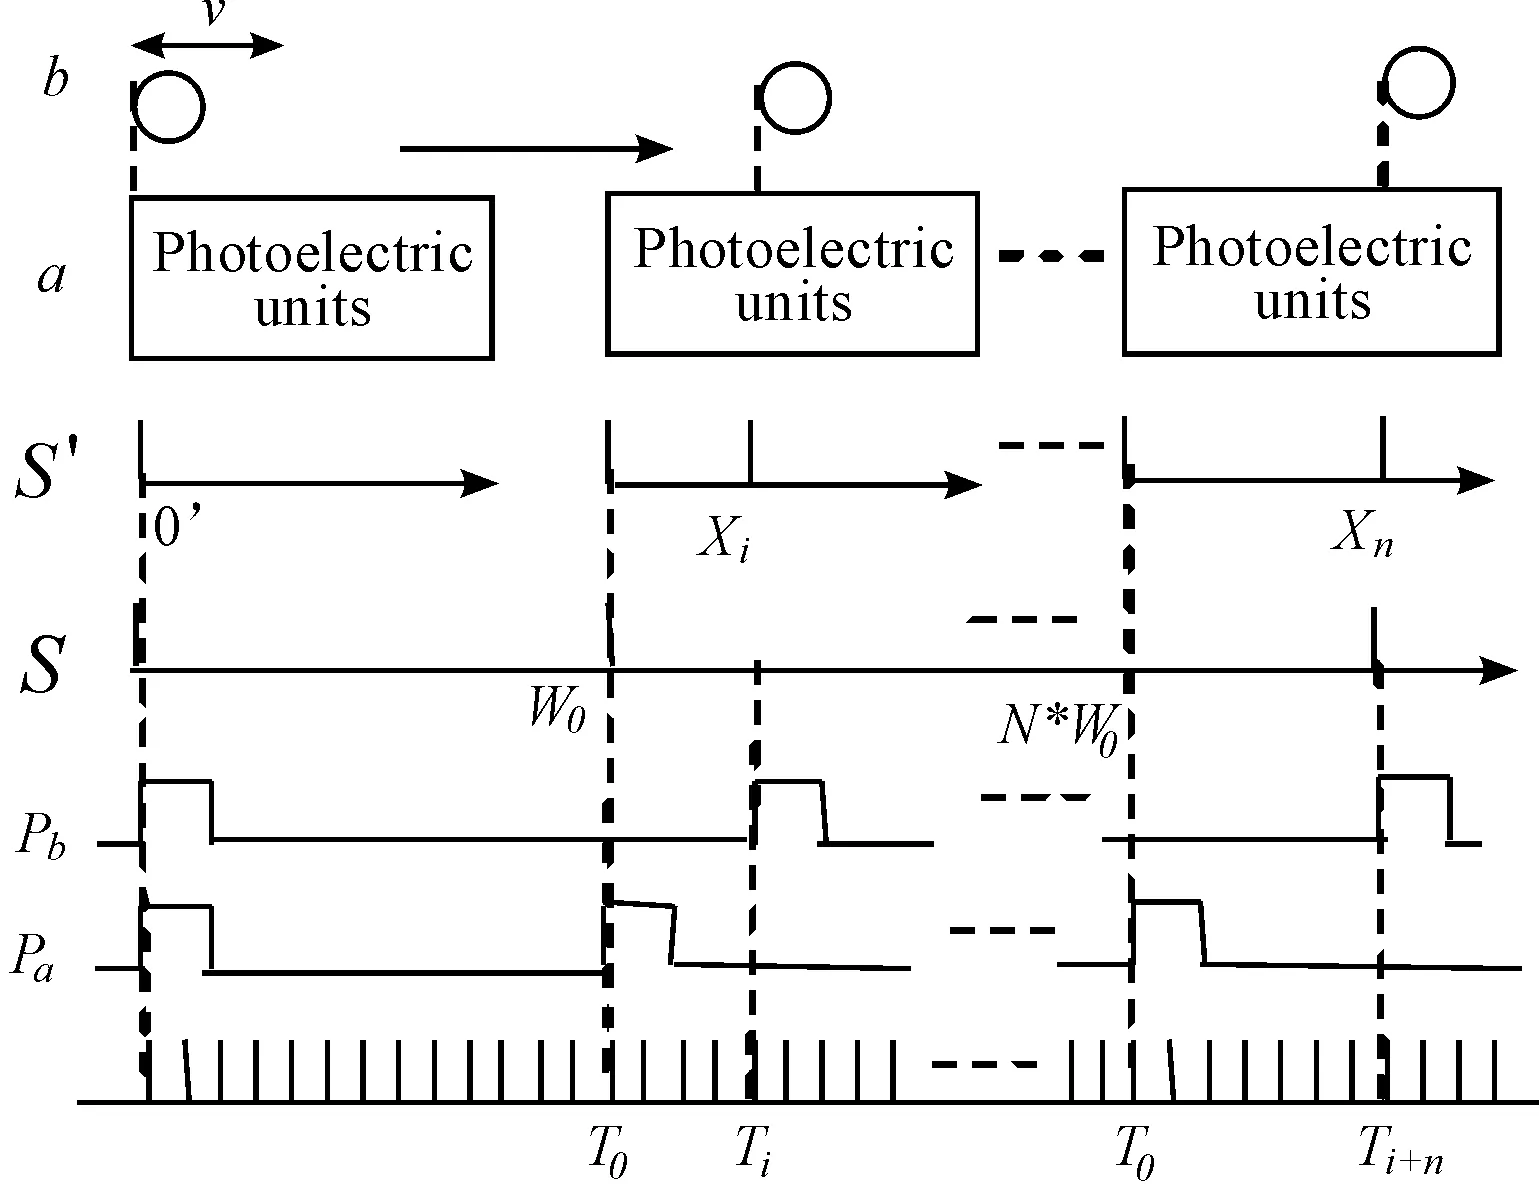
The time grating sensor works under the following principle: through the establishment of a two-coordinate system in a relatively uniform motion, the clock pulses are taken to get an aliquots spatial displacement in a certain measurement range [9]. Within this space, the number of clock pulses is read out to achieve the spatial displacement measurements. This requires the difference (offset) on the coordinate system position to be reflected as the time difference observed on another coordinate system. The light photons come with certain energy to maintain a constant intensity of the spatial light field, that is, the light field is stationary. In this space, photodetector unit a moves uniformly with a velocityV, the target object b moves with an arbitrary velocity. Assuming the photodetector unit has an indefinite length, and the target object always moves over the photodetector, as shown in Fig.1. According to the characteristics of relative motion, let the light field as a static space coordinate system. The photoelectric detection unit is composed of a coordinate system in uniform motion. In a time of everyT0, photoelectric cell makes a spatial displacementW0. In the stationary coordinate system , observation points are set in respond to everyW0. The object and the photoelectric cell, respectively, pass through the observation points in a time ofT0andTi, and then, the relative displacement of the object in the optical unit:Xi=V×(Ti-T0)=V×ΔT. Here ΔTcan be obtained using the interpolation of high frequency clock pulses.

Fig.1 Measurement principle of the static light field type time grating
3 The light field type time grating sensor designed with linear CCD
From the above analysis, the time grating based on light field could form a closely spaced circular array or a linear array composed of photodiodes, which can be driven by the timing sequence of certain frequency then to achieve the uniform scanning through equivalent motion of the photosensitive elements. In order to verify the feasibility of this approach, a linear CCD precisely arranged in a photosensitive array and the internal reading circuits are combined to build a linear CCD-based photoelectric sensor with time grating.
Fig.2 Structure diagram of linear CCD time grating
In this paper, the two same type CCD are placed for differential measurement. Combined with the previous analysis, the time grating sensor designed with CCD linear array is shown in Fig.2, which includes the components of the optical signal section of the transmission and the receiving section. The optical signal transmition part is translucent. On the linear shutter, in which the transparent slits were processed in a space ofL0, the light of a uniform intensity comes through gap to form the linear light spots in a fixed position of the linear space. Optical signal receiving section is composed of two linear CCD.By way of installation, effective pixels of CCD1 and CCD2 are aligned side by side, where the length of a single CCD pixel isW0(WhereW0is slightly greater thanL0). CCD module moves above the translucent shutter at any speedvin a straight line. In the course of movement, the CCD1 and CCD2 should always be able to receive the same transmitted light.
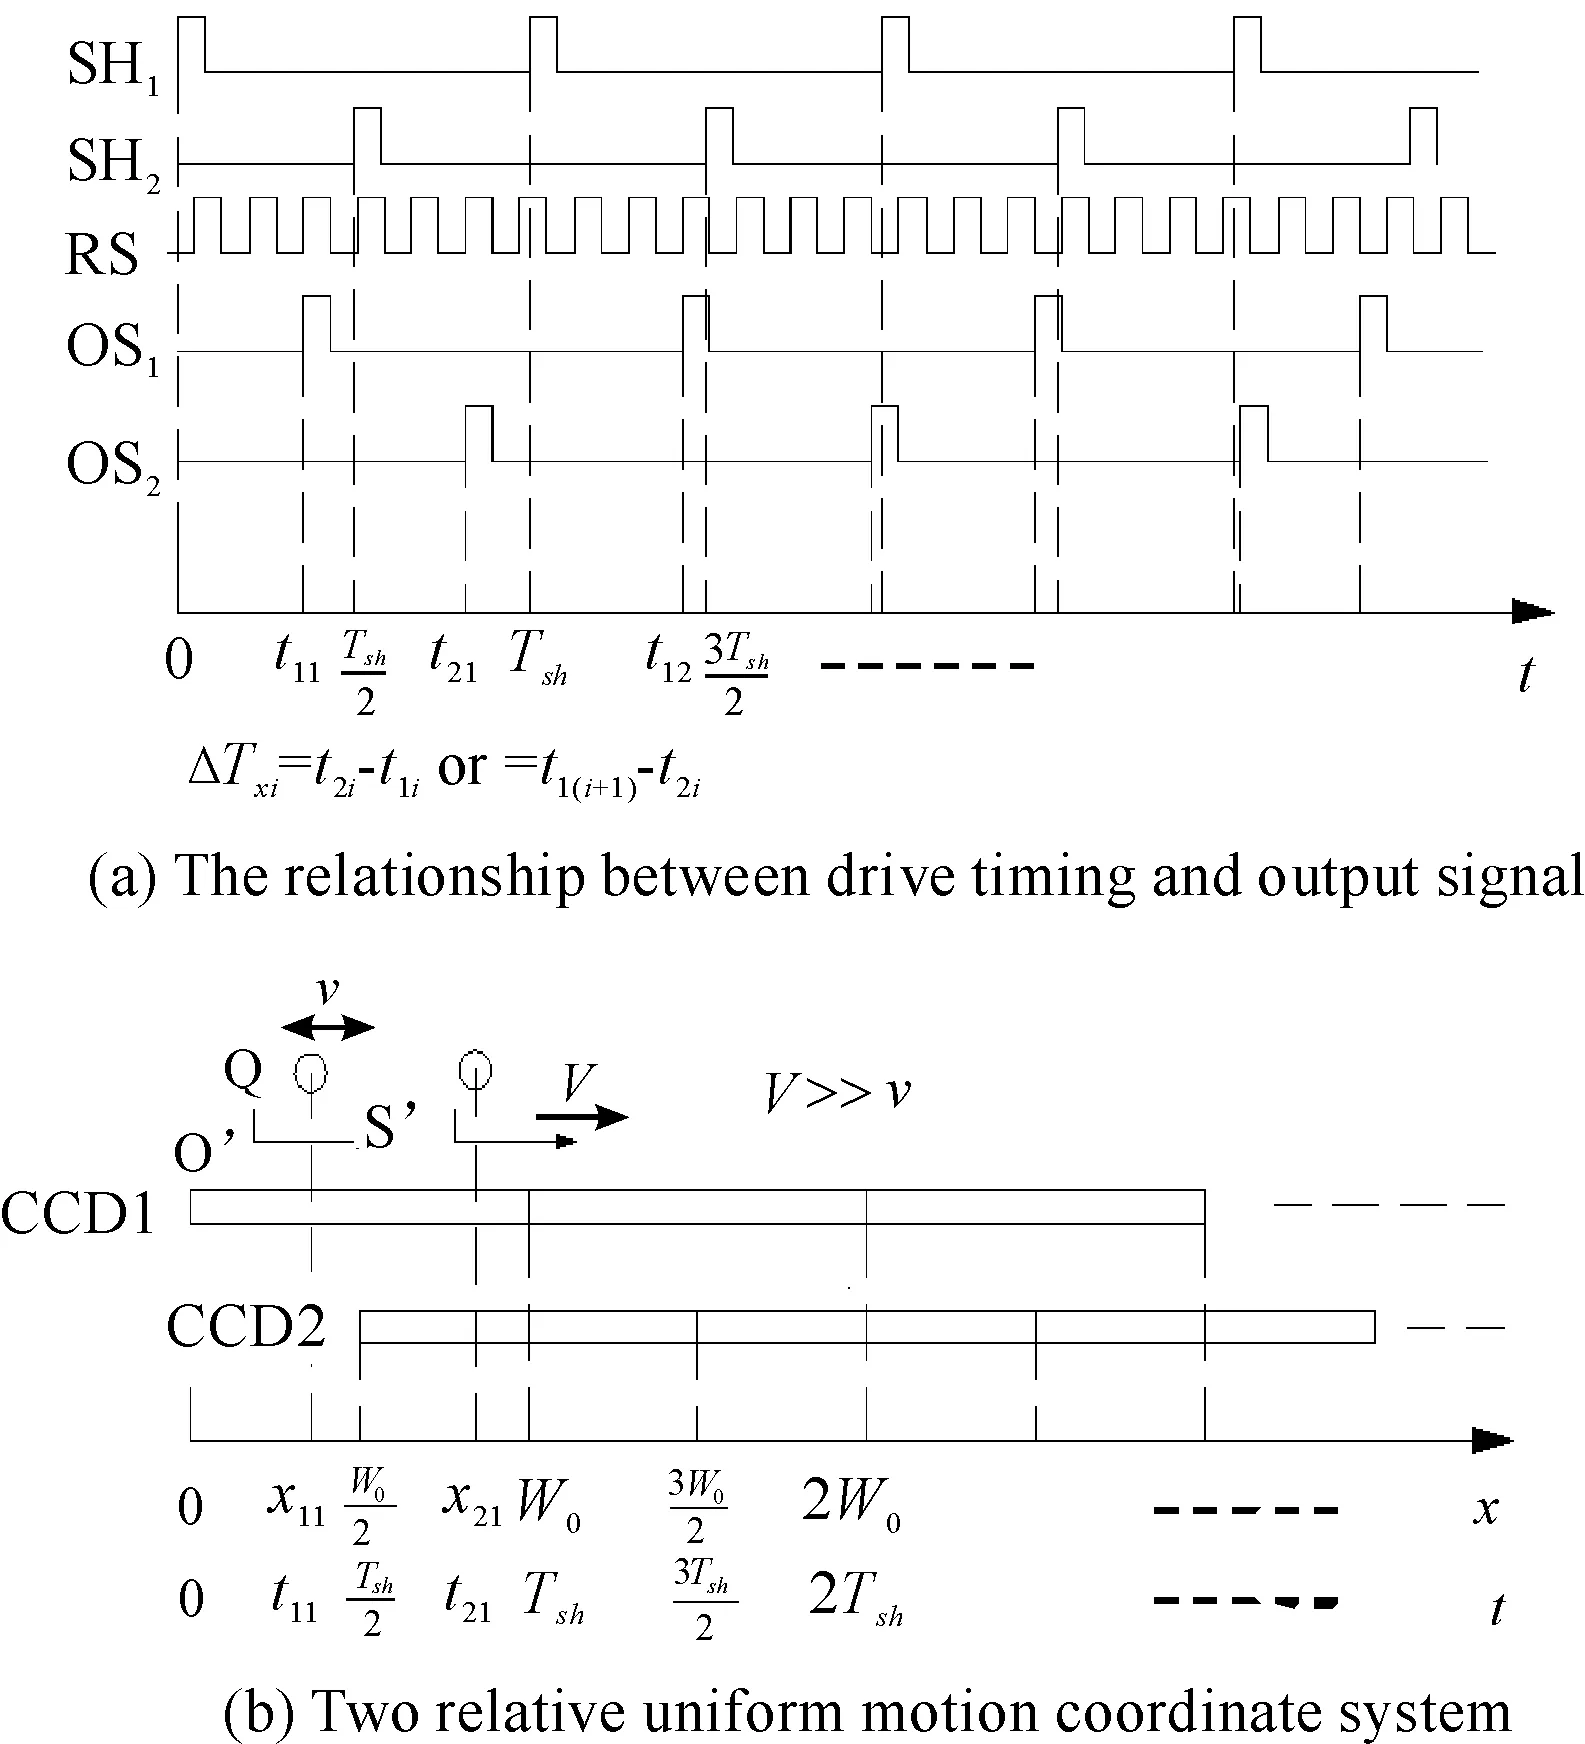
In order to build a timing-driven coordinate system with photosensitive elements, CCD1 and CCD2 are staggered on the drive timing in a half of the integration periodTsh, as shown in Fig. 3 (a). When a relative motion occurs between the CCD mounting plate and the translucent shutter, these two CCD have their optical output signals OS1 and OS2, which respond to the translucent positions and change along the time difference, directly corresponding to the changes in displacement. Since the timing of CCD1 is a half of the integration period away from the CCD2 timing, the coordinate system in uniform motion is taken as a reference object. In chronological order, CCD1 and CCD2 are expanded into an infinite stationary coordinate system. It is displayed on the timeline that CCD2 also is staggered in a spatial distanceW0/2 from CCD1. Thus, a two-coordinate system can be obtained as shown in Fig. 3 (b). From this figure, the size of the relative displacement could be determined by the difference between the CCD1 and CCD2 magnitude of displacement. Let the position of the light signal obtained at a certain time asx1ion the CCD1, and that on the CCD2 asx2i, then respectively, the displacement could be obtained as shown in formula (1):
(1)
(2)
Where,V=W0/T0,W0is the CCD fixed length of the effective pixel for;T0is the CCD line scan period,∑Ptis the interpolated value of the high frequency clock pulses. The symbol ΔTrepresents the direction of relative movement between the fixing plate and the transparent CCD shutter, if ΔT>0, CCD module moves relative to the shutter in the opposite direction ofX-axis; if ΔT=0,CCD module remains stationary relative to the shutter; ifTx<0, CCD module moves relative to shutter in the positive direction of theX-axis.

Fig.3 Differential measurement principle of linear CCD time grating
4 Experiment and analysis
Toshiba’s TCD1501D was selected as the CCD time grating sensor with linear array (CCD time grating for short). This is a CCD composed of 5000 effective photosensitive elements, in a pixel spacing of 7 μm, with the total effective length of 35 mm. To improve the reading speed of the CCD pixels, the CCD reset frequency and sampling frequency were set to 10 MHz, with its line scanning frequency of approximately 2 kHz. The figure 4 is the experimental design and calibration device, where ①-⑩ are, respectively, laser interferometer, screw guide, interferometer, light shutter, CCD fixing plate, mirror, electrical control box, interferometer control interface, CCD sensor measurement interface and servo motor.
Measurement process was calibrated using the Renishaw laser interferometer, where the mirror was installed in the CCD mounting plate, moving along with the slider. In experiments, CCD sensor measurements were collected by the electrical control box and sent to the upper computer for storage and display. To accompany this, the measurement value was recorded from the laser interferometer, and compared with the former values to obtain the measurement error of CCD sensor. Over the entire measuring range (600.05 mm), servo motor collected a set of data at every 1mm, a total of 600 sets of data were collected. Compare the measured results, an error curve could be obtained as shown in Fig.5, where the measurement error had a peak value of app. 8 μm.

Fig.4 Experiment platform of linear CCD time grating

Fig.5 The original error curve
As shown in Fig.5, the measurement results have the error component mainly composed of two parts: high-frequency error and linear low-frequency error. The high-frequency error is caused by the false determination of the imaging center position [10-12]. For this error component, an intelligent power supply was provided for a laser device to ensure the stability of the light source, while on the basis of the original algorithm to find the center pro rata, the intensity of the optical signal in real time was taken to adjust the size of the comparable threshold levels. Ultimately, the impact of changes in intensity arising from the instability of the light source and the diffraction of light could be reduced. The linear low-frequency error is caused by the measurement system, machining, thermal expansion, and other random errors. These errors in the entire measurement range are mainly presented as a linearity error, which, by way of linear fitting, could be largely corrected.

Fig.6 Measurement error curve after error correction
To summarize the above analysis, the corrected measurement curve was obtained as shown in Fig.6. The measurements revealed that except for individual data, the measurement errors were controlled within ±2 μm over the entire measurement range, merely half of those before correction. This approach is proven to be effective in the correction of both the high and low frequency errors.
5 Conclusions
In view of 2-coordinate system measurements with the time grating sensor, two timing-staggered CCD are proposed for differential measurement on the target signal displacement. Photoelectric type time grating sensor is adopted. This methodology involves the use of high-frequency timing pulses as the measurement benchmark, by which the linear CCD precisely arranged in a photosensitive array may improve the ability in identify the changes in position. The results show that there is no need for precise displacement measurement to require the high-precise mechanical processing technology to keep the measurement precision under control. Furthermore, the linear CCD used for measuring the large-range (>1 m) straight displacement is no longer a problem. Specifically, this work was completed in IT10 precision to achieve the measurement in μm, leaving much room for improvement. If a higher timing interpolated frequency is given, plus the help with more accurate sub-pixel algorithm, more satisfied measurements may be obtained. This work is viewed as a trial of the principle for time grating measurement being successfully applied in the optical field, providing an effective solution to the engineering application of optical displacement measurements.
Acknowledgements
This paper is supported by National Natural Science Foundation of China (No. 51127001, 51475063) and National Natural Science Foundation of Chongqing (No. CST2012JJA40062).
[1]PENG D L, LIU CH K,TAN W M. Study on the theory of time-space coordinate transformation and the grating displacement sensor [J]. Chinese Journal of Scientific Instrument,2000,21(4):338-342.
[2]DR.JOHANNES HEIDENHAIN GmbH. Exposed Linear Encoder[Z]. Germany, 2012.
[3]DR.JOHANNES HEIDENHAIN GmbH. Angle Encoder with Integral Bearing[Z]. Germany, 2010.
[4]PENG D L, ZHANG X H, LIU X K, et al. Study on the time grating displacement sensor of the field type [J]. Chinese Journal of Scientific Instrument, 2003, 24(3): 321-323.
[5]Xiaokang L I U, Donglin P, Ge Z H U, et al. Time-space concept for precision on measurement[J]. Chinese Journal of Mechanical Engineering, 2008, 21(3):112-118.
[6]TANG Q F, PENG D L, WU L, et al. Study on the influence of Doppler effect and its suppressing method in time grating angular displacement sensor [J]. Chinese Journal of Scientific Instrument, 2014, 35(3): 620-626.
[7]LIU X K, PU H J, ZHENG F Y, et al. Research on electric field distribution and error characteristics of the nanometer time grating displacement sensor [J]. Chinese Journal of Scientific Instrument, 2013, 34(10): 2257-2264.
[8]FU M, PENG D L, LU J, et al. Differential and linear CCD displacement sensors based on time reference points [J]. Optics and Precision Engineering, 2014, 22(4): 956-962.
[9]FU M, PENG D L, LU J, et al. Study on the time-grating displacement sensor of the static light field type based on linear charge-coupled device[J]. Journal of Mechanical Engineering, 2015, 51(4): 8-14, 21.
[10]XU ZH P, ZHAI L P, GE W Q, et al.CCD geometric super-resolution method based on subpixel [J]. Opt. Precision Eng., 2008, 16(12): 2447-2453.
[11]WANG H SH, CHEN C CH,HUANG W G. Research the method to improve CCD measurement accuracy[J]. Journal of Optoelectronics Laser, 2010, 21(1): 63-65.
[12]WANG W T. Research of High-speed CCD data acquisition system and image spots location [D]. Wuhan: Wuhan University of Technology, 2009.
10.3969/j.issn.1001-3881.2015.24.014 Document code: A
TP212
基于时序驱动的静态光场式时栅传感方法研究
付敏*,张兴红
重庆理工大学机械检测技术与装备教育部工程研究中心,时栅传感及先进检测技术重庆市重点实验室,重庆400054
提出了一种用时序驱动光敏元构成匀速扫描坐标系的方法,实现了将被测物体空间位移的测量转换为对时间差的测量。根据时栅相对运动双坐标系的转换原理,将线阵CCD的光敏元视为匀速扫描坐标系,两个空间上并排,时序上互相错开的线阵CCD为静止坐标系,则同一被测对象在两个CCD上输出电信号的时间差的变化量与扫描速度的乘积,即为所测位移的大小,并可以判断位移的方向。用雷尼绍激光干涉仪对所研制的CCD时栅传感器进行校准,在有效测量范围(600.05 mm)内,经过修正后的测量误差控制在±2 μm以内,实现了在光学领域应用时间测量空间的思想。
位移测量;时栅位移传感器;CCD位移传感器;时序驱动
14 March 2015; revised 6 May 2015;
Min FU, Research Assistant.
E-mail: fum_0@cqut.edu.cn
accepted 19 June 2015
Hydromechatronics Engineering
http://jdy.qks.cqut.edu.cn
E-mail: jdygcyw@126.com
猜你喜欢
杂志排行
机床与液压的其它文章
- The design of control system applied in artificial grass tufting machine adopting servomotors
- Research on active suspension control strategy based on fuzzy PID control
- Automobile magnetorheological damper multi-objective optimization analysis
- Co-simulation and consumption analysis of wheel loader on negative loading condition
- Influence of the underlap in the poppet valve on its performance
- Comprehensive reliability evaluation of foreign high-end gantry machining Center
