准双曲面齿轮齿面测量数据的应用与动态性能仿真
2014-06-29徐忠四雷红霞
徐忠四,冯 蕾,雷红霞
(1.中北大学 机电工程学院,山西 太原030051;2.兰州工业学院 机电工程学院,甘肃 兰州730050)
The tooth surface shape's character of hypoid gear for automobile industry is different from one of involute gear,because there is no reference surface and the machining accuracy depends on its machine tool and setting parameters[1].In addition,hypoid gear machine tool manufacturers such as world famous Gleason company in America.All keep the internal structures of the machine tool a secret and aren't willing to be open to the others.So the research on dynamical performance of hypoid gear is not sufficient even in the world,and its vibration and noise problems are always world problems[2].So to speak,even the world famous hypoid gear manufacturers,they still depend on experienced professional technical staffs and technician workers to control hypoid gear's machining quality,so it can not guarantee the quality stability of gear manufacturing[3].
Because the tooth surface shape of hypoid gear is very complicated and its measurement is very difficult,quality management and control of tooth surface accuracy depend on the contact spot in the past[4].The vagueness of contact spot's shape and position,judgment subjectivity of good or bad,and difficulty to keep their measurement data,so obviously there are a lot of problems about quality management and control of tooth surface accuracy by depending on the contact spot.In reality,the noise problem caused by the precision of gear tooth surface is always world problem[5,6].
In recent years,coordinate measuring machine(CMM)and special measuring instrument of hypoid gear can be used to measure the tooth surface's accuracy.The quantity of papers that measured data is used for the quality management of machining accuracy and dynamical performance is gradually rising[7,8].In spite of this,how to use these measurement data for the dynamical performance simulation of hypoid gear and quality managment of the machining accuracy is still a big subject.Application method on measured data of latticed measurement and scanning measurement and how to use measured data for dynamical performance simulation are studied in this paper.
1 Latticed measurement and scanning measurement
1.1 Measuring method
1.1.1 Latticed measurement
Tooth surface latticed measurement of hypoid gear can be illustrated by Carl Zeiss CMM.Fig.1 is the tooth surface measurement with latticed meas-urement when we use CMM to measure the actual tooth surface of hypoid gear.Three-dimensional probe is contacted with the actual tooth surface along the normal direction,and the deviations between the actual tooth surface and theoretical one can be measured.
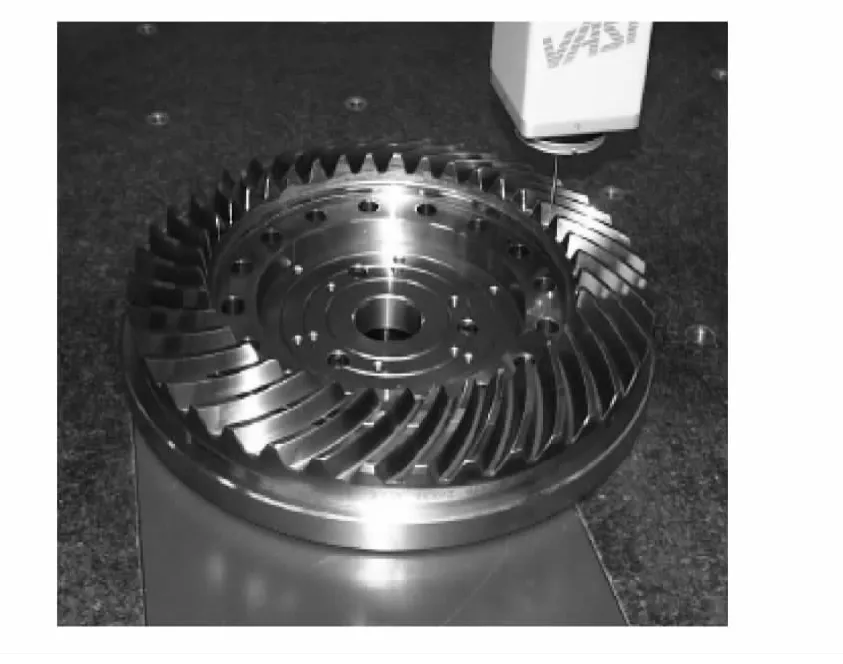
Fig.1 Tooth surface measurement with CMM
The latticed measurement has the advantage of high measuring accuracy because it can avoid the deviations resulted from friction.Its disadvantages are as follows:low measuring speed,gear easily interfere by probe when the concave surface of small modulus is measured,and probe slipping and breaking off easily when the pinion with a few teeth is measured[9].
1.1.2 Scanning measurement
Special measuring instrument of Hyb-35 type hypoid gear was developed by Japan Osaka Precision Machinery Co.Ltd.(OSK),which could be shown in Fig.2.
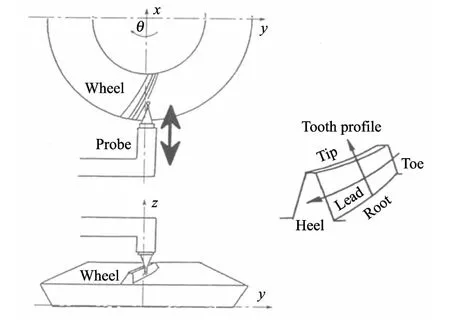
Fig.2 Diagram of scanning measurement
Hyb-35 uses two dimensional measuring heads to measure the tooth surface deviation between y and z axis.While measuring,in order to make measured point of x-axis component of normal direction closed to 0°,it is needed to rotate the hypoid gear constantly and keep the measuring head moving in the plane where y-axis coordinate is constant.So frictional resistance resulted from measuring head's movements will affect the measurement results[10].But scanning measurement using two dimensional measuring heads can greatly improve the measurement speed and measure the edge of the tooth surface.In addition,it can avoid the disadavantages of latticed measurement with CMM[11,12].
1.2 Character of measured data and analysis of measuring methods
1.2.1 Character of measured data of latticed measurement
We use CMM by Carl Zeiss to measure actual tooth surface in Fig.1,and we often measure 5 points along the tooth depth (“u”direction)and 9 points along the tooth profile(“v”direction)in the latticed measurement.(u,v)is the grid coordinate of measured points,and the sketch map of the latticed points is shown in Fig.3.We can see the actual area of gear flank,possible contact area and the distribution of measured points clearly.
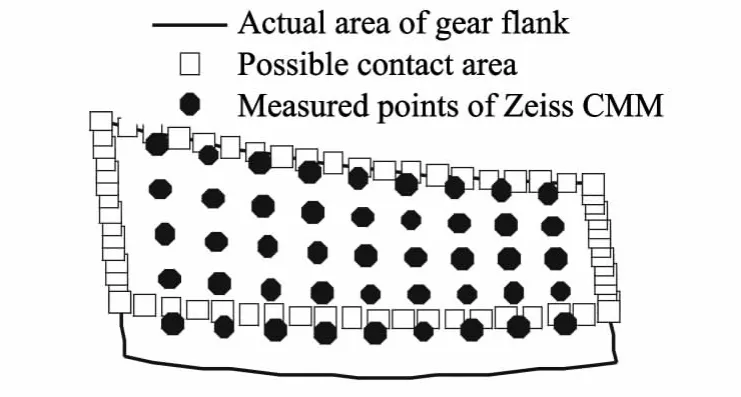
Fig.3 The sketch map of measured points for latticed measurement
1.2.2 Character of measured data of scanning measurement
The typical scanning measured pattern by special measuring instrument of Hyb-35 type hypoid gear developed by OSK can be seen from Fig.4.Fig.4 has shown three typical scanning measurement patterns:along the tooth profile 9 lines and along the tooth lead 29 lines;along the tooth profile 1 line and along the tooth lead 29 lines;along the tooth profile 3 lines and along the tooth lead 3 lines.And every scanning line has 113 measurements.
1.2.3 Advantages and disadvantages of measuring methods
We can see the following advantages and disadvantages of latticed measurement and scanning measurement from Fig.3 and Fig.4:
1)In the latticed measurement,tooth surface data information is quite few and only 45 points of tooth surface can be got,but in the scanning measurement,along the tooth profile 9 lines and along the tooth lead29lines(in the pattern1)can be got,and every scanning line has 113 measurements.
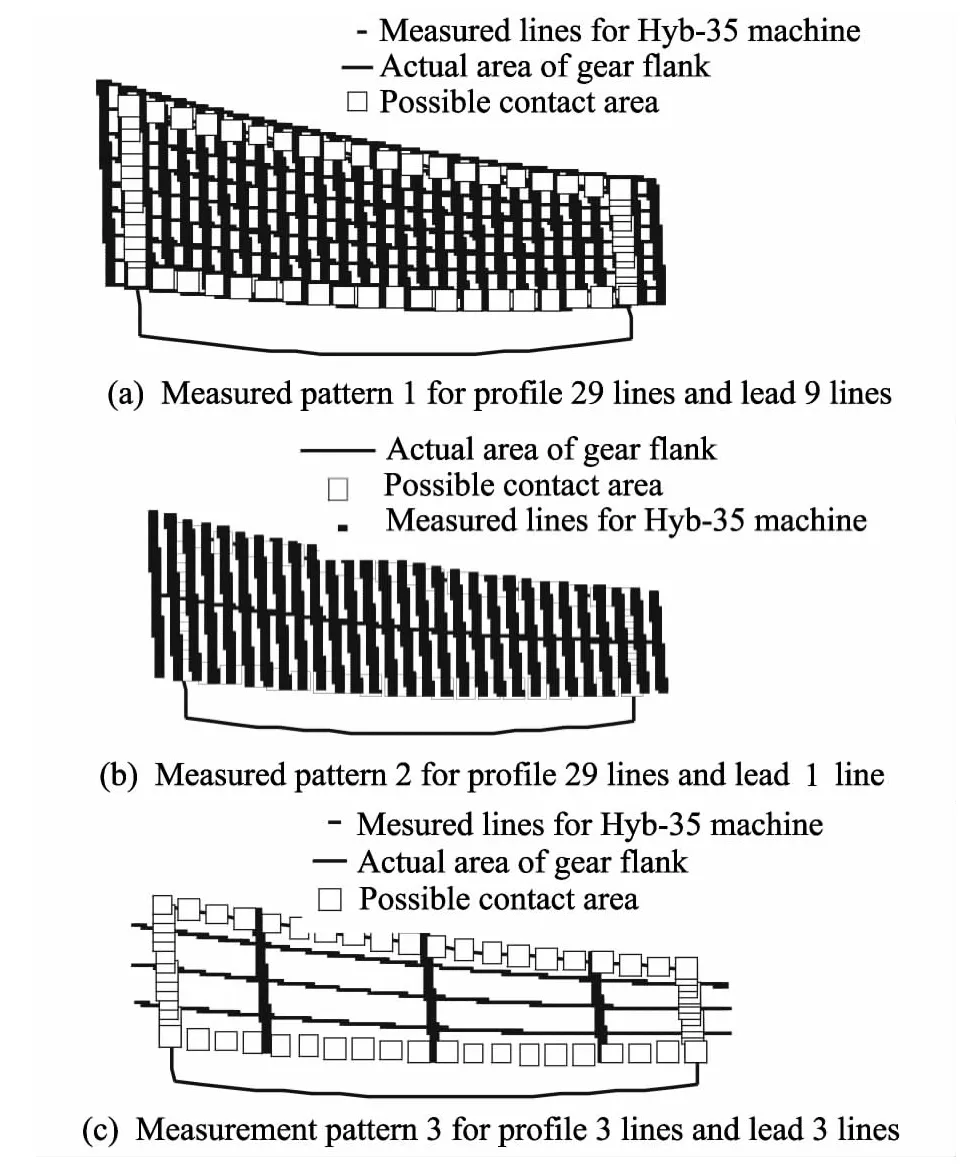
Fig.4 Three typical measurement patterns of scanning measurement
2)It is difficult to achieve the full field of tooth surface of the latticed measurement.Heel and toe of tooth can't be measured which can be seen from Fig.3,but it is easy to measure every field of tooth surface for the scanning measurement.
3)Scanning measurement can provide colorful measurement patterns.Measurement pattern in the Fig.4(b)can provide data information of the hypoid gear's dynamical performance simulation.But for the gear's quality management,because of the limit of measuring time,measurement pattern in the Fig.4(c)can be considered.
4)It is easy to refer the corrected values of the machine-setting parameters for the latticed measurement[13].
2 Application of measured data on quality management of hypoid gear
2.1 Application of scanning measurement
2.1.1 Lapping allowance's management
Measured data between the scanning measurement(OSK's 3HY type,Hyb-35 type)and the latticed measurement(Zeiss's CMM)is compared in Fig.5.Scanning measurement can measure the total field of the tooth surface,but latticed measurement can only measure the relative small field.From Fig.5 we can see that scanning measurement can stand for the lapping depth clearly,so it can control the lapping allowance effectively.
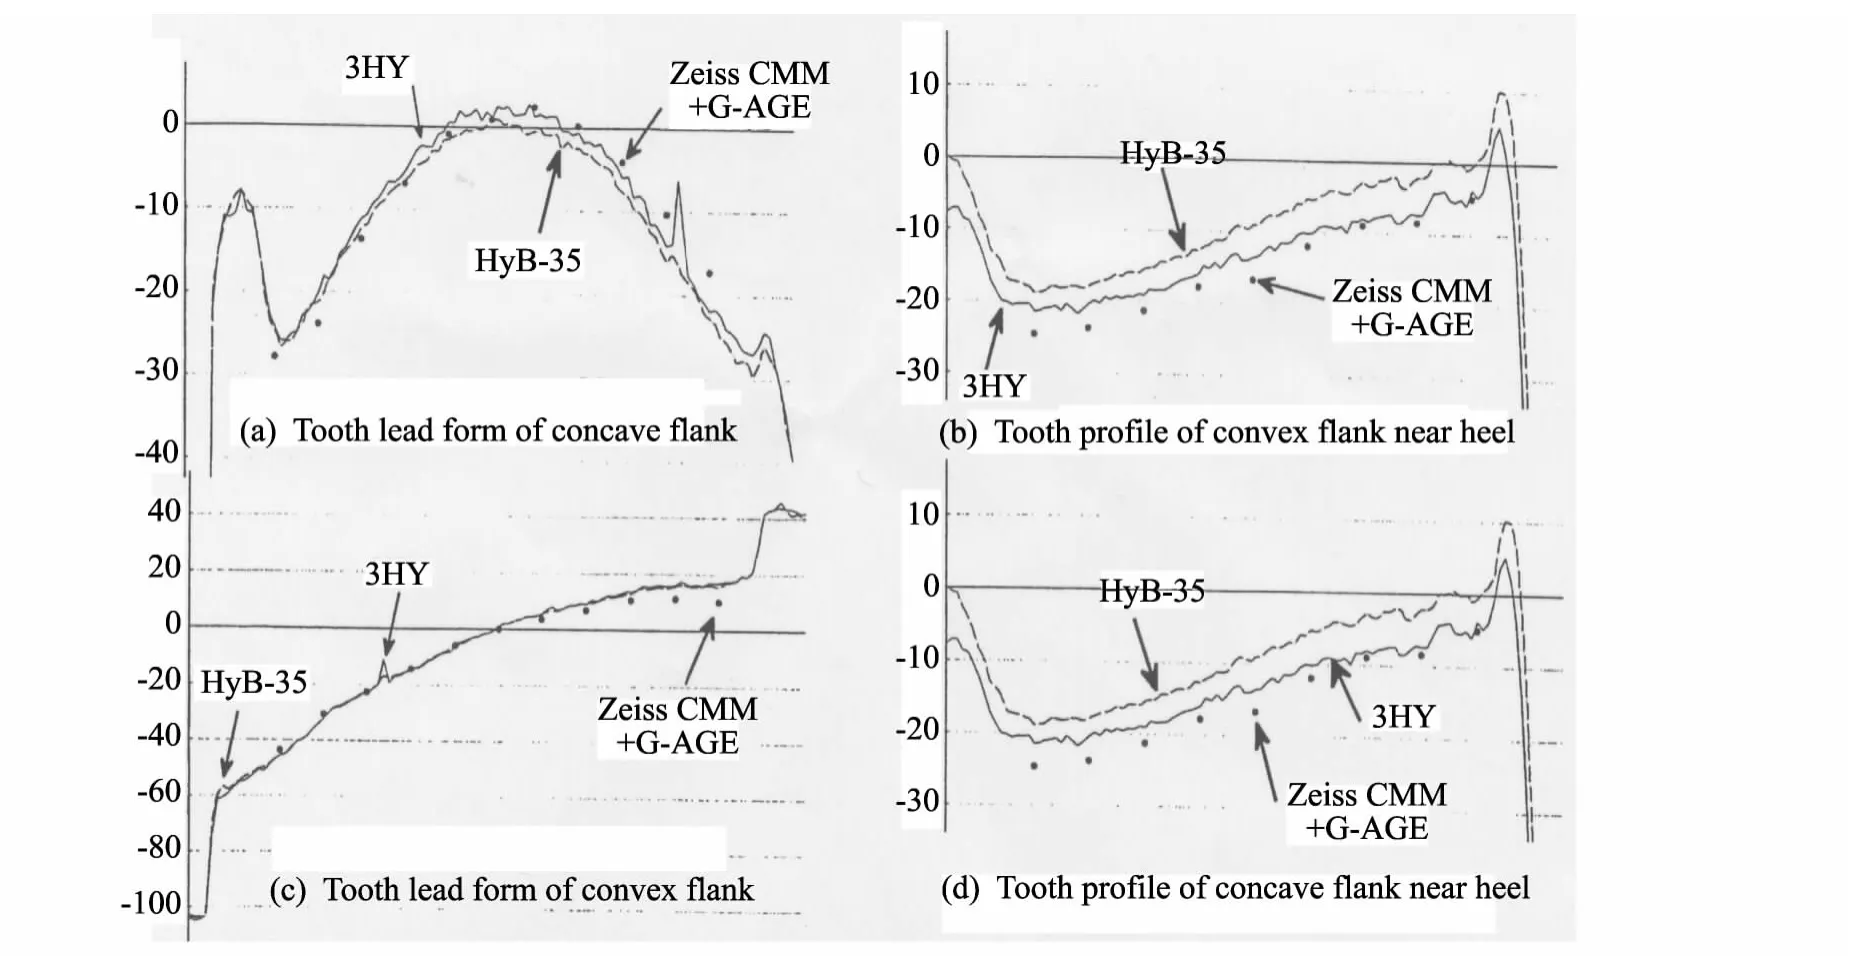
Fig.5 Comparison of mesured data between latticed measurement and scanning measurement
2.1.2 Management of heat treatment deformation
Tooth flank comprison of the hypoid gear before and after the heat treatment can be shown in Fig.6.
It can be seen that changes of the tooth surface shape are well judged by scanning measurement.In practice,we can find the heat treatment deformation law so as to take effective measurement to control the tooth surface shape after the heat treatment to,therefore,high quality gear can be produced.
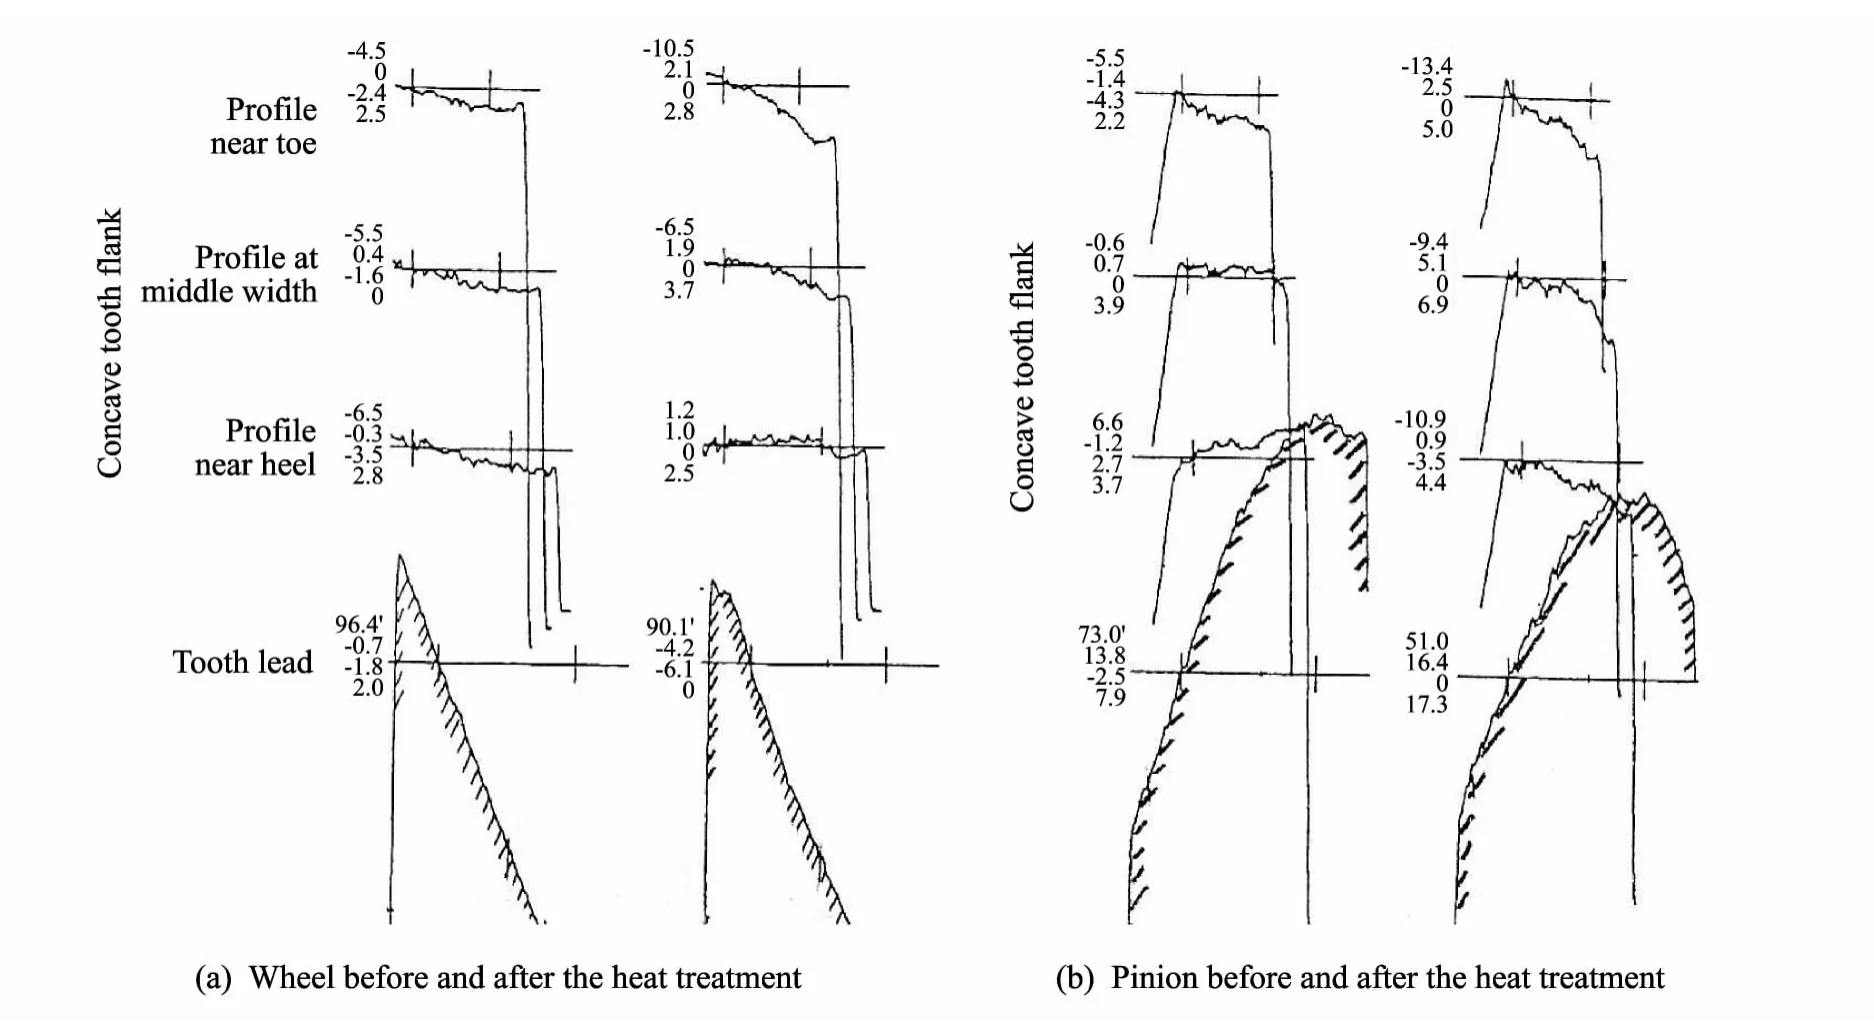
Fig.6 Management of heat treatment deformation
2.1.3 Shape and position of the contact spot
When the wheel and pinion of the gear are put together according to the actual meshing position,schematic diagram of error curve of meshing point is shown in Fig.7.Which can stand for the actual meshing situation of hpoid gear.As the actual contact position of gearscan be seen from Fig.7,we can speculate the contact spot shape and position from the measured data.In addition,the output data can also be considering the effect of installation error of V,H,which can quickly grasp the tooth face contact situation from the measurement results[14].
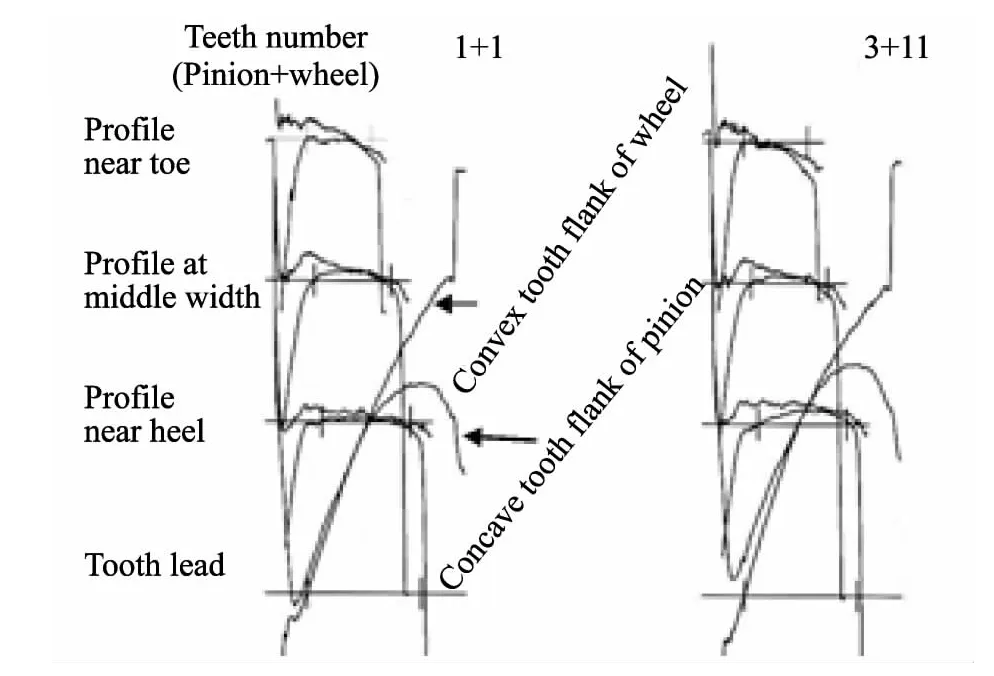
Fig.7 Error curves of real tooth surface meshing between wheel and opinion
2.2 Application of latticed measurement
As shown in Fig.8,the difference surface grids between the actual tooth surface and theoretical one have been obtained according to the initial machine-setting parameters.
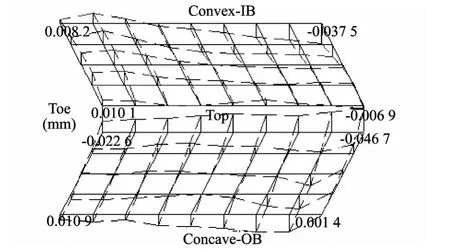
Fig.8 The difference surface grids obtained according to the initial machine-setting parameters
Fig.8 shows the 5×9 measurement grids of the pinion’s tooth surface,in which the positive numbers indicate the pinion’s actual tooth surface is above the theoretical one,and the negative numbers indicate the pinion’s actual tooth surface is below the theoretical one.From the Fig.8,we can also see that the lowest point’s deviation of the pinion's tooth surface is -0.046 7 mm,and the highest point’s deviation is 0.010 9 mm.They all exceed the specified values of GB6 and need to be corrected.
As shown in Fig.9,the difference surface grids have been obtained after the initial machine-setting parameters are corrected two times.
From the Fig.9,we can know that the lowest point's deviation of the pinion’s tooth surface is-0.053 2 mm and the highest point’s deviation is 0.009 3 mm.In addition,most of measured points’deviations have been reduced significantly,which show that the two times correction of machine-setting parameters can significantly improve the accuracy of hypoid gear and this measurement data processing and calculation method is very useful to obtain an ideal tooth surface.
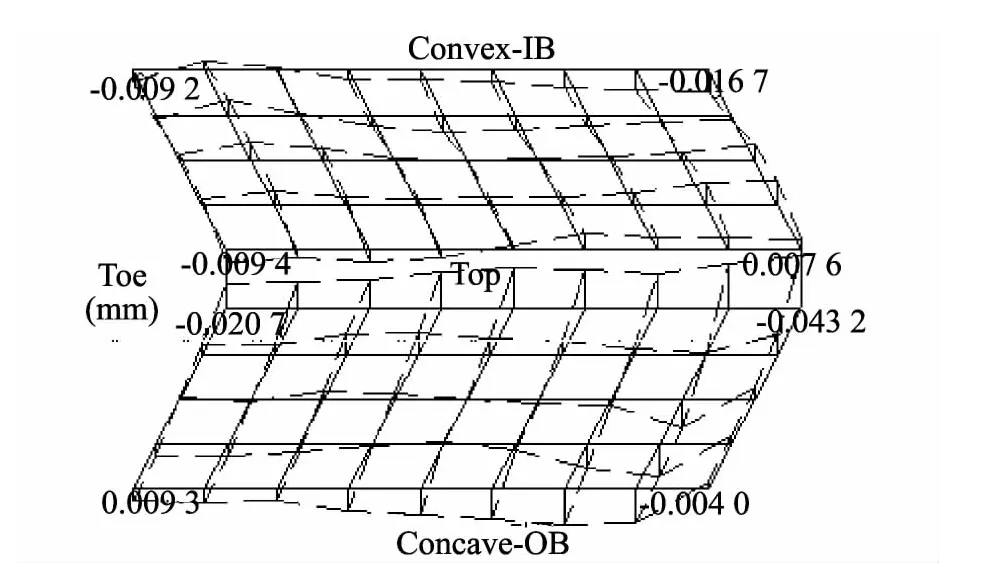
Fig.9 The difference surface grids obtained according to the corrected machine-setting parameters
3 Dynamical performance simulation of hypoid gear
Dynamical performance simulation and prediction have a very important significance to design and manufacture high quality gear[15,16].Dynamical performance simulation with loads and without loads will be introduced.
3.1 Simulation without load
The basic parameters of gear pair are shown in Table 1.
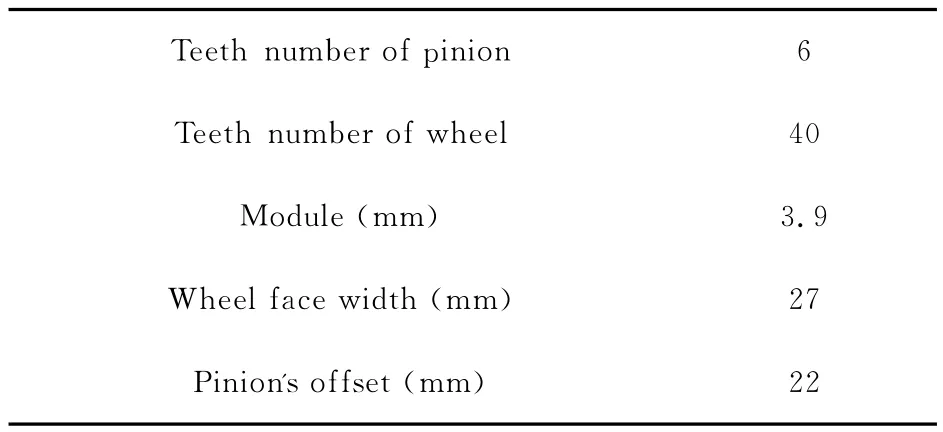
Table 1 The basic parameters of gear pair
Composite error surface of the theoretical tooth surface relative to the imaginary conjugate tooth surface is expressed in Fig.10,Fig.10(a)expresses latticed composite error of the wheel, and Fig.10(b)expresses the composite error of conjugate contact line[17,18].Path of contact point and red contact pattern resulted from the above composite error are expressed in Fig.11.In addition,We can see from Fig.10that to a certain degree path of contact point and red contact pattern's shape and position are speculated according to the composite error surface[19,20].
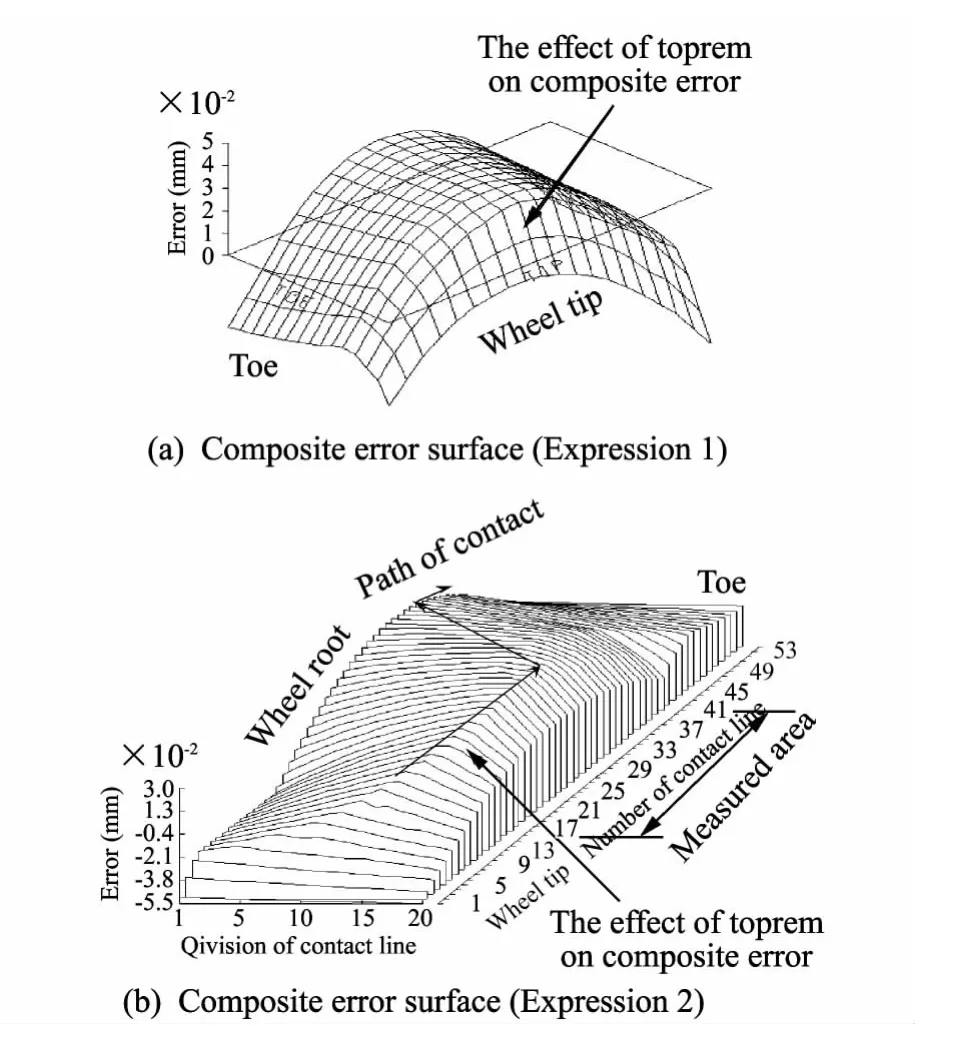
Fig.10 Composite error surface
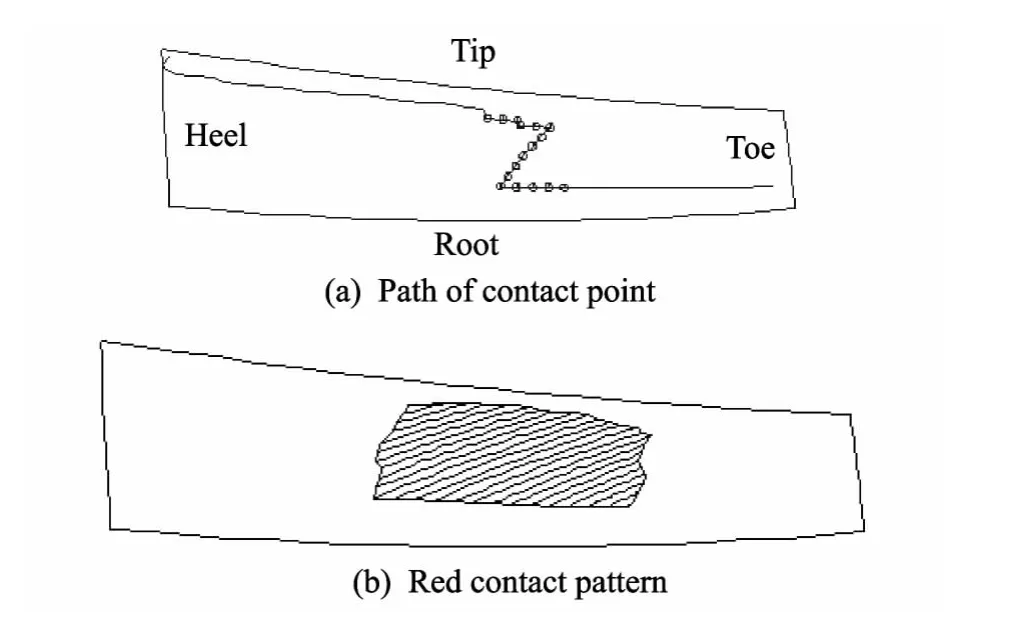
Fig.11 Path of contact point and red contact pattern of gear
3.2 Simulation with load
3.2.1 Contact point with load
The basic parameters of gear pair are shown in Table 2.

Table 2 The basic parameters of gear pair
Comprison between simulation and experimental results about contact point for hypoid gear with load(inputting torque is 30 N·m)is shown in Fig.12.
It can be seen from Fig.12 that the experimental results and the simulation are very consistent.
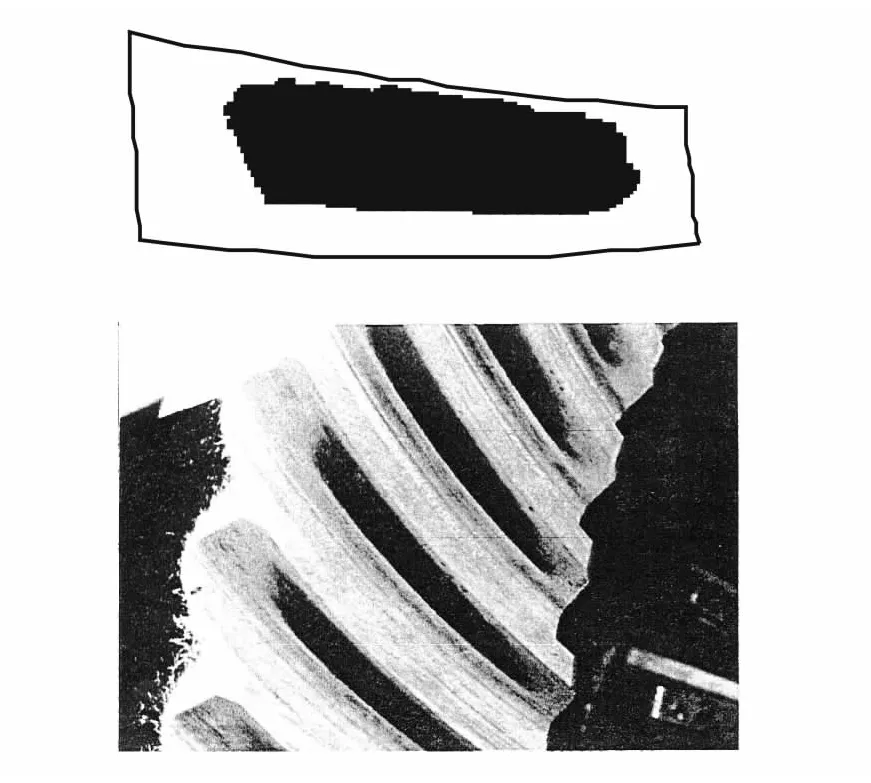
Fig.12 Comprison between simulation and experimental results about contact pattern with load(input torque is 30 N·m)
3.2.2 Dynamical performance simulation
In this chapter,the basic parameters of gear pairs are the same with those of Table 2,and the gear pairs are adopted after two times correction of machine-setting parameters.Fig.13 shows the transmission error when gear pairs are meshing each other(inputting torque is 50 N·m).
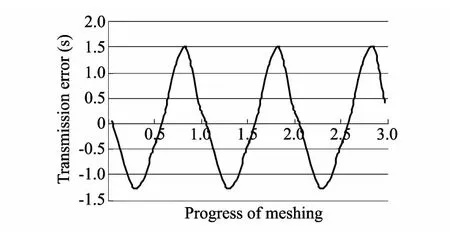
Fig.13 Transmission error of gear pairs with load
Fig.14 and Fig.15 show the normal load distribution and Hertz touch stress distribution in a meshing cycle when the meshing cycle is devided into several touch moments[21].

Fig.14 Normal load distribution
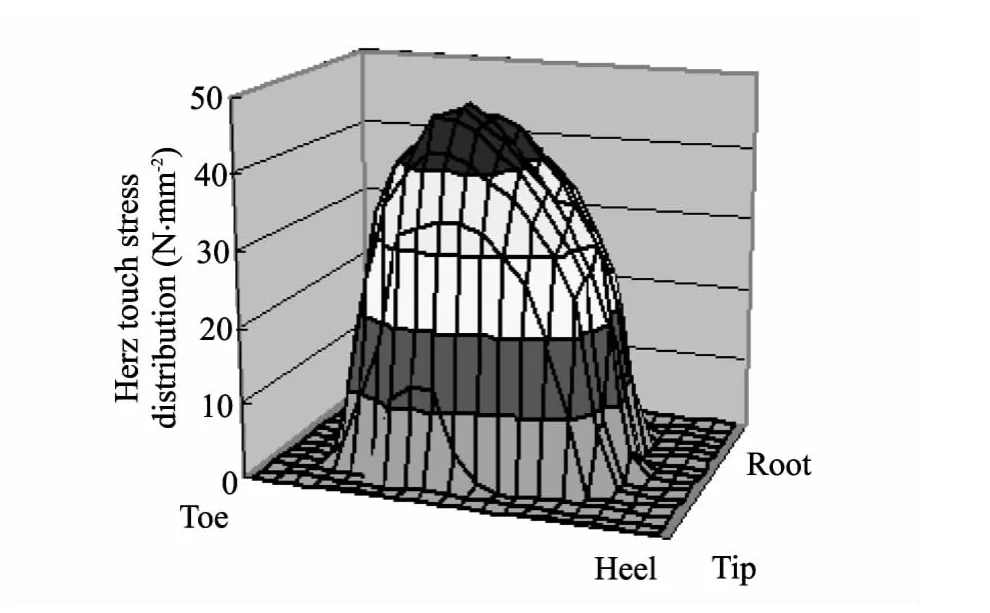
Fig.15 Hertz touch stress distribution
3.2.3 Simulation of root stress
Comprison among simulation,FEA results and measured results of root stress is shown in Fig.16,which shows the changes of root stress at 1/6,1/2 and 5/6 from toe along with the engagement.The tooth surface measured data is got by using Zeiss three coordinates measuring instrument with lattice 5×9 measured data.
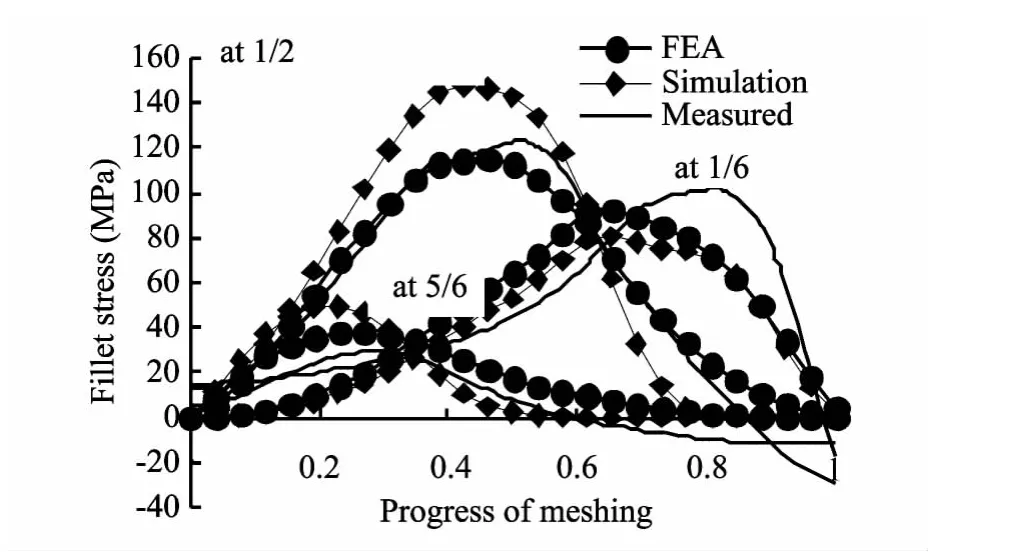
Fig.16 Comprison of root stress among FEA,simulation and measured results
From Fig.16,we can know variation trend bewteen simulation and measured results is very consistent,but the few lattices are also one of the reasons affecting absolute accuracy.
3.2.4 Simulation of vibrational excitation
Fig.17 shows the changes of vibrational excitation of one order frequency component with progress of wear.
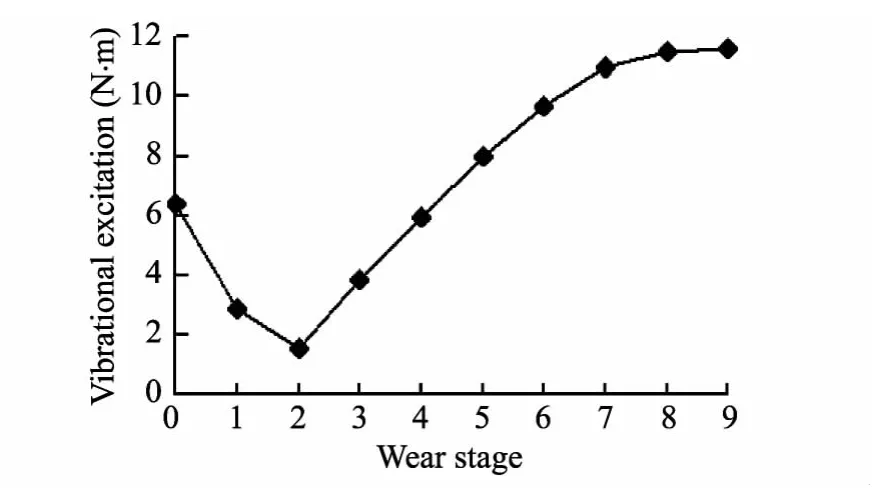
Fig.17 Change of vibrational excitation of the meshing frequency component with progress of wear
In the process of machining of the hypoid gear,if vibrational excitation and other dynamical performances can be predicted in time,it will supply an improtant guidance to produce the hypoid gear with lower noise and vibration and higher strength.
4 Conclusion
Two tooth surface accuracy measuring methods of hypoid gear which are latticed measurement and scanning measurement are researched,and applications of their measurement data on hypoid gear's quality management are analyzed.Scanning measurement can measure the whole tooth surface area,which is very useful for lapping allowance's management,heat treatment deformation's management and speculating the contact spot shape and position.And latticed measurement is very effective to compute the corrected values of machine setting parameters and obtain an ideal tooth surface.In addition,the intelligent predicton of the dynamical performance indexes on contact spot,root stress,vibration exciting forces and load distribution and hertz contact stress on the tooth surface are carried out.In the processes of designing and machining of the hypoid gear,if vibrational excitation and other dynamical performances can be predicted in time,it will provide an improtant guidance to produce the hypoid gear with lower noise and vibration and higher strength.
[1]XU Zhong-si.The research on evaluation method of tooth surface topographic deviation for hypoid gear.Beijing:Beijing University of Technology,2006.
[2]XIE Hua-kun,WANG Zhi,SHI Zhao-yao,et al.Development on technology of bevel gear measurement.Tool Engineering,2003,37(10):48-51.
[3]XU Zhong-si,FU Sheng.Different surface and application on topography deviation characterization of the hypoid gear.Modular Machine Tool& Automatic Manufacturing Technique,2006,(5):39-42.
[4]DONG Xue-zhu.Basic theory of gear meshing.Beijing:China Machine Press,1989.
[5]LIN Chung-yun,Tsay C B,FENG Zhang-hua.Mathematical model of spiral bevel and hypoid gears manufactured by the modified roll method.Mechanism and Machine Theory,1997,32(2):121-136.
[6]ZENG Tao.Design and manufacture of hypoid gear.Harbin:Harbin Institute of technology press,1989.
[7]LI Jing-cai,WANG Tai-yong,FAN sheng-bo,et al.Error corrections of hypoid gear tooth surface based on digitized manufacturing.Transactions of the Chinese Society for Agricultural Machinery,2008,39(5):174-177.
[8]SU Jin-ming,HUANG Guo-ming,LIU Bo.Matlab and external program interface.Beijing:China Electronic Press,2004.
[9]WANG Jun,WANG Xiao-chun,JIANG Hong.Measurement of tooth surface of hypoid gear.Chinese Journal of Mechanical Engineering,2003,39(6):151-154.
[10]Gosselin,Guertin,Remond.Simulation and experimental measurement of the transmission error of real hypoid gears under load.Journal of Mechanical Design,2000,122(3):109-122.
[11]Litvin F L,Kuan C,Wang J C,et al.Minimization of deviation of gear real tooth surface determined by coordinate measurements.Journal of Mechanical Design,1993,115(4):995-1001.
[12]Pfeifer T,Kurokawa S,Meyer S.Derivation of parameters of global form deviations for 3-dimensional surfaces in actual manufacturing processes.Measurement,2001,29(3):179-200.
[13]XU Zhong-si,SU Tie-xiong,JIN Lei.Research on global form deviations for hypoid gear based on latticed measurement.Journal of Measurement Science and Instrumentation,2003,3(1):1-9.
[14]Wang X C,Ghosh SK.Advanced theories of hypoid gears.Amsterdam:Elsevier Science BV,1994.
[15]Takeda R,WANG Zhong-hou,Kubo A,et al.Performance analysis of hypoid gears by tooth flank form measurement.Gear Technology,2002:26-30.
[16]Suh S H,Lee E S,Kim H C,et al.Geometric error measurement of spiral bevel gears using a virtual gear model for STEP-N.International.Journal of Machine Tools and Manufacture,2002,42(3):335-342.
[17]Suh S H,Jih W S,Hong H D.Sculptured surface machining of hypoid gears with CNC milling.International Journal of Machine Tools and Manufacture,2001,41(6):833-850.
[18]LI Xiao-qing,ZHOU Yun-fei,WANG Yan-zhong.Reserch on an algorithm for an NC machining hypoid pinion.International Journal of Advances Manufacture Technology,2003,22:491-497.
[19]Simon V.Head-cutter for optimal tooth modifications in hypoid gears.Mechanism and Machine Theory,2009,44(7):1420-1435.
[20]WANG Pei-yu,FONG Zhang-hua.Adjustability improvement of face-milling hypoid gears by modified radial motion(MRM)method.Mechanism and Machine Theory,2005,40(1):69-89.
[21]CAO Xue-mei,FANG Zong-de,XU Hao.Design of pinion machine tool-settings for hypoid gears by controlling contact path and transmission errors.Chinese Journal of Aeronautics,2008,21(2):179-186.
猜你喜欢
杂志排行
Journal of Measurement Science and Instrumentation的其它文章
- Application of Kalman filter on mobile robot self-localization
- Design of a titl angle measurement system based on ADXL345 sensor
- Status and development trend of asphalt foaming process
- Research and simulation of two-level grid-connected photovoltaic inverter system
- Research on temperature control module of injection molding machine based on C8051F020
- Design and application of integrated automation system platform of mine based on PON
