Research of data acquisition process and reconstruction for constructing prototype surface*
2014-07-31DongmanYUDiWANGXiaopengCHENXiaojingLI
Dong-man YU, Di WANG, Xiao-peng CHEN, Xiao-jing LI
1Henan Polytechnic Institute, Nanyang 473009, China;2Henan North Star Mechanical and Electrical Co. LTD., Dengzhou 473000, China
Research of data acquisition process and reconstruction for constructing prototype surface*
Dong-man YU†1, Di WANG1, Xiao-peng CHEN2, Xiao-jing LI1
1HenanPolytechnicInstitute,Nanyang473009,China;2HenanNorthStarMechanicalandElectricalCo.LTD.,Dengzhou473000,China
As a modern design method that contrary to traditional design, Reverse engineering (RE) plays an important role in accelerating conceptual design and physical design. The key problem of RE is how to obtain point data, process data and reconstruction data for a prototype. Therefore, this study focuses on the key steps of processing point cloud and reconstruction mode. Based on RE system of mechanical structural design, the dimensional surface module is established. The scattered point cloud data are acquired by optical scanning the physical object using three-dimensional coordinate measuring machine (CMM) and an optical scanning device. After the establishment of selected model, data process for prototype, includes noise elimination, data interpolation, data smoothing, data filtering, data splicing and surface reconstructing, are conducted subsequently. Through processing of measurement data, a CAD model is created and fabricated in stereo lithography apparatus (SLA) machine.
Reverse engineering, Constructing surface, Coordinate measuring machine
1.Introduction
Fabrication of pioneer products with lower cost and shorter cycle is a priority choice that an enterprise should conduct in such a competitive market circumstance, and reverse engineering plays an important role in propelling product development and borrowing novel ideals from other structure to meet such a requirement. In contrary to traditional design method, RE technology adopts special measuring technology and apparatus to get dimensional data[1-3]. After building a stereo model with measuring data, the more detailed analysis, modification, verification and fabrication would be carried out subsequently. In additional, combined RE and RP (rapid prototyping) technology, a particular manufacture technology, additive material forming process, which is different from the formerly removal material forming technology, we can replicate or manufacture the improved production and quickly evaluate or modify the production[4-6]. The RP system could produce working route from standard data or meshed STL model from the RE model. However, due to special structure and complex topology relation, obtain full surface data of a prototype, in most case, is a complicated work and should carry out a series of data processing procedure[7].
The starting point of RE technology for an engineer, is to obtain the full point cloud data. The measuring technique of point data, in most case, can be divided into 3 kinds in accordance with its feature and application, which are of contact measurement, non-contact measurement and layer-by-layer scanning method, respectively. The accuracy of contact measurement is quite high and reliable, and one of the common tools used for surface reverse is CMM machine. The non-contact measurement can scan surface with high-speed and avoid of probe radius compensation, which has been widely used in industrial detection. However, the two measurement methods mentioned above also have some deficiency. For example, it is quite difficult to measure the inner contour of model body. The layer-by-layer scanning method, developing with photoelectric technology and graph manipulation, can solve this problem, which has higher precision and could quickly measure the inner structure. The typical devices include laser scanner system, structural light scanner system, industrial computed tomography or stereo-radiography.
In this work, a module of fish sample is selected as research object and used to obtain surface data. Figure 1 shows the whole devices of the point cloud acquisition system, which belongs to non-contact measurement method. The optical imaging device, CS-0400, offered by Beijing 3D CaMega Co., Ltd, is installed in a CMM machine, CLY-CT2H, which is offered by Chengdu API Co., Ltd. The CMM machine scans the workpiece surface from one point to another, namely by picking points through scanning the line. The scanning line is an intersection of the scanning plane and the workpiece. The photo source mounted on the scanning head is a filament lamp, and the double-side of the scanning head is an optical pickup tube. The measurement system, a non-contact device herein, adopts the projection grating method with triangulation principle and coded scanning mode. The scanning accuracy reaches 0.03 per frame, the global accuracy reaches 0.1 mm per meter.

Figure 1. Point cloud acquisition system, CMM and auxiliary attachment
2.Digitization of the surface
Two main scanning modes are frequently used for RP technology, which are radial scanning and axial scanning, respectively. Measurement path planning is concerned with determining the position of surface points, the directions of probing vectors and a collision-free path. In order to achieve the best point cloud, it is essential to arrange the measuring path properly. In this project, the most important surfaces are some free-form surfaces, such as discontinuity surface and transition surface. Selection of probe orientation is a key step for this system, while improper probe orientation method may make a reachable point become unreachable. The CMM should be adjusted with different poses, at the same time, lowering the step size can get more points in this free-form surface. The point cloud derived from scanning of sample surface by optical non-contact device is shown in Figure 2(a). In this figure, some malformed areas of point cloud in fins and tails must be processed subsequently.
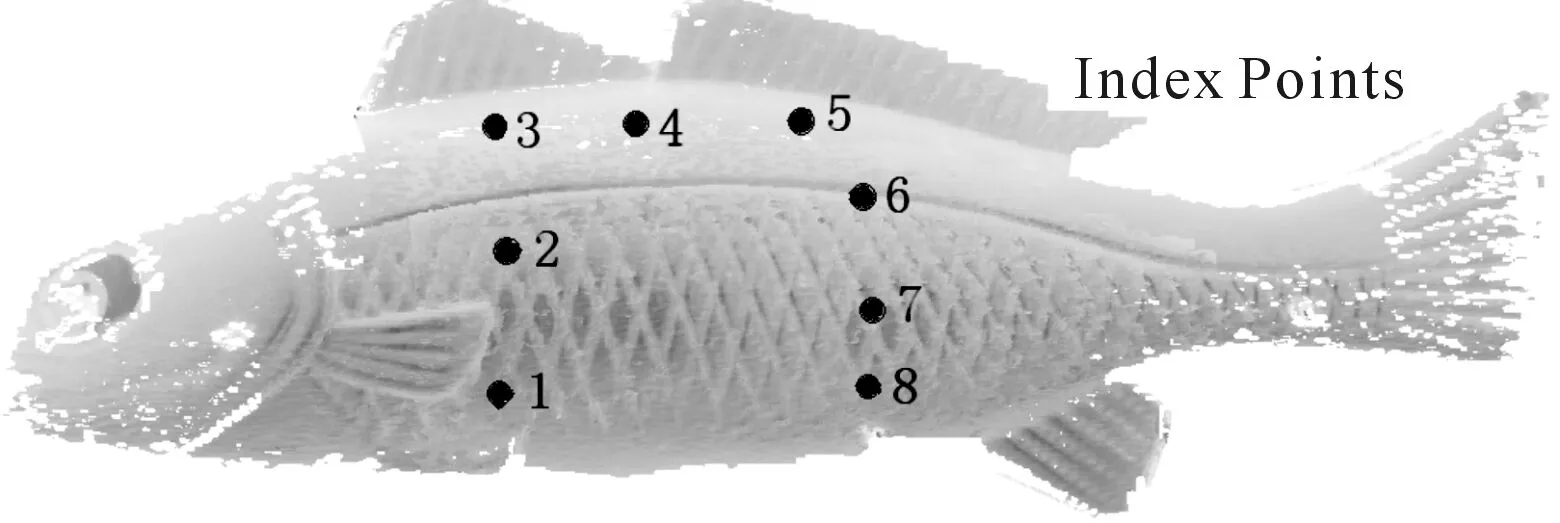
Several datum-points should be created at different position of the surface and marked before measuring. For example, eight marked points, served as index, are distributed in different areas which is shown in Figure 2(b). With the scanning head moved from one position to another position for measuring the feature, three datum points must be measured again for each step. The surface reconstruction is an indispensable step for this course, the main reason is the machining procedure needing the triangular mesh created by smooth surface model or good point cloud. The result of a mechanical tracing process is a structural point sequences with a large number of points and a line structure. The output data of the optical device are coordinate values of the center of the probe and normal vectors in theX,YandZdirection at the position of the surface points. Additionally, the output format of the measured data does not accord with the demanding of the creation of a CAD model. Thus we must process the measurement data.
3.Processing of measurement data
Adequate measuring points would lift the surface accuracy and reduce the deviation between model and prototype. However, plenty of noise mixed in point cloud will increase rough error. The data of prototype might contains some errors that caused by anthropogenic factor or enhancement factor, especially in sharp edge and boundary point. Constructing the surface with error or bad point might lead to surface deflection or structural interference, even will lead to surface fitting failure. Therefore, the data obtained from physical model should be processed before building model. The data processing includes noise elimination, radius compensation, data splicing, data resampling and data boundary treatment. Generally, the data process for thin-wall big-area physical model should take the following steps.

(a)The diluted point cloud made up of several data blocks

(b) The original point cloud with marked points Figure 2. The point cloud of the sample module after splicing of several blocks
3.1.Data splicing and elimination
In most case, some complicated workpiece cannot be described by a single surface, should be constituted by several surfaces. Therefore, the acquired point cloud should be divided into blocks according to covering power and construct each block into surface model. These surface models should be converted and aligned in one coordinate system. Figure 2(a) shows that four data blocks are spliced together to form whole data, the shade regions are overlapped by two or three regions. Three kinds of data division methods are in common use, which are based on edge, based on surface and based on edge & surface, respectively.
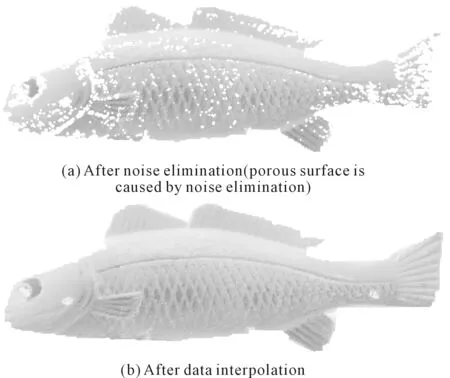
Noise is a fundamental component of surface image, especially prevalent in dense prototype. In the course of product numeralization, quantity noises will be introduced by measurement error and operation error. For the reason of reducing or removing noise that influencing on model, the noise points would be picked out and removed away from cloud points. In this course, the visual inspection and spatial domain are common methods used for eliminating noise. Noise interrupts the boundary, resulting in incomplete surfaces in 3D reconstruction that typically appears rough. However, eliminating noise points would also delete some regular points, sometimes even result in porous surface, which is illustrated in Figure 3(a).

Figure 3. The point cloud of the sample module
3.2.Data interpolation and smoothing
Data interpolation method is used for refilling the vacant data for some areas that cannot be measured directly. Two kinds of surface models should be take into account, one is surface reverse modeling based on point & spline, another is surface fitting based on point. The point cloud of the sample with data interpolation is shown in Figure 3(b). Figure shows some porous surfaces have been refilled.
Data smoothing aims to erase hash points and cuspidal points randomly distributed along the boundary. The data smoothing technology contributes to obtain good feature extraction result and establish accurate model.
3.3.Data filtering and surface reconstructing
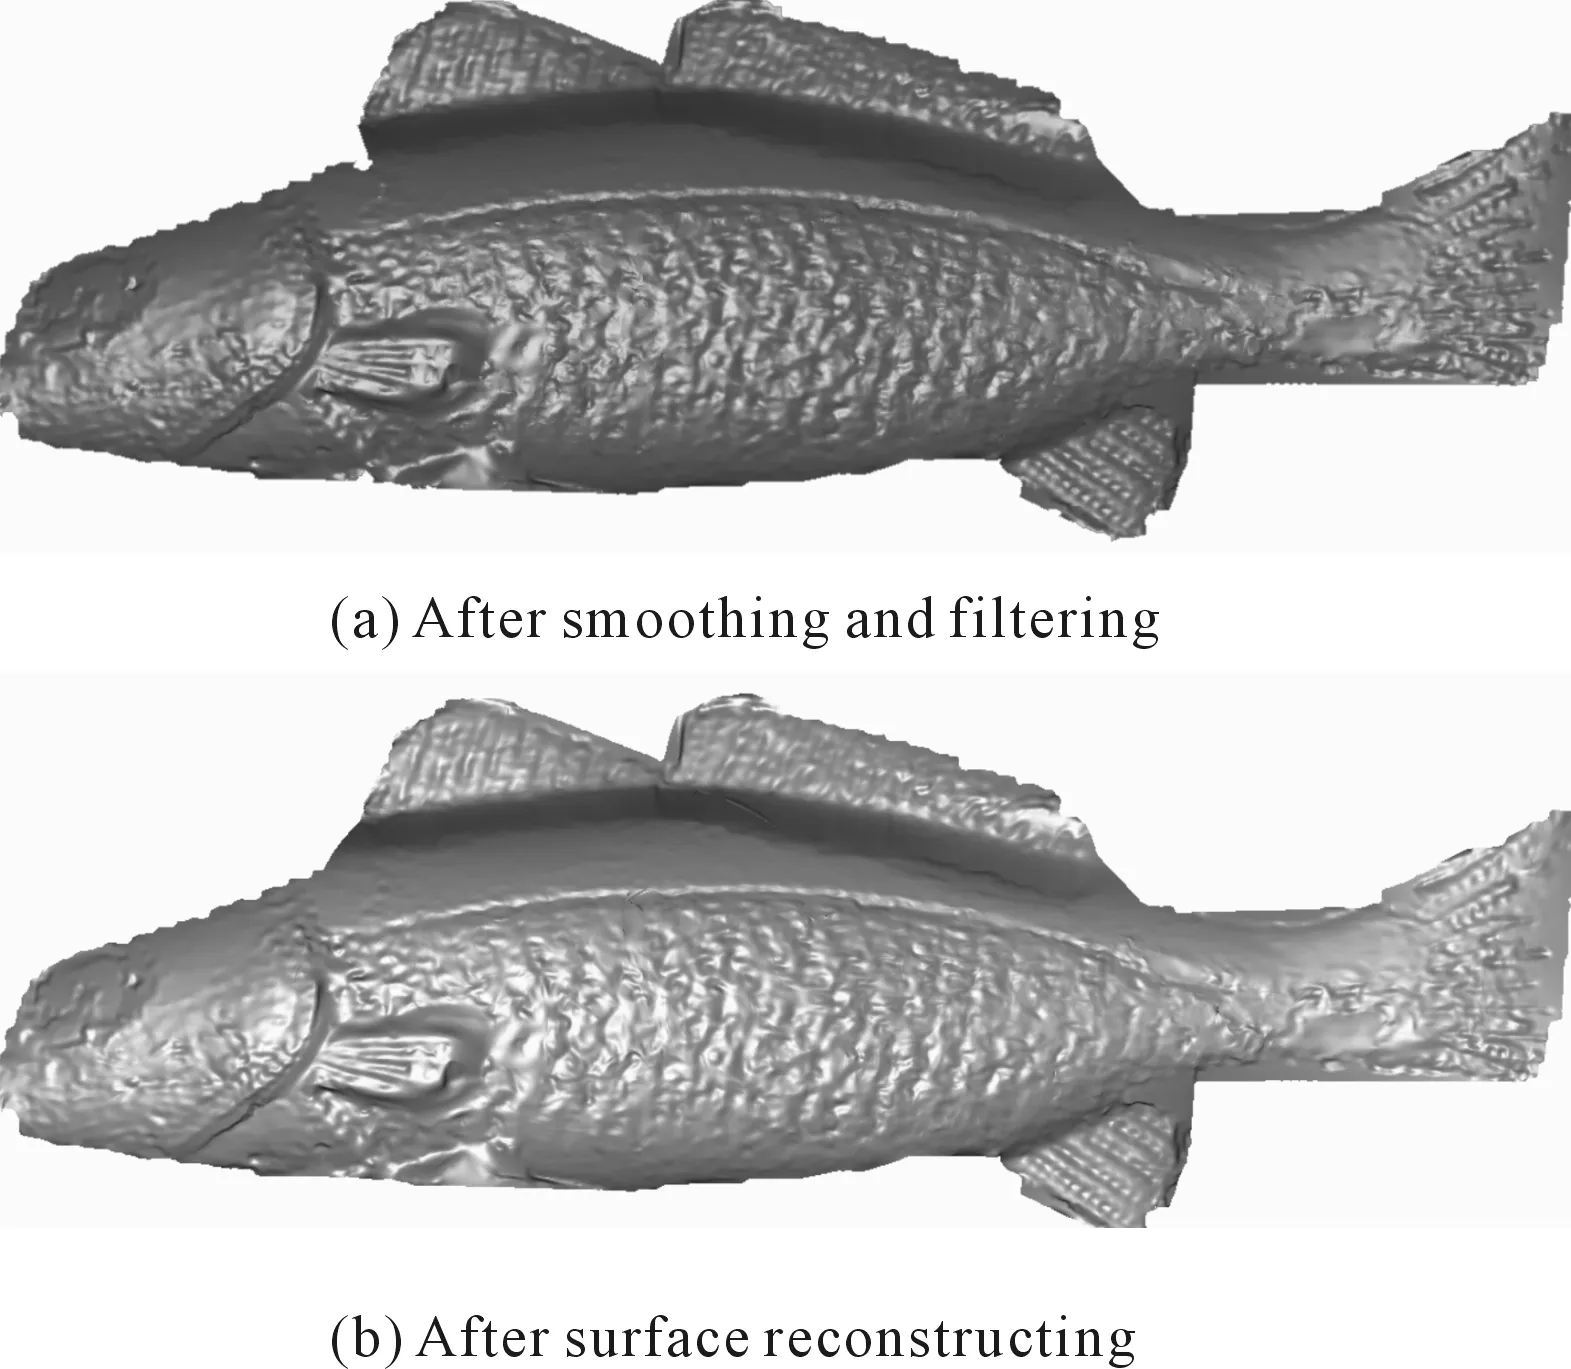
Further improving surface precision technology is data filtering. The methods of neighborhood averaging and median filtering are common used for eliminating system noise, among which the former can smooth the signal and the later can eliminate the noise. The experiment has confirmed data filtering could refine the measuring quality. A 3D model of the sample after data smoothing and filtering is shown in Figure 4(a).
A complex 3D model can be assembled by multiple simple surfaces with different features. After the digitization of the model and a series of steps for processing, we can get plenty of spatial divergent points randomly distributed. However, the data still need be modified or repaired furthermore for better results. From Figure 4(b), we can see a 3D model of the sample after surface reconstructing, some bad points and overlap points have been repaired or moved.

Figure 4. The 3D model of the sample after data
4.Fabrication of model
After building the model, the 3D model is converted into special code, STL format, which has been widely accepted as industrial standard. In the translation process, STL model would be discreted along special direction and generated by tessellating outside skin of the CAD model. With the help of RP technology, we can manufacture the production with standard 3D model and could quickly evaluate or modify the production with shorter work cycle. In this study, we choose a stereo lithography apparatus (SLA) machine as rapid prototyping device to fabricate the model. The whole device of SLA system is shown in Figure 5.

Figure 5. Whole fabrication system for 3D model
Selection or optimization of forming orientation is a necessary step for fabricating a model accurately with high-speed. Choosing proper parameters and slicing the model with slice software, then we can get plane information of each layer and grid vector data, which is used to control scanning trace of laser beam. The slicing parameters have a significant effect on finished quality. Therefore, in this course, the slicing thickness, scanning mode, scanning speed and radius compensation must be assured. Table 1 and Table 2 listed all the important technical parameters of fabrication process.

Table 1. Parameters of support and STL

Table 2. Parameters of SLA process
5.Conclusion and further research
Based on previous research of RE technology, the authors have explored the engineering application of RE technology in designing and manufacturing of complex prototype. This paper takes a toy prototype as an example, describes the whole processes from object digitization to CAD model reconstruction, and have gained a good result. With the help of RE technology, we can accelerate product design and borrowing ideals from other business. It assumed that this technology would have more extensively application in mechanical fields.
[1] Jin T,Kuang J Y.A 3-D point sets registration method in reverse engineering[J].Computers & Industrial Engineering,2007,53:270-276.
[2] Lai X M,Lin Z Q,Huang T,et al.A study of a reverse engineering system based on vision sensor for free-form surfaces[J].Computers & Industrial Engineering,2001,40:215-227.
[3] Nadira L,Isabelle C W,Jacky A.Extracting generalization hierarchies from relational databases:A reverse engineering approach[J].Data & Knowledge Engineering,2007,635:68-589.
[4] Zhang Y.Research into the engineering application of reverse engineering technology[J].Journal of Materials Processing Technology,2003,139:472-475.
[5] Maresca P.Reverse engineering collaboratory:a logic-based tool for monitoring the quality of programs[J].Engineering Applications of Artificial Intelligence,2000,13:99-107.
[6] Liu Y P,Wang C T,Dai K R.Reverse engineering in CAD model reconstruction of customized artificial joint[J].Medical Engineering & Physics,2005,27:189-193.
[7] Lee R S,Tsai J P,Kao Y C.et al.STEP-based product modeling system for remote collaborative reverse engineering[J].Robotics and Computer Integrated Manufacturing,2003,19:543-553.
构建原型表面的数据获取处理与重构研究*
余东满†1,王 笛1, 陈晓鹏2,李晓静1
1.河南工业职业技术学院,河南 南阳 473009;2.河南北方星光机电有限责任公司,河南 邓州 474150
逆向工程是一种与传统设计相反的现代设计方法。它的重要作用就是加速概念设计和物理设计。逆向工程的关键问题是如何获得点云数据、处理数据和重建数据原型,因此着重研究处理数据点云和重建曲面模型,并经过基于逆向工程系统的机械结构设计最终建成空间曲面模型。使用包含三坐标测量机(CMM)和光学仪的三维光学扫描设备,完成实物对象分散点云数据的获取。获取点云数据后再进行数据处理操作,包括噪声消除、数据插值、数据平滑、数据筛选、数据拼接和曲面重建。处理测量数据创建出CAD模型,将模型在激光快速成型机(SLA)上制造出来。
逆向工程;曲面构建;三坐标测量机
TN919.5
2014-01-15
10.3969/j.issn.1001-3881.2014.12.022
*Project supported by Provincial Science Foundation for Distinguished Young Scholars of Henan (Grant No. 2012GGJS-248), and Provincial Key Research Plan of Science and Technology (Grant No. 112102210207)
† Dong-man YU, PhD.E-mail: yudongman@126.com
猜你喜欢
杂志排行
机床与液压的其它文章
- A Simple time-domain method for bearing performance degradation assessment*
- Structural design and performance testing of the electromagnetic proportional pressure relief valve
- Analysis of magnetic field characteristics for different winding cylinder materials of a new type of magnetorheo-logical damper*
- Impacts of centrifuge errors on calibration accuracy of error model coefficients of gyro accelerometer*
- Interior ballistic simulation and parameter influence analysis of an underwater pneumatic launcher*
- Influence of airflow uniformity over the duct outlet of vehicle air-condition on cooling performance*
