Experimental and simulation research on hollow AZ31 magnesium alloy three-channel joint by hot extrusion forming with sand mandrel
2024-04-18ShiShengnnWngHongyuTengFeiJingLeiSunJuniSunJieZhngShunhu
Shi Shengnn ,Wng Hongyu,∗ ,Teng Fei ,Jing Lei ,Sun Juni ,Sun Jie,∗ ,Zhng Shunhu
a Transportation Engineering College, Dalian Maritime University, Dalian, Liaoning 106026, China
b State Key Laboratory of Rolling and Automation, Northeastern University, Shenyang, Liaoning 110819, China
c Shagang School of Iron and Steel, Soochow University, Suzhou, Jiangsu 215021, China
Abstract Magnesium alloy is one of the lightest metal structural materials.The weight is further reduced through the hollow structure.However,the hollow structure is easily damaged during processing.In order to maintain the hollow structure and to transfer the stresses during the high temperature deformation,the sand mandrel is proposed.In this paper,the hollow AZ31 magnesium alloy three-channel joint is studied by hot extrusion forming.Sand as one of solid granule medium is used to fill the hollow magnesium alloy.The extrusion temperatures are 230 °C and 300 °C,respectively.The process parameters (die angle,temperature,bottom thickness,sidewall thickness,edge-to-middle ratio in bottom,bottom shape) of the hollow magnesium alloy are analyzed based on the results of experiments and the finite element method.The results are shown that the formability of the hollow magnesium alloy will be much better when the ratio of sidewall thickness to the bottom thickness is 1:1.5.Also when edge-to-middle ratio in bottom is about 1:1.5,a better forming product can be received.The best bottom shape in these experiments will be convex based on the forming results.The grain will be refined obviously after the extrusion.Also the microstructures will be shown as streamlines.And these lines will be well agreement with the mold in the corner.
Keywords: AZ31 magnesium alloy;Three-channel joint;Sand;Experiments and the finite element;Die angle.
1.Introduction
With the energy shortage and environmental degradation,it is particularly important to save energy and reduce emission.One of the most effective means to achieve this goal is lightweight.Magnesium alloy is one of the lightest metal structural materials [1,2].So forming magnesium alloy is a significant way to achieve material lightweight.With the advantages of higher specific strength,superior cost performance,better environmental protection,magnesium alloy has been widely used in aerospace,transportation,electronic instruments,etc.[3–6].Since the crystal structure of magnesium is hexagonal,it is easy to brittle crack during the deformation at room temperature [7].But when the temperature is raised above 200°C,plasticity can be greatly improved.At the same time,twinning and slipping can be combined by compressive stress,then a better plastic deformation ability can be shown.Therefore,deformed magnesium alloy is mainly produced by rolling,casting [8],extrusion and forging in the temperature range of 200∼500 °C [9–11].After deformation,better mechanical properties and microstructure characteristics will be found in the material [12,13].
Salevati et al.studied the relationships between mechanical strength and microstructure of AM60 magnesium alloy during ECAP (equal channel angular pressing) and MDF (multidirectional forging).With the decreasing of grain size,tensile ductility of AM60 alloy can be improved obviously [14].The ACAE (annular channel angular extrusion) for AZ80 magnesium alloy was proposed by Zhao et al.The microstructure and mechanical properties of the extruded magnesium alloy were analyzed simultaneously.After a great refinement of grains,higher hardness,tensile properties and deformation uniformity of extruded parts can be obtained [15].Qiao et al.prepared Nano-SiCp/AZ91 composites.ECAP was carried out at different temperatures.It is found that the yield tensile strength and the ultimate tensile strength will be increased sharply with grain refinement [16].
Although the mechanical properties and microstructure characteristics can be improved by the deformation of solid magnesium alloy profiles.However,it should be pointed out that compared with the solid material,the mass of the hollow material will be reduced,more ideal lightweight is further realized.So hollow AZ31 magnesium alloy profiles are used to further study in this paper.Magnesium alloy tubes were prepared by Du et al.through local-heating-assisted dieless drawing,and the results were shown that promising clinical application of dieless drawing tubes [17].Although the shape and properties of magnesium alloys tube were changed through the dieless drawing technique,the tube shape can be controlled better by using a core material.Guo et al.carried out hydro-bulging experiments on magnesium alloy.Good shape and size were obtained in the hollow profile [18].Liu et al.performed hydraulic bulge test of magnesium alloy tube.A tubular component with an expansion rate of 50% is obtained[19].Because of the mandrel,the hollow profile could be filled well and had better formability.
It should be emphasized in the above references is that,how the mandrel material used to fill the hollow to assist receiving the designed shape is particularly important.For hollow profiles,their functionalities and peculiarities are directly provided by the various hollow shapes.During the deformation,the core of controlling the hollow shape is to find the appropriate mandrel material.At present,the commonly used mandrels are divided into fluid medium and solid granule medium.Fluid medium include hydraulic oil,pure water,gas and so on.Solid granule medium is divided into continuous granule medium such as rubber,and discontinuous granule medium such as sand.Cui et al.proposed a multi-step hydroforming process with hydraulic oil.The thinning problem of hydroforming was solved.The T-shaped tube of a certain thickness was obtained [20].Although high precision tubular profiles can be made by the internal hydroforming method with fluid medium,the cost is a little higher.Also the deformation temperature of magnesium alloy in this study will be above 200 °C.However,rubber is easy to soften at high temperature and its service life is shortened.Then the sand as one of heat resisting solid granule mediums is used to fill hollow magnesium alloy.The shapes of hollow magnesium alloy are effectively controlled by the granular medium.And the final designed three-channel joint is successfully archived.
Nagasekhar et al.conducted equal channel angular pressing (ECAP) on alloy tubes with sand as the mandrel.The mechanical properties were obviously improved.Finally,the same designed shapes in ECAP were well controlled [21].In another ECAP experiments on tubular alloy with sand mandrel conducted by Nagasekhar et al.,the study also showed that ECAP could improve the performance of tubular materials with original shapes [22].Bi et al.used the solid granule medium internal high-pressure forming process to bulge AA6061 pipe.The strength and hardness can be increased with the same expansion rate [23].Cao et al.carried out hot granule medium pressure forming for cylindrical parts.It was shown that the formability can be improved by internal pressure [24].On the basis of AA6061 alloy hollow tubes,internal high pressure forming with granule medium was studied by Bi et al.Some typical parts,such as stepped shaft and convex ring tube,have been successfully manufactured [25].Sand mandrel have been successfully applied to hollow profiles.On this basis,the three-channel hollow profiles were used for research in this paper.

Fig.1.Three-channel joints.
The three-channel extrusion method is adopted to extrude the hollow magnesium alloy in this research.Sand is used as the mandrel for the experiment.The three-channel extrusion process of the hollow AZ31 magnesium alloy profile is studied by both the finite element simulation and the physical experiment.Many different parameters are analyzed and discussed based on the forming results.
2.Finite element model
ABAQUS software is used for finite element simulation.Assembly,Material model,Dynamic contact conditions,Loading,Boundary conditions and Mesh are included in FEM(finite element method).The modeling of this experiment contains four parts: die,push,magnesium alloy and sand mandrel.The modeling and assembly are shown in Fig.2.Where L1 and L2 are the sidewall thickness and bottom thickness of the magnesium alloy profile,respectively.S1 is the length of the sand mandrel,S2 is half of the width of the sand mandrel.Since there will be a large plastic deformation in three-channel extrusion,serious mesh distortion is easier to be produced in magnesium alloy and sand mandrel.Computational accuracy can be improved evidently by the refined meshes [26].This model is symmetric,so according to the symmetry,one half of the model is imported into ABAQUS to reduce the calculation time.

Fig.2.One half of modeling as well as assembling of the simulation.
2.1. Material model
The die and the push are seen as non-deformable rigid bodies,while the magnesium alloy and sand mandrel are defined as deformable ones.The pressure moment of the push is transferred by sand mandrel filled in the hollow magnesium alloy.At this moment,the alloy is also forced to move.Its final shape is formed according to the shape of the die.Since the sand is not only pressure transfer medium but also a supporting structure of shape control,the parameters of sand mandrel are considered to be the key of the whole experiment.In this experiment,sand was selected as the pressure transfer medium to fill the hollow magnesium alloy.The partical size of sand is ranged from 0.117 to 0.14 mm.The Rockwell hardness can be 48–55 HRC in these sands [27].Using Drucker-Prager linear model provided in the ABAQUS material library,the sand model is constructed.
AZ31 magnesium alloy is used as specimen for extrusion experiment.Density of the AZ31 magnesium alloy is 1.78×10⁻⁹kg/mm³.Poisson’s ratio is 0.35.The elastic modulus is 38,000 MPa [28].When the temperatures are 230 °C and 300 °C,the yield stresses and strain curves of AZ31 magnesium alloy are also shown in Fig.3,respectively [28,29].
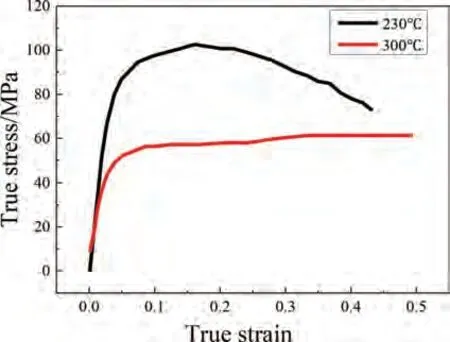
Fig.3.AZ31 magnesium alloy stress-strain curve.
2.2. Dynamic contact conditions
Before the extrusion,sand is filled into hollow magnesium alloy.Then alloy with sand mandrel can be regarded as one billet.As shown in Fig.4,in the hot extrusion experiment of the three-channel joint,the lower surface of the push is in contact with the upper surface of the billet.For the inner sides of the magnesium alloy,the surfaces are contacted with sand mandrel,while for the outer ones,the surfaces are touched with the die.

Fig.4.A Cad model of the simulation.
During the simulation,the non-deformable rigid die is always fixed in all directions.The push is allowed to extrude the billet only along the negative direction ofYaxis at a speed of 20 mm/s.Displacements in all rest directions are restricted.Since the half of model is established as mirror image,it is also necessary to restrict the displacements of the sand mandrel and magnesium alloy on the symmetrical surfaces alongZaxis.It is free to move in the direction ofXandYaxes.
2.3. Finite element mesh
Because of the different types of bodies,different meshes are used in the simulation.As shown in Fig.5.For the discrete rigid bodies,die and the push are meshed with R3D4 (a 4-node linear brick) based on their regular shapes.The mesh sizes are 1 mm and 0.3 mm,respectively.Due to the serious stress concentration in the corner of the die,the mesh is partially refined as 0.1 mm.
One evening a fearful tempest3 arose, it thundered and lightened, and the rain poured down from the sky in torrents1: besides, it was as dark as pitch. All at once there was heard a violent knocking at the door, and the old King, the Prince s father, went out himself to open it.
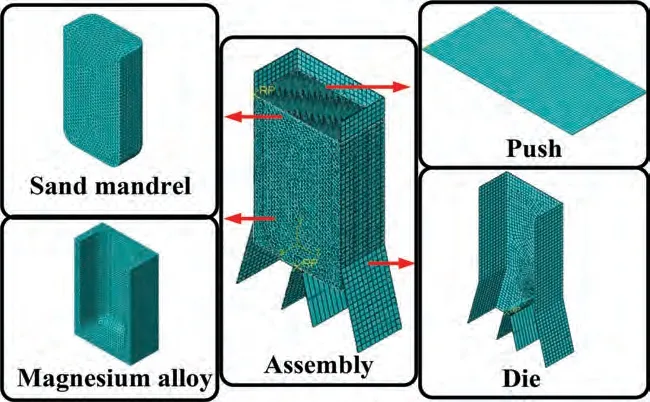
Fig.5.One half of meshing.
For the deformed bodies,the magnesium alloy and sand mandrel are divided into tetrahedral meshes.The mesh type is C3D10M(a 10-node linear brick)and the mesh sizes of the magnesium alloy and sand mandrel are 0.7 mm and 0.8 mm,respectively.There are also chamfers on both hollow AZ31 magnesium alloy and sand mandrel.The radii of chamfersRare 3 mm.
3.Experiment
In this study,AZ31 magnesium alloy three-channel joint was processed by hot extrusion.The chemical composition of AZ31 magnesium alloy was shown in Table 1 [30].

Table 1.The chemical composition of AZ31 magnesium alloy (wt%).

Table 2.Parameters of three-channel joint hot extrusion experiment.
First,AZ31 magnesium alloy was made into a tube sample with 20 mm×20 mm×30 mm.Several geometric parameters were used in this experiment.And the details of the parameters were shown in Tables 2 and 3.
Because the deformation of the bottom is a little larger,at the same time it directly contacts with different die angles.There is a relatively complex deformation process on the bottom.So,in addition to the geometric parameters mentioned above,the bottom shape is carefully considered in this paper.They are described based on several functions.The point O is defined as the intersection of the bottom edge and the extension of the side edge.The standard intercept L3=2 mm is obtained upward.Based on the different function curves,the thickness at the bottom center point is made to be L4.L3:L4 is defined as edge-to-middle ratio in bottom.In Group 5,this ratio is ranged from 1:1.5 to 1:4,while in Group 6 this ratio is remained as 1:3.
The bottom shape of the tube is shown in Table 3.According to the symmetry,the left half of the curve is analyzed.And the coordinate system is established with point O as the origin.The bottom shape in group 5 is linearly distributed and can be expressed as Eq.(1):
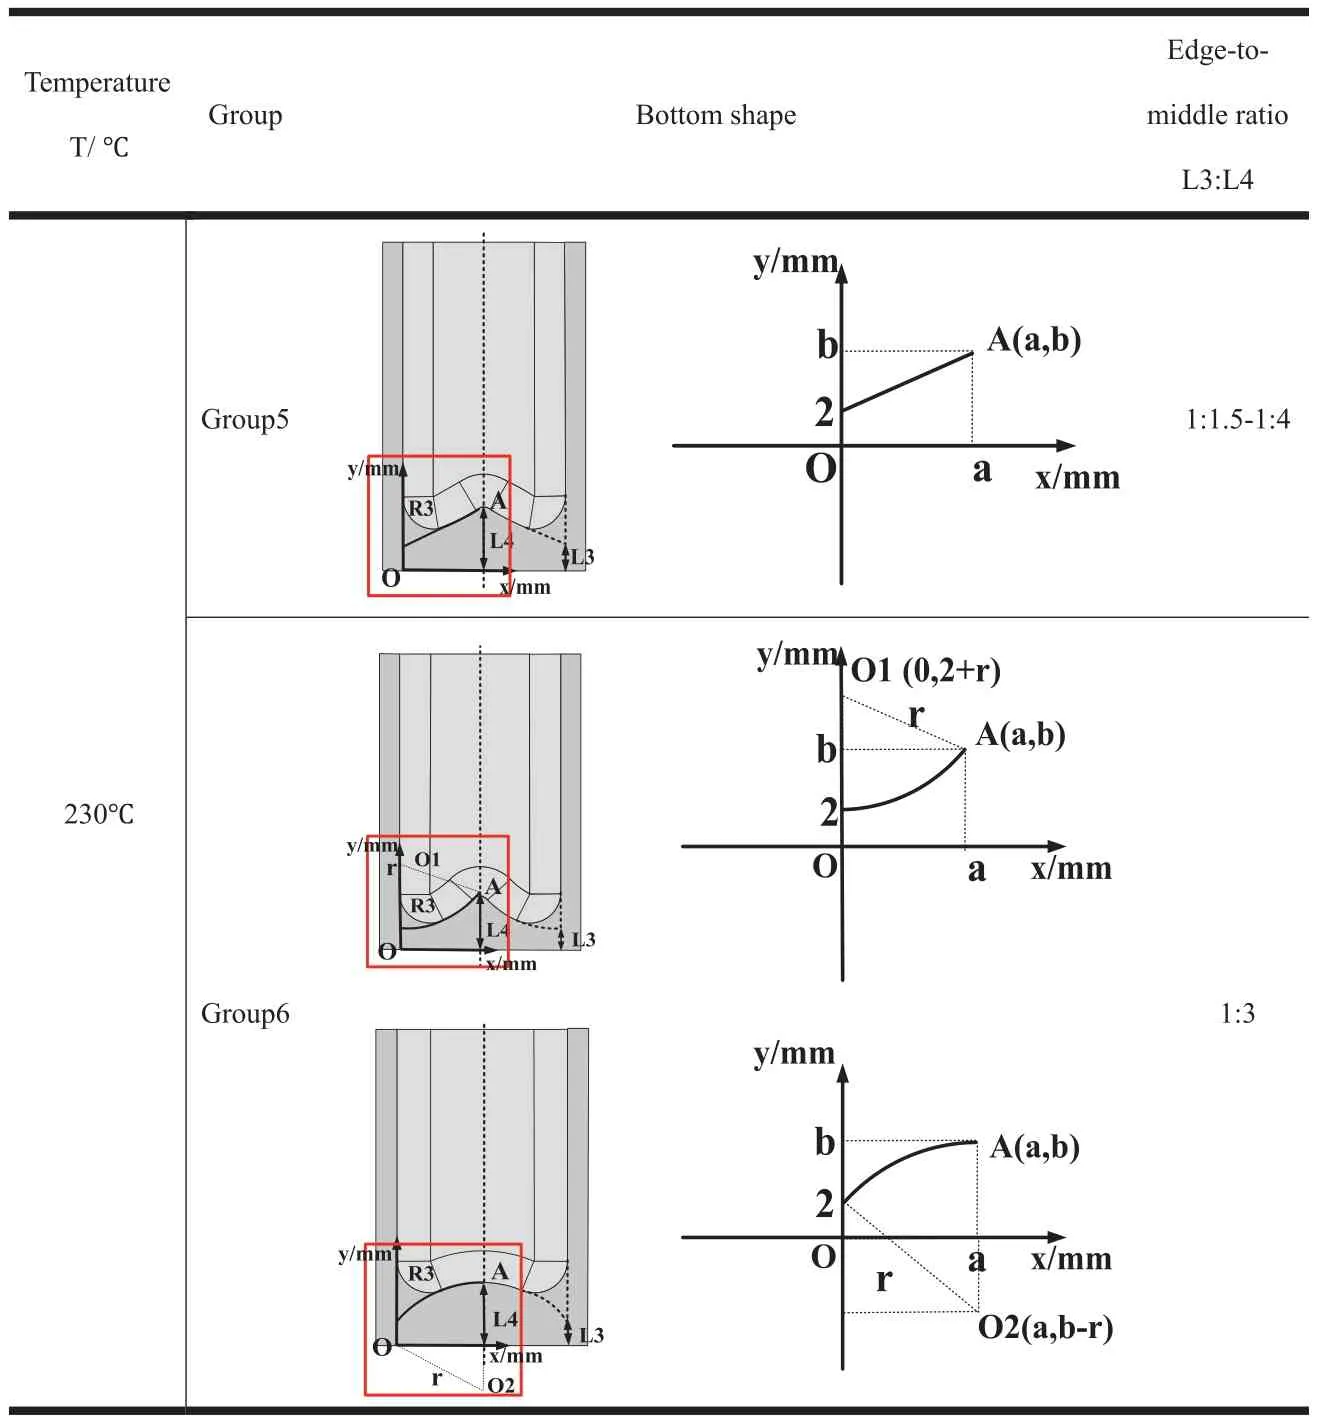
Table 3.The bottom shape of magnesium alloy.
whereais the distance from point O to point A along theX-axis,bis the distance from point O to point A along theY-axis.
The bottom shape in group 6 showed nonlinear distribution,which are concave and convex.The concave and convex shapes are composed of functions with points O1 and O2 as circle centers andras radii,respectively.Eq.(2) is given according to the Pythagorean theorem:
Similarly,we can get the coordinate of O2 isThe function that the convex shape can be obtained as Eq.(4):
For this three-channel extrusion experiment,the die was made from GH4169.The main channel of the die was a square tube with a width and thickness of 20 mm.The experimental process is shown in Fig.6.Before the experiment,the magnesium alloy was heated in a tube furnace.After annealing at 300 °C for 2.5 h [31],the alloy were ready to be used.During the experiment,the die was fixed in a cylindrical frame.To reduce temperature losses,the die and frame were put into the tube furnace together and heated to the experimental temperature.Finally,the heated sample was put on the extruder and extruded.

Fig.6.The picture of experimental process.
In order to study the grain refinement,Magnesium alloy was embedded in a transparent epoxy resin.GX51 metallographic microscope was used to observe the longitudinal plane of the sample.After grinding and polishing,the sample was etched with 0.5% nitric acid alcohol.The etching time was 30–60 s.
4.Results and discussion
4.1. Determination of friction coefficient
Coulomb’s law of friction is followed by the friction behaviors in the simulation [32].Different friction coefficients are applied on the surfaces between magnesium alloy,sand mandrel and die.The shapes of finite element simulation results with different coefficients are shown in Fig.7.Also the real curves obtained from experiments are shown in black.As shown in the figure,the effect of friction coefficient between magnesium alloy and sand mandrel on the simulation results can be ignored.When the friction coefficient between magnesium alloy and die is 0.3,the simulation results are close to the black line.That means this coefficient is closer to the actual situation.

Fig.7.The forming results in experiments and simulations with different friction coefficients.
(a) surfaces between die and Mg alloy=0.1,0.2,0.3,the surfaces between Mg alloy and sand=0.1;
(b) surfaces between die and Mg alloy=0.1,0.2,0.3,the surfaces between Mg alloy and sand=0.2;
(c) surfaces between die and Mg alloy=0.1,0.2,0.3,the surfaces between Mg alloy and sand=0.3
4.2. Effect of experimental temperature and die angle
During the process of magnesium alloy forming,it was important to select the die angle and experimental temperature.The die angles were selected as 30 °,60 °,120 °,150° and 180 ° The experimental temperature was 230 °C and 300 °C,respectively.
The magnesium alloy is longitudinally sectioned and its microstructure is observed.As shown in Fig.8,the magnesium alloy sidewall has no obvious grain refinement after extrusion.And the microhardness of different positions is measured at 230 °C and 300 °C.As shown in Fig.9.It is not difficult to find that the temperature has little effect on the microstructure and microhardness.

Fig.8.(a) Metallographic structure before extrusion experiment;(b) metallographic structure after extrusion experiment at 230 °C and 300 °C.
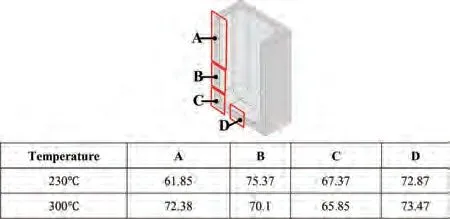
Fig.9.Microhardness analysis at different temperatures.

The Mises stress nephogram is shown in Table 4.And it can be seen that the stress concentration at the sidewall is small.The finite element simulation is agreement well with the metallographic structure.
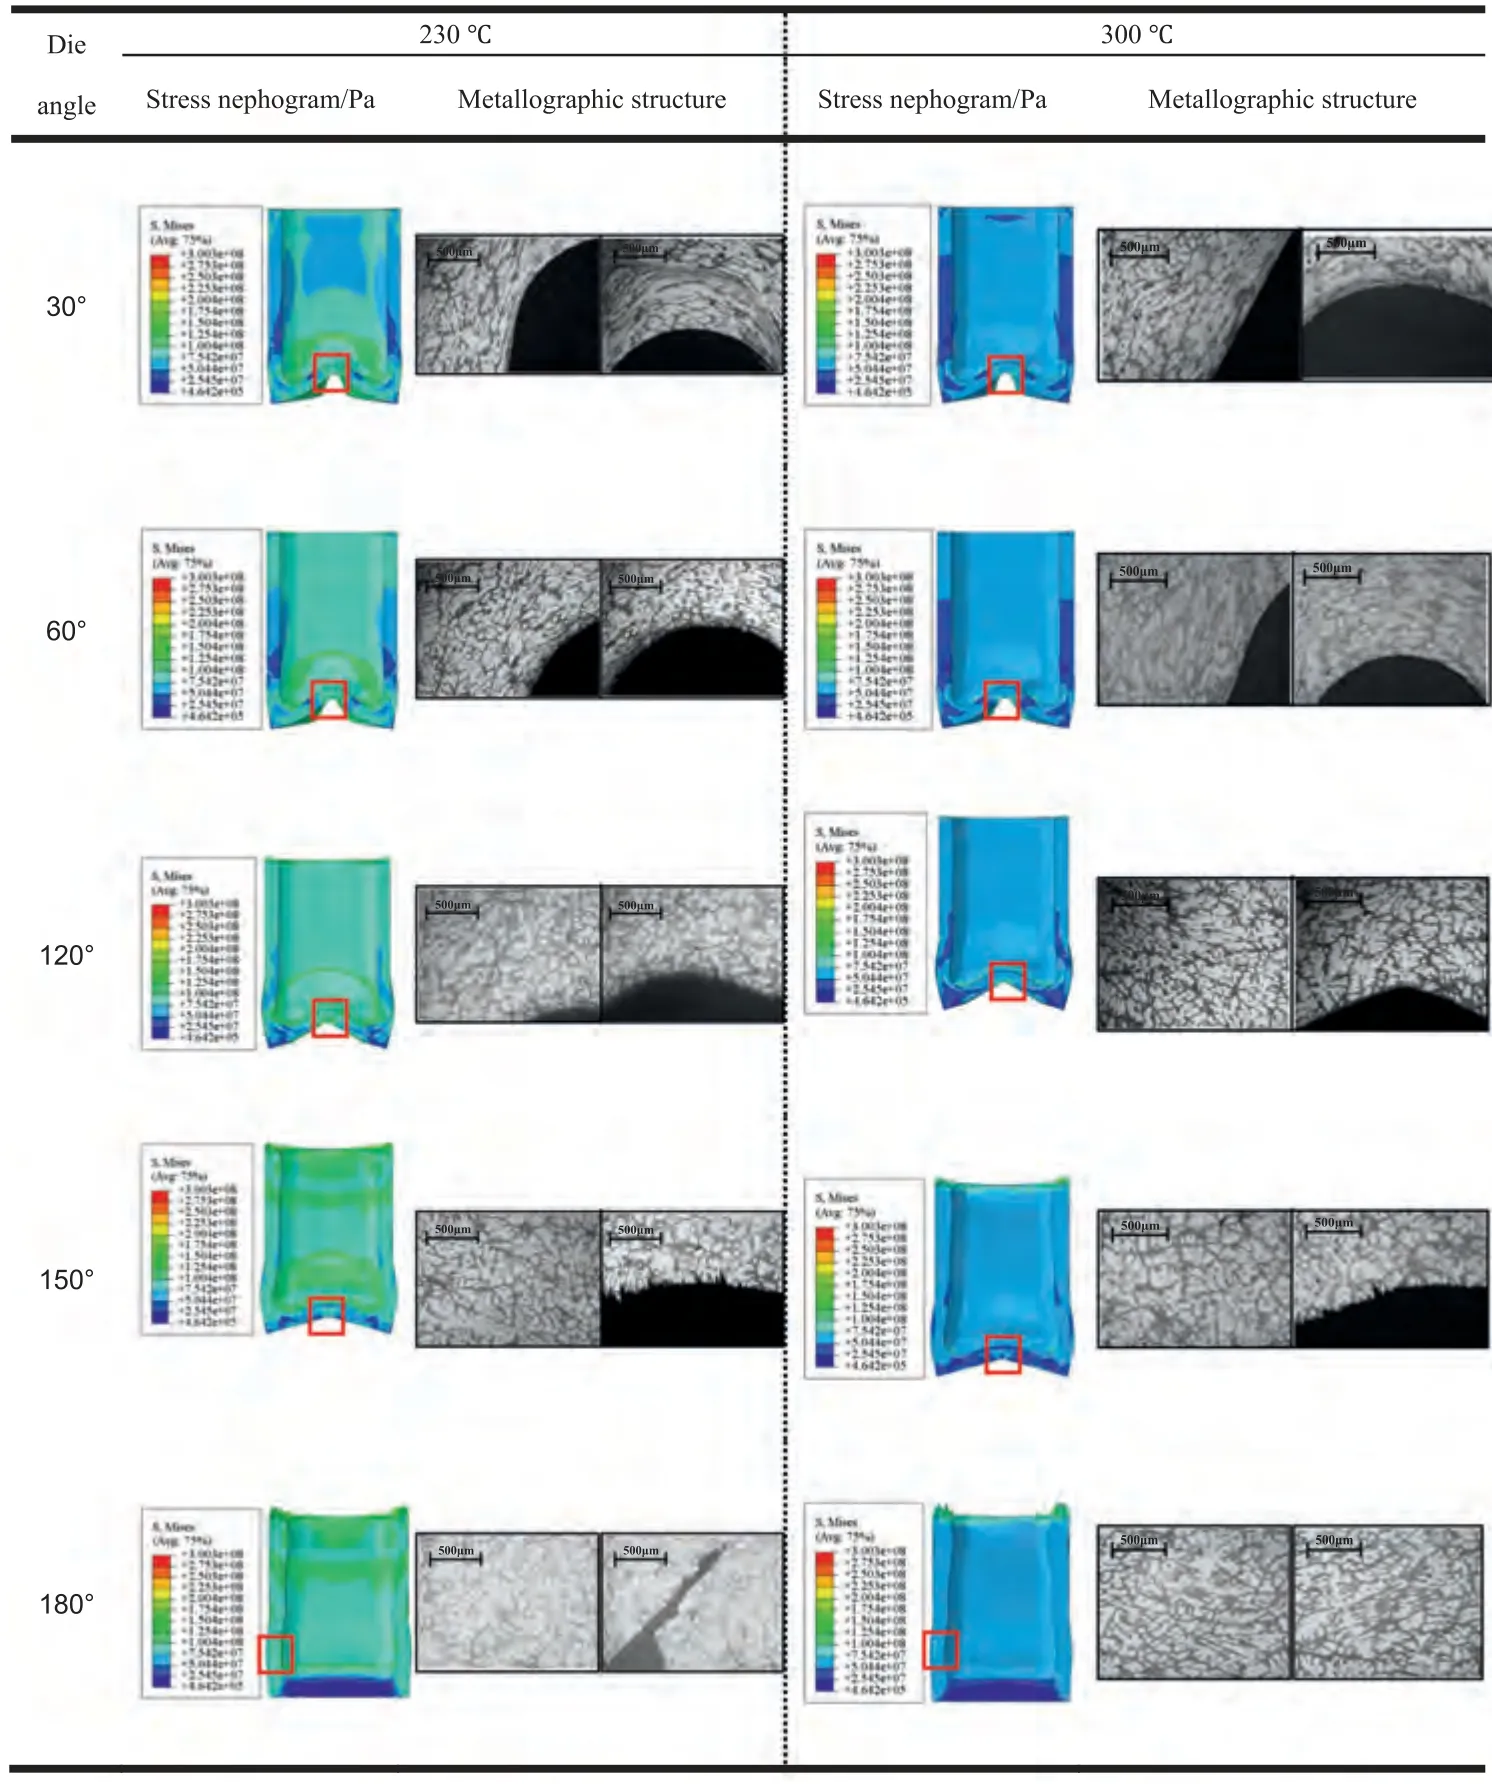
Table 4.Stress nephogram and metallographic structure at different angles and temperatures.
It can be also seen from Table 4 that the stress is mainly concentrated at the bottom center of magnesium alloy.The grains are refined at the stress concentration position.A clear streamline is shown along the shape of the corner.However,the grain refinement degree is decreased with the increasing of die angle.Comparing with 230 °C,when the extrusion temperature is 300°C,the stress concentration can be reduced with similar grain refinements.And cracks are not easy to be generated.
The FEM is attached to the profile curve of the experimental,as shown in Table 5.It is found that the temperature has little effect on the shape at the same press measure.According to the displacement nephogram,more serious thinning phenomenon is appeared with the decreasing of angle.This phenomenon can be explained as that the metal flow is caused by the dragging behavior on both sides.More metals are moved from the middle to the sides.Also a strong downward compressive stress is generated by the conductive stress from the sand mandrel above the middle of alloy.The thinning in the middle is further intensified.The sidewall is shown as the upsetting from the macroscopic view.More serious upsetting phenomenon at the sidewall is appeared with the increasing of angle.After extrusion,the pipe wall thickness is uniform.The finite element simulation results are close to the experimental ones.
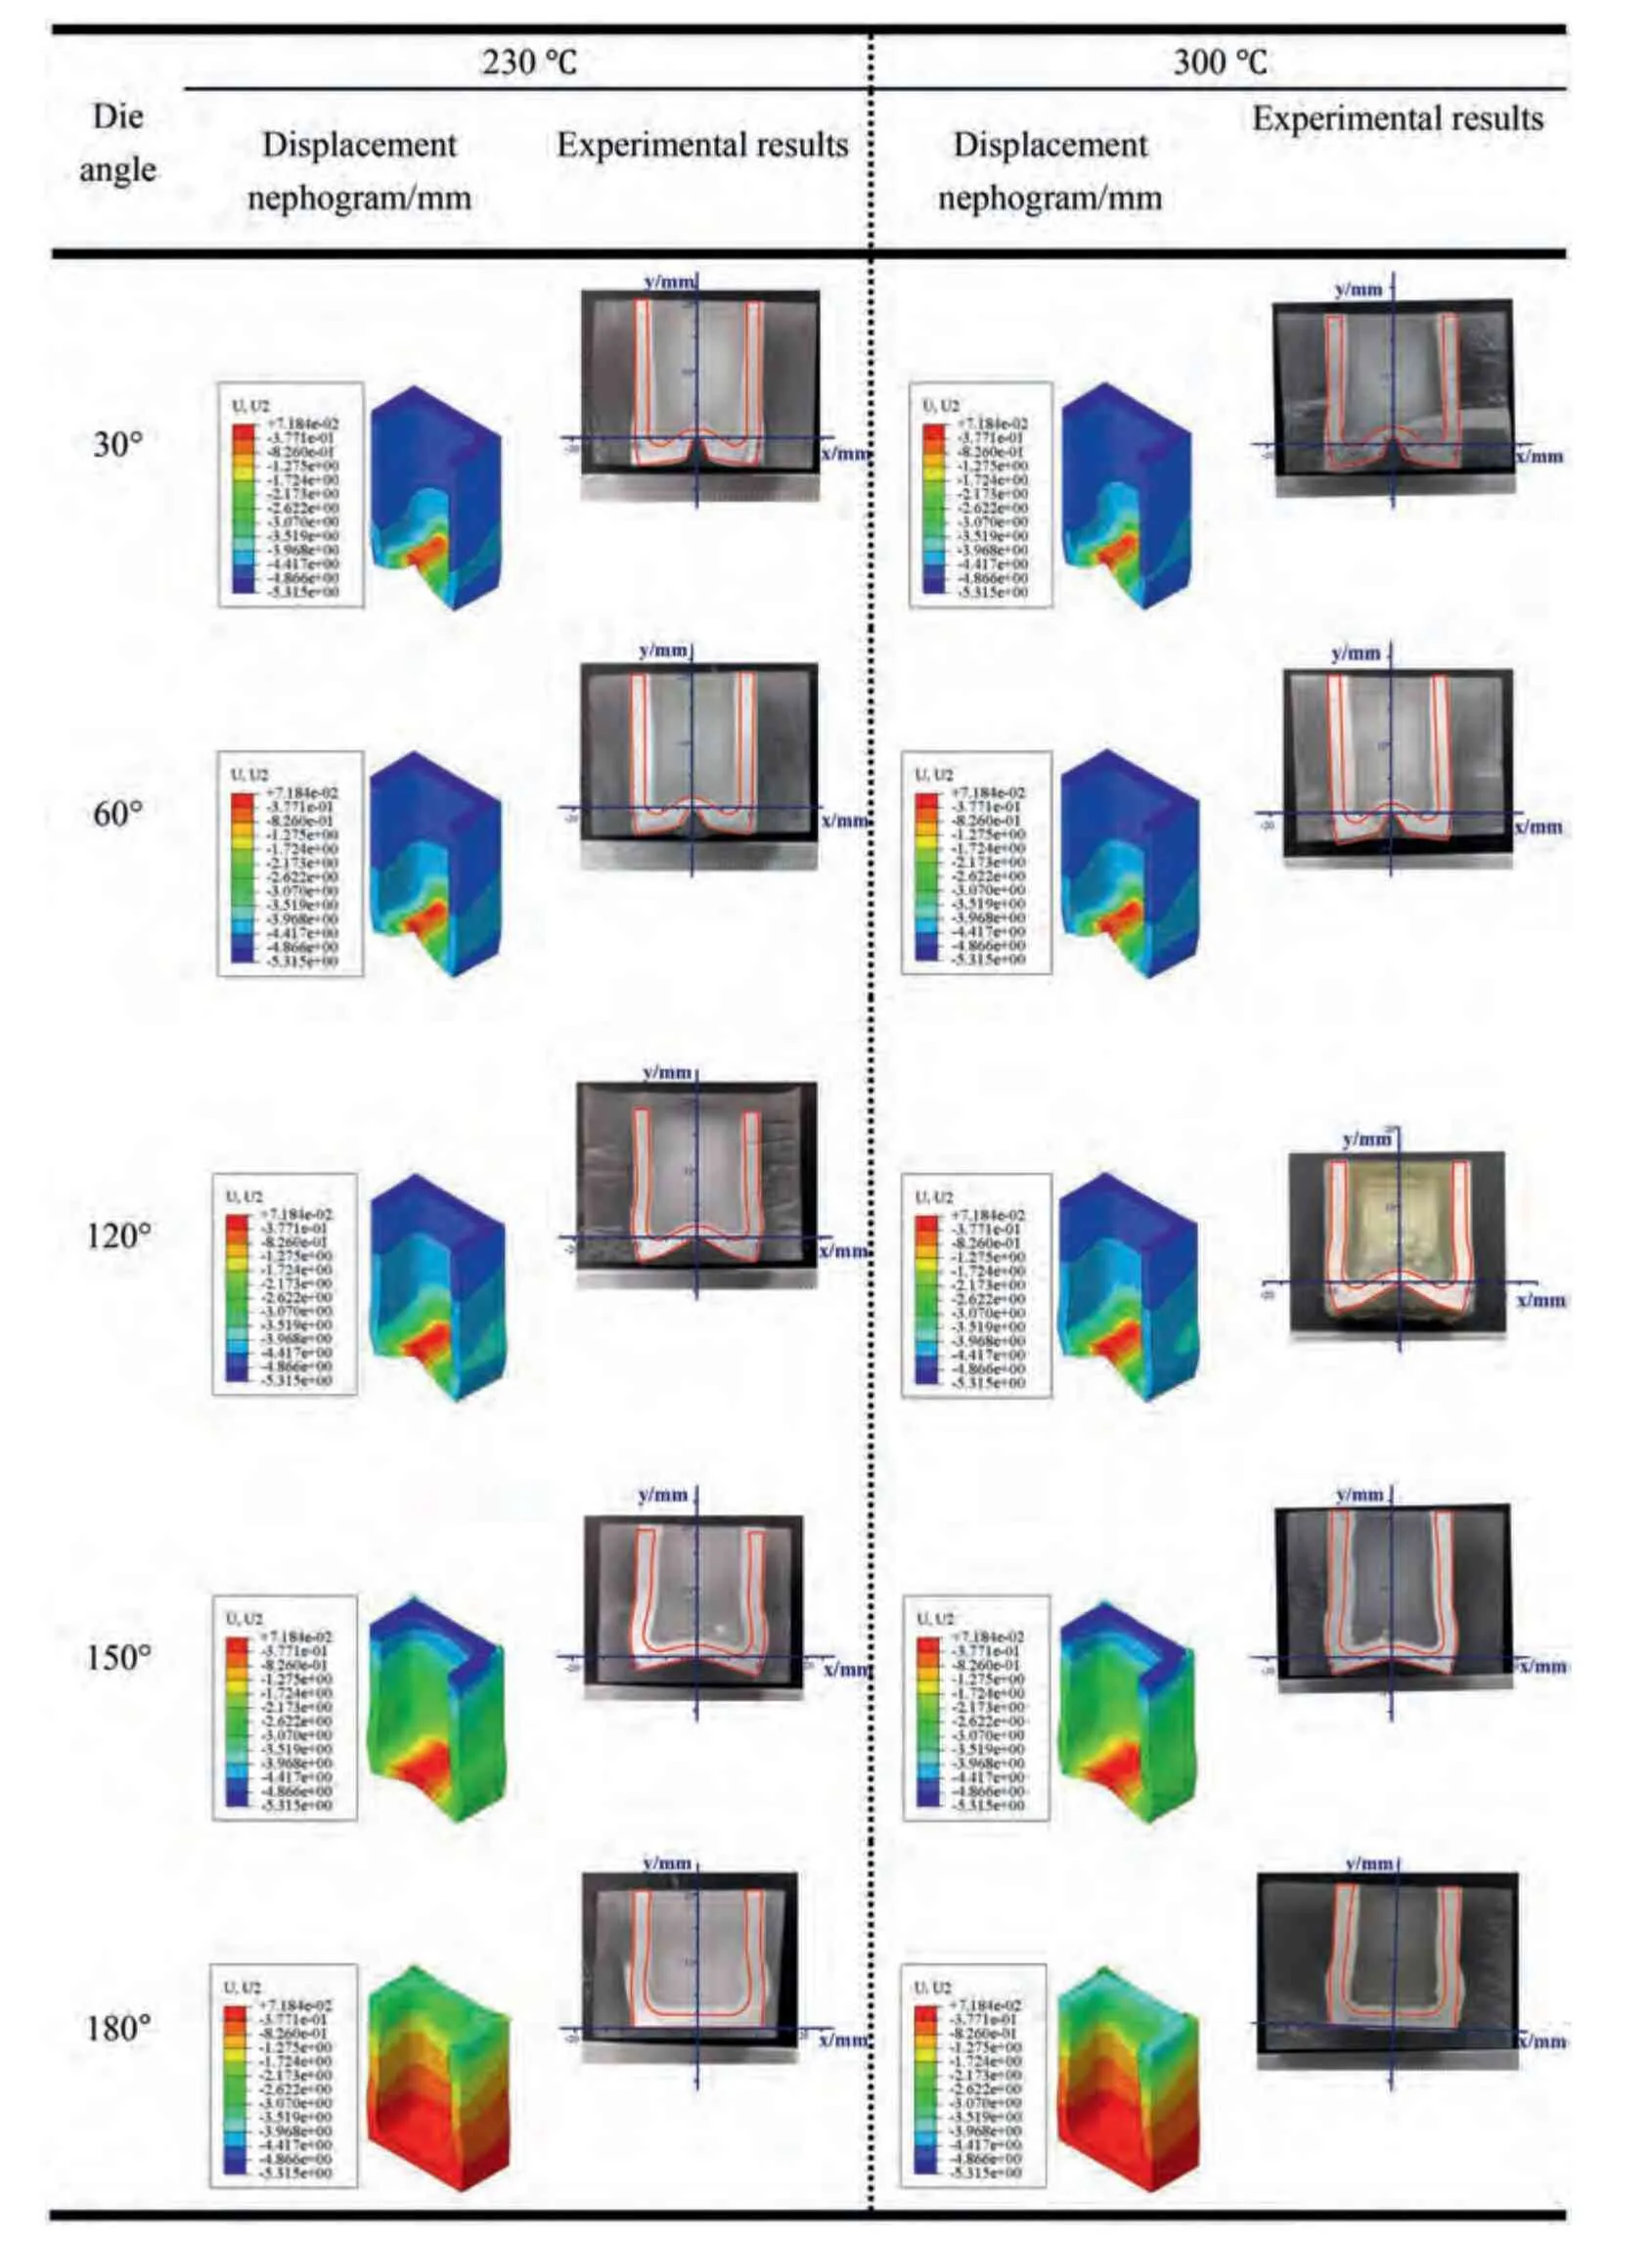
Table 5.Displacement nephogram and experimental results at different angles and temperatures.
4.3. Effect of bottom thickness
During the experiment,large plastic deformation is produced at the bottom,so the selection of bottom thickness is significant.Different bottom thicknesses are selected to investigate the effect of bottom thicknesses on formability.The thickness of the sidewall is kept constant at 2 mm.The ratio of L1 to L2 is shown in Table 6.It can be obtained that,with the increase of bottom thickness,there will be less deformation appeared in magnesium alloy.This can be explained by less stress transferred from the sand.More thicknesses of the alloy with less sand,the deformation will be limited.The three-channel joint after deformation is not uniform in the wall thickness and stress distribution,and the upsetting phenomenon at the sidewall is serious.At L1:L2=1:1.5,the stress and wall thickness can be uniformly distributed while the bottom thinning problem is improved.It can also be seen from Table 6 that the finite element simulation results and experimental ones can be joined with each other very well.
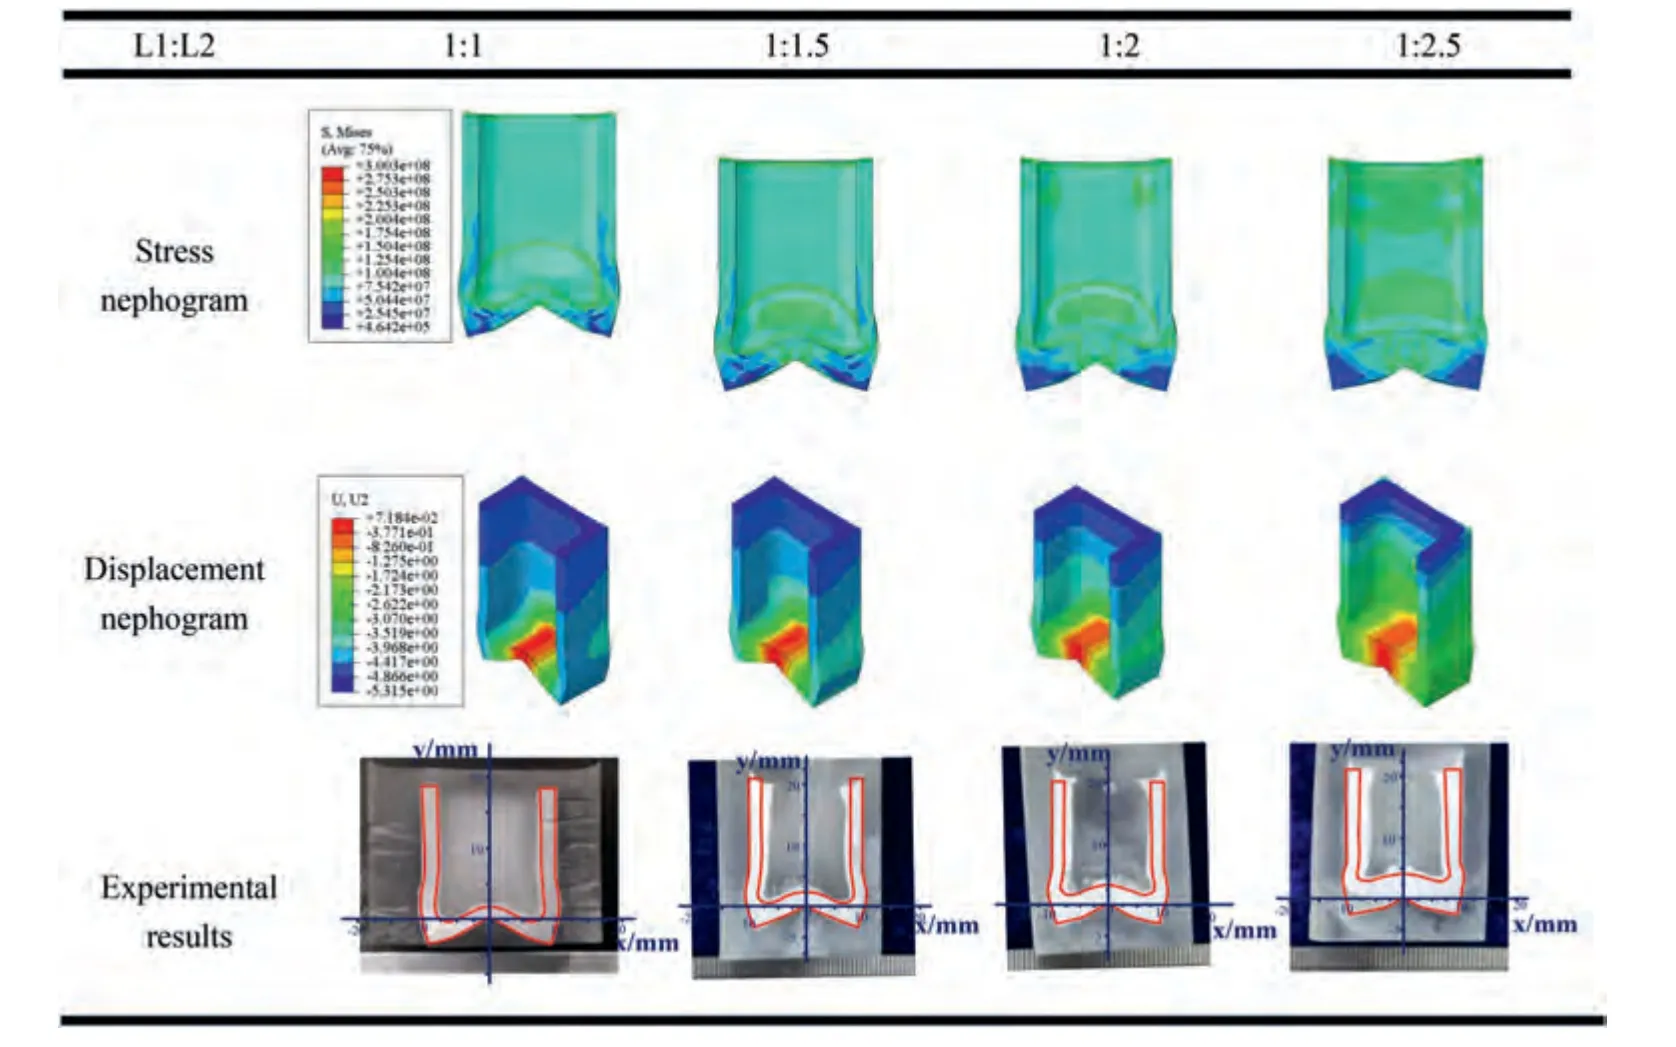
Table 6.The simulation and experimental results of changing L2 (bottom thickness) when L1 (sidewall thickness) is always 2 mm.
4.4. Effect of sidewall thickness
The ratio of L1 to L2 is shown in Table 7.the compressive stress at the bottom is increased,which makes deformation more difficult.After deformation,the wall thickness and stress distribution of the three-channel joint are not uniform.Based on the above analysis,it can be concluded that the formability of magnesium alloy joints will not be improved by the increasing of sidewall thickness.From the profile curves in Table 7,it can be obtained that the finite element simulation agreed well with the experimental results.

Table 7.The simulation and experimental results of changing L1 (sidewall thickness) when L2 (bottom thickness) is always 2 mm.
4.5. The effect of edge-to-middle ratio in bottom
The large plastic deformation is produced at the bottom center of the magnesium alloy,and the stress is concentrated in here easily.So the bottom shape is adjusted in this section,which means that the thickness is increased at the center of the bottom.The edge-to-middle ratio in bottom L3:L4 is shown in Table 8.It is not difficult to be found that the more serious the upsetting phenomenon will appear when there is a smaller ratio of edge-to-middle in bottom.And the stress distribution becomes more uneven as the edge-to-middle ratio in bottom decreases.The finite element simulation agreed well with the experimental results.When L3:L4=1:1.5,the central thinning phenomenon and the risk of cracking can be reduced.At the same time,the thickness uniformity of magnesium alloy tube is guaranteed.
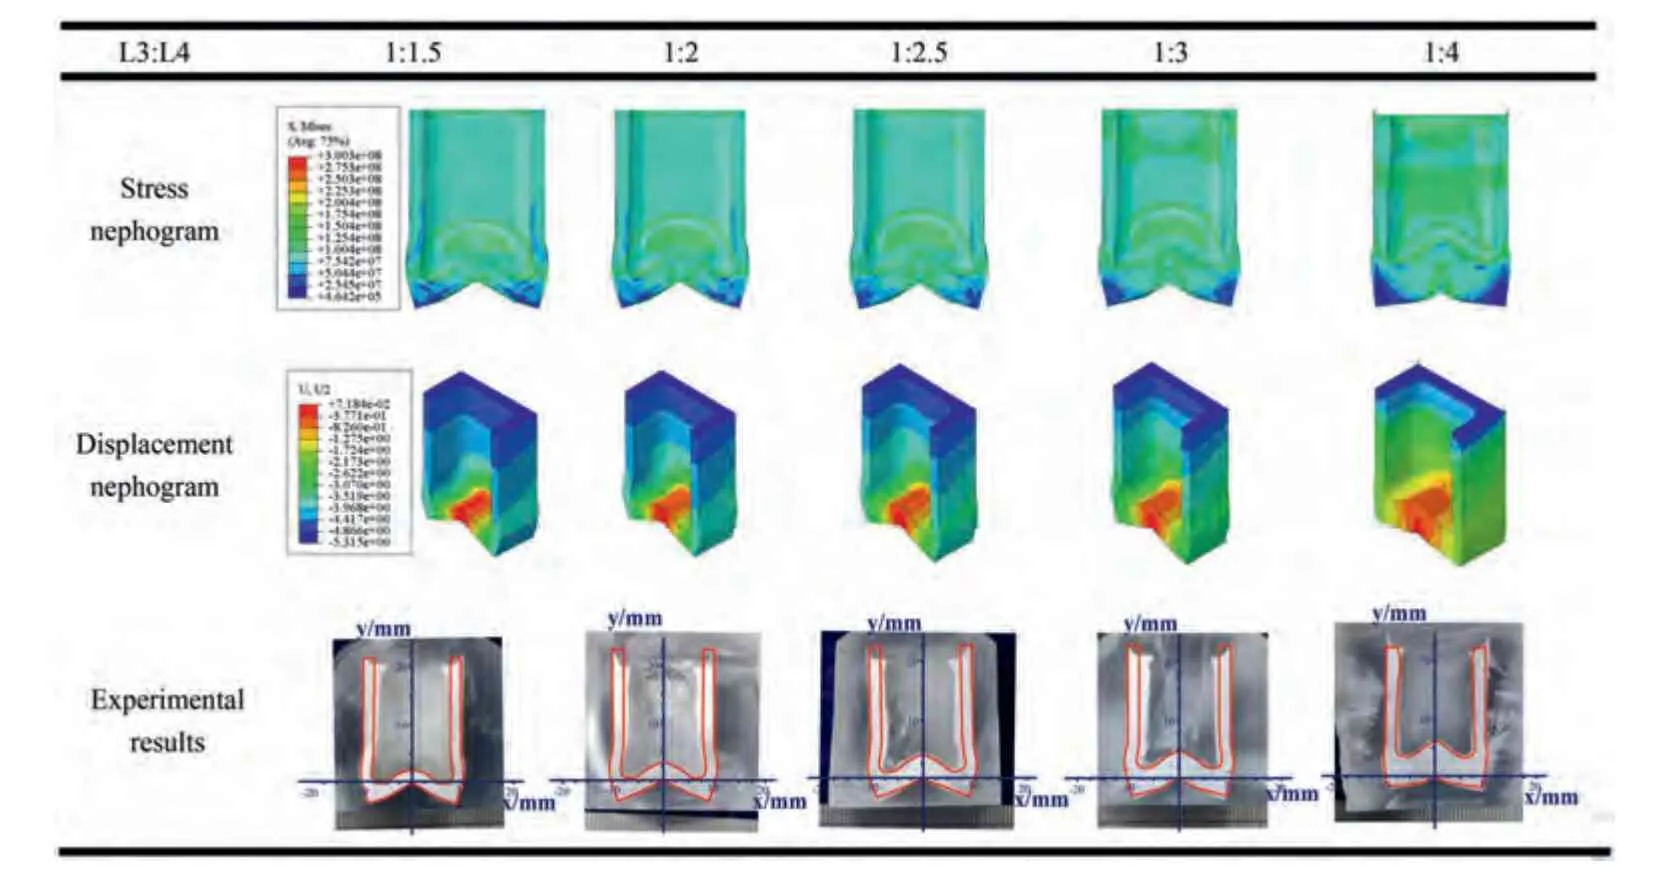
Table 8.The simulation and experimental results of changing the edge-to-middle ratio in bottom.
4.6. Effect of bottom shape
The bottom shape of magnesium alloy hollow tube is changed to concave and convex in Table 9.The finite element simulation results almost overlap with the experimental ones.When the bottom shape is concave,the stress is evenly distributed on the tube wall.A good formability three-channel joint will be extruded with uniform thickness.And there is no obvious thinning phenomenon.When the bottom shape is convex,the stress and thickness distribution are uneven and the formability will be poor.

Table 9.The simulation and experimental results of changing the bottom shape.
5.Conclusion
Finite element simulations and experiments are used to verify the feasibility of hollow AZ31 magnesium alloy threechannel joint by hot extrusion forming with sand mandrel.The formability and metallographic structure of magnesium alloy are investigated with different temperatures,die angles,bottom thicknesses,sidewall thicknesses,edge-to-middle ratios in bottom and bottom shapes.The following conclusions have been drawn.
(1) After extrusion,obvious grain refinement is seen at the bottom center of magnesium alloy with streamlines.The smaller die angle is,the better grain refinement effect in the middle of alloy joint will be.The risk of cracking is reduced through increasing the temperature.But it has little effect on grain refinement.
(2) With the increasing of both bottom thickness and the sidewall thickness,the formability of the magnesium alloy tube will be worse.When L1:L2=1:1.5,the stress and tube thickness can be distributed more evenly,meanwhile,the risk of middle thinning is reduced.The finite element simulation results agreed well with the experimental ones.The formability is better when the bottom shape is convex and the edge-to-middle ratio in bottom is 1:1.5.
(3) The forming problem of hollow magnesium alloy at high temperature can be solved effectively with sand mandrel.The low cost sand can be well filled with magnesium alloy tubes.A new idea is offered in the processing of hollow magnesium alloy profiles.
Funding
This work is financially supported by National Natural Science Foundation of China No.51905068,Natural Science Foundation of Liaoning Province No.2020-HYLH-24,The open research fund from the State Key Laboratory of Rolling and Automation,Northeastern University No.2020RALKFKT012
杂志排行
Journal of Magnesium and Alloys的其它文章
- A comprehensive review on the processing-property relationships of laser strengthened magnesium
- Recent advances in electrochemical performance of Mg-based electrochemical energy storage materials in supercapacitors: Enhancement and mechanism
- Peri-implant gas accumulation in response to magnesium-based musculoskeletal biomaterials: Reframing current evidence for preclinical research and clinical evaluation
- Influence of laser parameters on the microstructures and surface properties in laser surface modification of biomedical magnesium alloys
- Mg/MgO interfaces as efficient hydrogen evolution cathodes causing accelerated corrosion of additive manufactured Mg alloys: A DFT analysis
- The corrosion characteristic and mechanism of Mg-5Y-1.5Nd-xZn-0.5Zr(x=0,2,4,6 wt.%) alloys in marine atmospheric environment
